Hey friends, it's Len here at 1A Auto. Today I'm working on a 2007 Hyundai Elantra. I'm going to show you how to do a left front lower control arm. It can be a very simple job. I want to be the guy that shows you how to do it. If you need this or any other part, you can always check us out 1aauto.com. Thanks. Okay, so we're going to take off our five lug nuts here with a 21 millimeter socket. There we are. Now we're going to continue taking off the other four. And this on here. Take off our last lug nut. Hubcap.
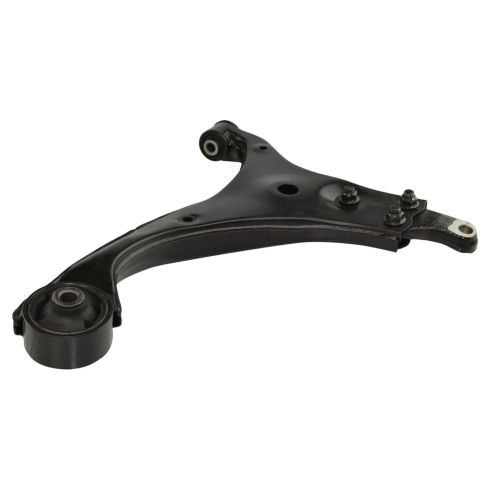
So now that we've got the wheel off, one important thing to do is always try to match up your parts. Make sure you're dealing with the right item, right? So we'll just bring it under. We'll match it up. We've got the hockey puck bushing up here. That's why we're replacing it. This one's garbage obviously. You got the straight on bushing right there. That's great. You got your ball joint hole, it looks good. And you also got a little L here. That was nice for them to put that. So there we go. We know we got the right part. Let's move along. Start blasting this one outta here.
So I'm just going to start by loosening this bolt right here. I'm going to use the 17 on a swivel. On the backside there, there's a nut. I'm going to use a 17 wrench just to hold it. Okay. You can use an air gun if you have an air gun or you can use a ratchet, whatever you have access to, but it's a 17 in the 17 okay. Here we are. Got our nut off of here. I'm going to leave the bolt in for now. I'll take it out a little later. We'll move along to the next couple of steps. We've got this one right here, and then we've got this right down here. After that this should be pretty much ready to come right out.
So I've got my 19 millimeter up top here on the nut. I'm going to use a 22 millimeter on the bottom down here where the bolt is. I'm going to use my safety glasses and An air gun. Can use whatever you've got. 19 and the 22. There we are. 19 millimeter. Easy peasy. Pull that out. Pretty big. We'll set this aside. Move along to down here. Lower ball joint. So right here there's a cotter pin. I'm going to use my cutters. If you have an extra cotter pin that you can replace it with, that's always a good habit. If you don't, well you're going to have to try to save this one. So you do you Boo-Boo.
If you have access to it, I would just replace it though because odds are like this one, it's not going to want to come out. I'm just going to wiggle it around. See if I can get it to break free inside the ball joint there. Okay. I'm going to grab my little hammer. I'm going to bonk on this, see if I can push it through. There we go, I'm just going to grab onto it with my cutters. Try not to cut it. It does not seem like it's moving. Nope. All right, cut that off, we'll just blast this nut off of here and then we'll use a punch and we'll try to punch through the rest of it.
I'm going to use the 17 trying to blast this nut off. I've got my safety glasses on still. There it is. So here we go. Here's the situation. We put some upward pressure on the knuckle itself, okay, which is where the ball joint goes into. I just went right on the nut or the the bolt on the other side. I'm lifting it up so it's pushing up on the knuckle, compressing the strut a little bit. So now what I'm going to do is I'm going to try to hit right on here, and I'm going to try to bonk this down and separate the stud from the lower control arm. That's my plan. I'm going to be very careful not to hit my ABS wire or tug on my brake line obviously. And if I can avoid the rotor, that's always a plus too. So I'm going to go right here and try to avoid all that.
I'm just going to try to heat this up a little bit. Being careful not to try to melt the boot. So if I can just try and get the heat to get up in here, maybe it'll pull my penetrant up. I don't necessarily need to heat up the stud so much as the control arm, right. You don't want to swallow up that stud. Make it even bigger. Starting to get warm, can see all the corrosion in there. Let that do its job. If you want to, you can try to scrape out some of the corrosion that's holding it in. Big Chunks. Big Chunks. Holy Moly. Probably didn't even need a nut to hold this thing together.
Trying to give it a couple more bonks here. So I'm just going to try to hit down with my air chisel now. If you have access to this, yeah you, if you don't, well just keep hammering, I guess. Just need to get this to break. Definitely getting the corrosion out of there now. It could be another minute doing this. Holy chicken bowl-ey! Some more spray. Oh yeah. Woo woo. Get this down and out of here. You can even kind of leave it there actually because we can just get this control arm out. It's going to help us get it all set up. All right, we'll hold this. It still might be a little hot, so keep that in mind, right, if you heated it. Got our last bolt, put that aside, I'm just going to try to pry this out of here. Wiggle it up and down, left and right. There we are. Now we've removed our left front control arm.
Here we have our old lower control arm. This is out of our 2007 Hyundai Elantra. We just removed it. It was fun and easy. And then over here we have our quality 1A Auto part right here. This is a quality part. You can tell it matches up exactly the same with the original one. It's got the same mounting right? Boom, boom, boom. We've got a brand new hockey puck bushing here. That's what always goes bad. It's the reason why we're replacing this one. I'll line it up right over the top of each other. As you can tell, matches up the exact same. If you had the right side instead of the left side, might look a little something like this. We have the right part. We know that before we pulled this one out, because we double checked it already, so I don't see any reason why this wouldn't be a great quality part to install into our vehicle. So I'm going to go ahead and do it. If you need this part or any other part, you can always check us out at 1aauto.com.
So getting this back in is going to be a challenge, all right. And it's not necessarily getting it in or whatnot. It's having this hockey puck bushing right here, straight up and down once you have it in. Okay. When you first go to put it in, you're going to be at this angle, it's going to be wedged at an angle, so it's not really going to want to go in very easily, so you're just going to have to work at it, okay. Maybe you're gonna use a little bit of a rubber mallet or a regular hammer if you have to. How would you use rubber? Or who knows? Maybe it might just slide in just like that, which is highly irregular.
But just to prove me wrong and make me say some stuff that I really didn't have to say, I'm going to take this bolt right here. I'm going to put it in before it decides it wants to fall back out and really mess with me. Here we are. Just get that started. I'm going to take my bolt for this side. It came through this way. See if I can get it lined up. There we are. Pretty close. Go down. Oh yeah. Cool beans. See if I can get my nut in here. I got to try to squeeze it in between the, let's see, the subframe and the sway bar. No big deal. There we are. If you want to use a little bit of threadlocker on your nuts, you can always do that. It's your prerogative. I'm not going to worry about it for the purpose of this video, I'm just going to keep moving along, okay.
So we've got these bolts started. We know we don't have them tightened yet. I'm going to get some torque specifications and make sure we get that. Before I get too far, I'm going to go ahead and take out this right here.
First, I'm going to look at it real quick. Might be a little bit easier to take out once I get it through the lower control arm so it can't wobble around. So I'll just do that first. I'm going to turn it though so I can try and get to it straight forward. See there's our cotter pin. If you needed to, you could try using a punch or if you wanted to just use a drill bit, you could drill right through. So whatever you want to do. You do you Boo-Boo. So here we go. I'm just going to pull down on my control arm. I'm going to try to weasel this over, get it lined up. That's my plan at least. Try to push that. Okay. My glove's stuck in there. It's okay. Wasn't my thumb, so that's nice. Perfect. Okay.
Let's drill out that hole real quick and then we'll put a nut in there. We'll tighten everything up. So I'm just gonna use my drill bit. I'm gonna drill a hole right through here. Perfect. All right, let's grab a cotter pin. We'll get our nut on here, we'll get it torqued down, we'll move along. So let's get this nut started. It's our castle nut, right. When we tighten this up, it's going to get torqued to 65 foot-pounds, which really isn't very much, so keep that in mind. If you're using something as big as a half inch gun, you don't need to blast on it, okay. Just bottom it out and then we're going to torque it. Once we get it torqued, we're going to bring the castle nut slots around so they line up with our hole we made. Pretty basic. We'll go with that's tight enough for now. Torque it down to 65. Okay. Take a peak. Looks like it's pretty much lined up.
Take this off the jack real quick. There we are. We're going to put it on our new cotter pin and just hopefully slide through. Here we are. Just going to grab it. Some people say peen it over to the side. Some people say to the front, you do you. All that matters is that it's peened. And this castle nut won't ever come loose on its own without removing this right there, okay. So let's go ahead and torque these up. We're going to go 116 foot-pounds right here and then if you can get your torque wrench in there somehow, 116 foot pounds, all right. It's time to bottom these out. I'm going to use my 19 up on top, on the nut, my 22 that I used to remove this on the bottom. We'll leave that like that. We're going to go ahead and torque it down.
First, I'm going to tighten up the other one. I'm just going to bottom it out, just like I just did. I'm going to use my 17 wrench on the nut side there, if I can get it on, there it is. Get my 17 swivel on the front here. I'm just going to bottom it out. There we are. Okay. Let's get these torqued down to 116 foot-pounds. There we are. We've got the front one. We'll go ahead and do this one back there. I've got my 17 on the back here. One second. Here we are. Just going to torque this down. Yo. Nice and tight. Perfect.
Time to get the wheel back up on here. I'm just going to go ahead and lift it up, center cover, hubcap, whatever you want to call it. We're just going to bottom these out with our 21 millimeter socket and our long ratchet. Once they're all bottomed out, we'll bring it down on the ground and torque them up. So now we're gonna go ahead and torque these down with our 21 millimeter to 80 foot-pounds. We're going to do a star pattern. Okay, one here, here, here, here, here. I'm just going to go around.
Thanks for watching. Visit 1aauto.com for quality auto parts shipped to your door, the place for DIY auto repair, and if you enjoyed this video, please click the subscribe button.


