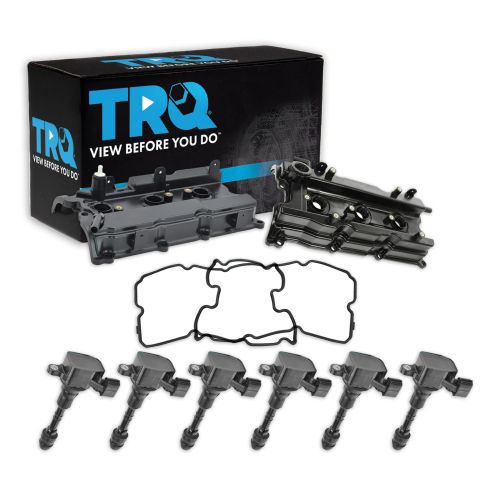
Matched TRQ Kit: Fit, lab, and road tested for peak performance
Application Specific Design: No modifications necessary
Heat Range and Life Cycle Tested: Exact match to stock specifications
Complete repair to restore your engine to like-new conditions
Item Condition:New
Attention California Customers:
WARNING: This product can expose you to chemicals including Di(2-ethylhexyl)phthalate (DEHP), which is known to the State of California to cause cancer, and birth defects or other reproductive harm. For more information, go to www.P65Warnings.ca.gov.
Lifetime Warranty
This item is backed by our limited lifetime warranty. In the event that this item should fail due to manufacturing defects during intended use, we will replace the part free of charge. This warranty covers the cost of the part only.
Returns: Parts with electrical components cannot be returned once installed.
FREE Shipping is standard on orders shipped to the lower 48 States (Contiguous United States). Standard shipping charges apply to Hawaii and Alaska.
Shipping is not available to a P.O. Box, APO/FPO/DPO addresses, US Territories, or Canada for this item.
Expedited is available on checkout to the United States, excluding Alaska, Hawaii.
Final shipping costs are available at checkout.
How to Replace Ignition Coil 2002-08 Nissan Maxima
Created on:
Tools used
Socket Extensions
T30 Driver
10mm Wrench
10mm Socket
Slip-Joint Pliers
Ratchet
1. Removing the Front Ignition Coils
Remove the four T30 Torx bolts from the engine cover
Remove the 10mm bolt from the ignition coil
Disconnect the ignition coil wiring lead
Pull out the ignition coil by hand
2. Installing the New Front Ignition Coils
Push the new coil into place
Connect the ignition coil wiring lead
Insert the 10mm bolt into the ignition coil
Repeat Steps 1 and 2 for the other two front ignition coils
3. Accessing the Rear Ignition Coils
Use a flat blade screwdriver to loosen the intake hose clamp screw
Disconnect the green wiring connector
Loosen the clamp on the middle intake line with the slip joint pliers
Disconnect the hose
Remove the two 10mm bolts from the front intake plenum brackets
Remove the two 12mm bolts from the rear intake plenum bracket
Loosen the clamp on the back vacuum line with the slip joint pliers
Remove the two 12mm nuts and three 12mm bolts from the front of the intake plenum
Disconnect the blue wiring harness
Pry the wires out of its clip with a flat blade screwdriver
Disconnect the wiring harnesses behind the plenum
Pry the wires out of its clip with a flat blade screwdriver
Pull the plenum up and out of the way
4. Replacing the Rear Ignition Coils
Replace these coils using the steps outlined in Steps 1 and 2
5. Reinstalling the Intake Plenum
Make sure nothing gets caught underneath the intake plenum
Push the plenum into place
Reconnect the intake hose
Start the two 12mm nuts and three 12mm bolts into the plenum by hand
Insert the two 12mm bolts into the rear plenum bracket
Tighten the two 12mm nuts and the three 12mm bolts to between 25-30 foot-pounds of torque
Reconnect the rear wiring harness
Insert the 10mm bolts into the front plenum brackets
Connect the wiring harnesses on the side of the plenum
Connect the vacuum hoses
Check that there are no loose connections
Put the engine cover back on
Insert the four T30 Torx screws into the engine cover
Brought to you by 1AAuto.com, your source for quality replacement parts and the best service on the Internet.
Hi, I'm Mike from 1A Auto. I hope this how-to video helps you out, and next time you need parts for your vehicle, think of 1AAuto.com. Thanks.
In this video we're going to show you how to replace the ignition coils on this 2003 Nissan Maxima. We go through the simple part of replacing the coil in the first part of the video. The front three coils are very easy to replace. All you need to replace them is a T30 torx driver and a 10mm socket with a ratchet or 10mm wrench. Then we detail how to take the upper intake plenum off, which allows you to get to the rear three coils. This requires a few more tools: pliers, and a 12mm socket and ratchet in addition to your 10mm.
Start with the T30 torx driver and remove the four bolts that hold the top engine cover. OK, so the coils on this side of the engine are really easy to see. With a 10mm socket, remove the bolt and here's a connector here. They have a tab on the top. Push the top tab with that finger. Disconnect. Finish taking this bolt out. Then the coils come right out. The new coil from 1A Auto is just like the original. It's going to go right in there. Just the same. Put it down in. Just push it straight down, reconnect the lead, bolt back in. Then you can see the two in the front here are just as easy as that one.
You may be saying "Well, how about the rear ones?" The rear ones are pretty easy but you do have to take this intake plenum off. I'm going to show you that real quick. We're going to start up top here. With a flat blade screwdriver, loosen up the clamp that holds the intake hose on. Make sure that's nice and loose. Make sure you can pull this off the intake and then we're going to disconnect this green connector here. Just push on the little tab that's on the front here and take that off. Then we're going to disconnect this middle line here. Pull that clamp off and then use my pliers. Grab onto the hose, make sure the hose twists a little bit. Pull that off. Take a 10mm socket. We're going to take off this bolt here. Let that bracket go to the side. We're going to take off this bolt here. Put these up here. It allows that to come off. Now we're going to use a 12mm socket. I can't really show them to you because they're back in here but if you just take your hand and reach back in here, you'll feel two bolts and they're going in this way. You need to remove those two bolts. That's a bracket holding up the back of the plenum.
As I'm looking back here I can see that there's another vacuum line. I'm just going to use my pliers. There's a clamp, squeeze the clamp, take the clamp off using pliers. Get the hose to twist, pull it off. Then take my extension, and there are two 12 mm nuts on each end. Then there are three 12mm bolts to remove. Disconnect this lead. Take the screwdriver and pry out the clip that holds the harness. Just take the screwdriver and again pry clip off that holds the harness. You should be able to push on the two teeth beside. So right here on the backside you can see I disconnected this here. There's also two connectors, little tabs. Disconnect them then squeeze this clip as well and disconnect this line. Pull these two vacuum lines up out of their clip, or vice versa. Disconnect that connection. Pull up. Now you can lift it up and push it out of the way enough. I'll show you here. You can lift it up and out of the way enough that you can now get to the coils. You may want to just have somebody help you out, lift it out of the way for that middle one. That's probably the most difficult one. I'm just going to fast forward as I put the plenum back on. It's pretty much a reversal procedure.
Make sure that there's nothing, no wires or anything between the upper intake plenum and the lower intake before you put it down. Get it down into place. Make sure that you get the intake hose over the opening of the plenum on the driver's side. Make sure you get it down in place. Just check underneath, make sure there's nothing between the plenum and the engine intake. I can see it go down on this side here, down there. Pull the intake tube up. Replace that. Get that intake tube on; it goes down nice and easy. Once it's in place, take and put the two nuts and the three bolts that hold the upper intake to the lower intake. I put those in place then I actually put the two bolts that hold the rear of the intake to the bracket, put those in place and tighten them up. After I've tightened those rear ones up then I tighten the plenum down. You want to tighten it down to about 25 to 30 foot pounds. Then just carefully, I basically just try to go methodically from the passenger side rear. Reconnect those two connections back there, and there are two vacuum lines. Then come around to the front and bolt on the two brackets. Make sure the connections are reconnected. Then around to the throttle body and air intake side. Bolt everything back together. Make sure all the electrical connections are connected and all the vacuum connections are connected.
Basically what I do is after I'm done I just look very carefully around. You basically look for any clean or shiny spot. Basically when you take connectors apart, you'll notice that they're dirty but then when you take them apart, the part that had fit together was nice and clean so it's a good idea to look around. Just look for any clean spots or shiny spots that might indicate that there's something that hasn't been reconnected. Once you have it all reconnected then you can put your intake cover back on.
We hope this helps you out. Brought to you by www.1AAuto.com, your source for quality replacement parts and the best service on the Internet. Please feel free to call us toll-free, 888-844-3393. We're the company that's here for you on the Internet and in person.
VCA93549
In Stock
Product Reviews
Loading reviews
4.83/ 5.018
18 reviews
5 Stars
4 Stars
3 Stars
2 Stars
1 Star
16
1
1
0
0
Saved Over $700 Ordering through 1A Auto
Winstton
October 22, 2018
This is my third order with A1Auto and I can say that this is a budget saver. Car parts are so expensive, especially when dealing with the dealership or the local auto parts store. Nissan quoted me a price of over $1000 to replace one Gasket Cover and one Ignition Coil for my 2007 Nissan Maxima.
My local Auto parts store quoted a price of $202 for one Gasket Cover and one Ignition Coil; however I was able to purchase six Ignition Coils and two Gasket Covers for less than $160 dollars.
My Mechanic installed everything for $140.00. Now that is a Savings!!!!
Thank you 1A Auto...you are budget saver.
Winston
great job
R
October 23, 2018
shipping was great , parts where great , and the service great
Cam shaft sensors/valve covers
juan
July 8, 2019
I bought and installed both cam shaft position sensors on my 02 maxima and they work great, no more check engine light. Got them both for a great price with both valve covers also. Good quality and they offered life warAnty as long as I own the car. ????????????
I love 1A
E
July 18, 2019
1A auto makes having to repair my car simple, easy and adorable. Delivery is on point and on schedule every time.
Heather
August 8, 2019
I love this place. It is the only place I buy my parts from
they are good parts at great prices! Can't be beat
Perfect fit!
Joseph
March 25, 2020
Perfect fit. Sealed up nice and made of great gasket material. Definitely recommend!
My new "go to" for auto parts!!!
Samuel
April 10, 2020
The parts that I got from A1 Auto, are as high quality as anything I could buy in town, at a much better price! The shipping was fast, and free, all the parts in the valve cover kit were a perfect fit. I know that you can count on 1A AUTO to be there if there is a problem with your order Because I accidentally gave them the wrong shipping address, but they were quick to help me straighten it out and get the parts delivered to the right place. Thanks 1 A Auto!
Valve cover kit
V
April 11, 2020
It arrived on time and made my sound brand new I was so happy after my car sat for 2 weeks
Great Price and Great Warranty!
S
August 30, 2020
This is a great price and a great warranty. It gives the buyer a peace of mind in case of a defect.
Valve cover kit
O
October 17, 2020
Everything was like the picture showed and it worked well. Thank yall
Great product, fast shipping
J
January 25, 2021
I was very pleased with the kit. Everything was new, and in original packaging. Would definitely recommend to anyone needing car parts
Valve cover kit
A
April 23, 2021
Got to my house just in time and there was no problems with the valve covers. Most definitely would recommend and would most definitely shop again.
Great product and an even better price
Cedre
October 16, 2021
Has my car running like new again
Dielectric grease inside the boot already.
Van
November 5, 2021
Pre greased with dielectric grease in the boot and excellent quality. Thank you.
Good items
Derrick
March 24, 2022
Good item worked great.
Recommended purchase.
Ricardo
April 25, 2022
Price was right, fit my vehicle. Only complaint is they did not have the PVC hose that it usually recommends to replace along with this job. Video's very helpful.
Great
Leif
October 25, 2022
Worked great!!
Timothy
March 26, 2024
Not to good ran great couple days now hot little miss again not tore it back down yet
Customer Q&A
Are these quality parts? Dont want to loose money over junkJanuary 19, 2019
Dakota R
10
Thank you for your inquiry! We only sell quality parts here at 1A Auto, and these come with a lifetime warranty against factory defects.
January 20, 2019
T I
Would this fit a 3.5 SL?. The description only reads 3.5L. Is there a difference?January 26, 2019
Jorge M
10
This part is specific to vehicles with a particular set of options. We will need more information about your vehicle to confirm the fit.
January 26, 2019
Peter L
Do these items has substance that may cause cancer?May 15, 2019
H E
10
This product can expose you to chemicals including Lead and Lead Compounds, which are known to the State of California to cause cancer, and birth defects or other reproductive harm. For more information, go to www.P65Warnings.ca.gov.
May 15, 2019
A C
Will this fit an 03 350Z?July 18, 2019
Amulek S
10
Currently, we do not carry this part for your vehicle. We're always updating our inventory so please check back soon! If you have any other questions, let us know.
July 18, 2019
Adam G
Do the valve covers already have sparkplug seals??November 28, 2020
Darren D
10
Yes. They have everything you need.
November 29, 2020
Michael W
10
The spark plug seals are included.
November 30, 2020
Adam G
What material is it made of?September 25, 2021
Kevin R
10
Hello our parts are a direct replacement to your originals and would be made for the same matereial.
September 25, 2021
Ricale A
Does this kit have the valve cover gaskets?September 2, 2024
Justin P
10
Yes, the valve cover gaskets are included.
September 4, 2024
Andra M
Customer service
877-844-3393
Monday - Friday 8:00am - 9:30pm ET Saturday - Sunday 8:00am - 4:30pm ET
Nissan is a registered trademark of Nissan Motor Co., Ltd. 1A Auto is not affiliated with or sponsored by Nissan or Nissan Motor Co., Ltd.See all trademarks.
Enter Vehicle Year Make Model
Specify your vehicle's year, make and model to guarantee fit.
Year
Make
Model
Options
Drivetrain
This part doesn’t fit a . Select from parts that fit.