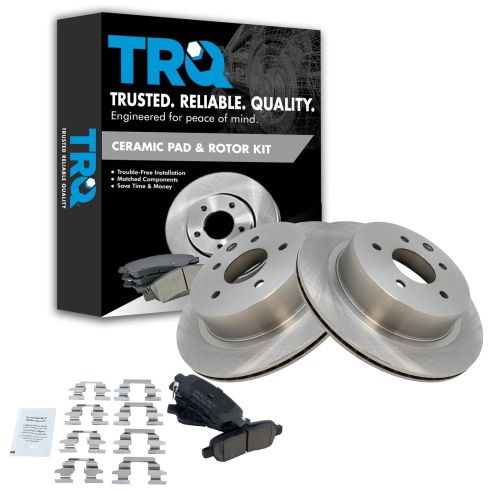
1ABFS00467-Nissan Infiniti Rear Ceramic Brake Pad & Rotor Kit TRQ BKA10689

Replaces
2011 Nissan Leaf Rear Ceramic Brake Pad & Rotor Kit TRQ BKA10689

Product Reviews
Loading reviews
4.78/ 5.0
37
37 reviews
Sent me the brakes for the rear
November 18, 2017
Sent me the wrong set of brakes, they are for the rear not the front as I had ordered
Exactly what I need.
January 11, 2018
This kit was exactly what I needed and fit perfectly.
F150 brake kit
April 8, 2018
Great quality kit has everything included at a great price. After a year in service the rotors are still pristine with no corrosion whatsoever. Excellent stopping power too. Would definitely recommend for anyone needing a full brake job.
1ABFS00467-Brake Kit Nakamoto CD905 31349
May 31, 2018
This Rear Brake Kit was purchased for a 2009 Nissan Rogue. Parts were identical to original equipment and arrived in timely fashion free of shipping charges. I reviewed the installation video provided by 1A Auto prior to replacing my brakes. Their videos are excellent and show the procedure step by step making installation an easy process for the do it yourselfer. Thank you to 1A Auto for allowing me to replace my brakes and save money.
satisfied customerr
February 26, 2019
parts arrived on time, exact fit and working as expected. Especially appreciate the videos which include small but necessary details. so what more can you ask for !!!
Very easy process ordering parts and getting the job done.
March 13, 2019
From getting the parts ordered and installation video for doing rear brakes was awesome! A to Z get it done. Thanks 1A Auto that was a great deal and process. Congrats o the 1A Suto Team. Jim in Colorado
Brakes
April 15, 2019
The best product for the price
Great Products
June 26, 2019
These have been great so far! Would highly recommend.
nissan rogue
July 22, 2019
direct fit, good quality
Brakes
August 10, 2019
Yeah there ok better and cheaper than buying at O'Reilly's
Perfect
November 22, 2019
Parts fit as expected and arrived quickly. Couldnt ask for anything better. Saved me 200-300 bucks over a dealer.
January 14, 2020
I received my parts right on time and they fit perfectly. I recommend 1AAuto to everyone. The parts work the first time, no returning them. And they beat the competition price. 1AAuto is a win win.
Rear rotors with brake pads
July 27, 2020
Seem like a quality product and cheaper than any local dealer.
Excellent product
October 27, 2020
Products were perfect. No problems. Matching video by A1 Auto was perfect also.
Just installed
April 14, 2021
While I can't speak to how they will wear or last they seem to be good quality. They are quiet and fit well. No negative issues.
Brake kit
May 5, 2021
Worked great everything was included. I will order again
Nice Product
August 10, 2021
Kit available at a good price, easy to order, arrived as described, and contained everything I needed. I will definitely use 1A Auto again.
Rotor and pads work perfectly
October 9, 2021
I like what you gave me, and I installed them myself thanks to the video you posted on YouTube.
Great quality product, service and video help if needed.
November 4, 2021
Great product, quick shipping exactly as described got the job done in under an hour.
December 13, 2021
Fits perfectly
Extremely fast shipping
January 16, 2022
I ordered these on Monday and they were delivered to me on Wednesday. Unbelievably fast. they installed very easily and fit perfect.
April 19, 2022
Great quailty
April 26, 2022
Perfect fit
May 4, 2022
good product
Rear brakes on 2015 Nissan Rogue
June 27, 2022
Installed rear brakes on my 2015 Nissan Rogue. The process was smooth due to your excellent how to video. The brakes work fine.
June 27, 2022
Always the best for the money
Good kit, oem fitment.
August 11, 2022
Parts came on time, everything fit like oe parts. No issues while driving.
Rear brakes
January 6, 2023
Great product, great cost
Great price
January 31, 2023
Good product, great price
Perfect Fit, Fast Shipping
February 3, 2023
Always a perfect fit and FAST shipping!
EXCELLENT*****
March 1, 2023
GREAT!!!!!*****
June 13, 2023
great product. how to video is the best !!
Fast, detailed and I would recommend you to all my family and friends ??
September 10, 2023
I first had a small problem with my order but I guess it was covered and I received my brake pads in a nick of before inspection was due. Thanks and keep up the good service.
December 29, 2023
It is a good product fits exactly for my Nissan rogue
April 13, 2024
great fit
Fit great
July 18, 2024
Fit was perfect on my 2005 expedition. Braking is quite and solved the shaking I was having when breaking. Price and customer service is always great with 1A Auto
October 15, 2024
Perfect fit!
Customer Q&A
Is this for g35?
April 23, 2022
10
Hello, this is listed to fit 2003-2004 Infiniti G35 without Brembo Brake Calipers.
April 23, 2022
Ricale A
I have a nissan rogue sv Does it fit?
May 8, 2024
10
We would be happy to check. What is the year of your vehicle?
May 8, 2024
Andra M
Nissan is a registered trademark of Nissan Motor Co., Ltd. 1A Auto is not affiliated with or sponsored by Nissan or Nissan Motor Co., Ltd.
See all trademarks.


