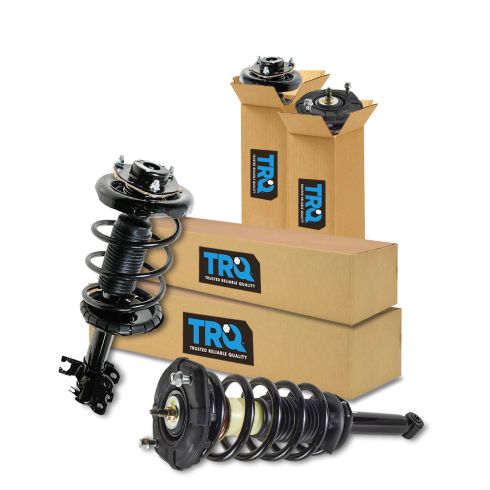
Kit Includes: (2) Front Strut & Spring Assemblies (2) Rear Strut & Spring Assemblies
Specification
Steering / Suspension Option
without Electronic Suspension
Location
Front & Rear
TRQ fully loaded shocks and struts are manufactured using premium raw materials and calibrated to restore original ride comfort. TRQ shocks are fully loaded featuring a pre-loaded bearing plate, upper and lower spring isolator, upper spring seat, coil spring, boot kit, and premium strut. TRQ recommends replacing your shocks or struts in pairs to ensure even wear of components and improved ride comfort. All products are fit and road-tested in our Massachusetts R&D facility to ensure we deliver on our promise of Trusted Reliable Quality.
Product Features
Loaded Struts: Pre-assembled application specific design
Application Specific Design: No modifications necessary
Matched Pair: Improved comfort and extended service life
Restored Performance: Reduced body sway and vibration
Replacing struts used to require specialized tools to compress, remove, and transfer the old spring and mount. Our Pre-assembled, complete strut & spring assemblies come with all new parts and make the job much quicker and easier for the do-it-yourself mechanic.
Strut & spring assembly contains:
Upper Strut Mount
Strut Bearing
Coil Spring
Boot & Bumper Kit
Gas-charged Strut
Item Condition:New
Attention California Customers:
WARNING: This product can expose you to chemicals including Chromium (Hexavalent Compounds), which is known to the State of California to cause cancer, and birth defects or other reproductive harm. For more information, go to www.P65Warnings.ca.gov
Lifetime Warranty
This item is backed by our limited lifetime warranty. In the event that this item should fail due to manufacturing defects during intended use, we will replace the part free of charge. This warranty covers the cost of the part only.
FREE Shipping is standard on orders shipped to the lower 48 States (Contiguous United States). Standard shipping charges apply to Hawaii and Alaska.
Shipping is not available to a P.O. Box, APO/FPO/DPO addresses, US Territories, or Canada for this item.
Expedited is available on checkout to the United States, excluding Alaska, Hawaii.
Final shipping costs are available at checkout.
How to Replace Strut Spring Assembly 2002-03 Nissan Maxima
How to Replace Strut Spring Assembly 2000-03 Nissan Maxima
Created on:
Tools used
Torque Wrench
14mm Socket
Hammer
Rust Penetrant
Jack Stands
19mm Wrench
19mm Socket
21mm Socket
Flat Blade Screwdriver
Ratchet
Floor Jack
Needle nose pliers
1/2 Inch Breaker Bar
1. Removing the Wheel
Loosen the lug nuts with the vehicle on the ground
Raise the vehicle with a floor jack
Secure the vehicle on jack stands
Remove the lug nuts
Pull off the wheel
2. Removing the Strut
Hold the strut spindle bolt with a 19mm wrench
Remove the strut spindle nut with a 21mm socket and ratchet
Pull the bolt out of the spindle
Push the ABS sensor out of its brackets
Remove the brake line clip with needle nose pliers
Pull the brake line out of its bracket
Pry the strut out of the wheel spindle with a flat blade screwdriver
Apply penetrating oil to the strut mount nuts
Remove two of the three 14mm nuts from the strut mount
Support the strut as you remove the remaining 14mm nut
Pull the strut out
3. Installing the New Strut
Align the strut mount using a screwdriver so that the F faces forward
Push the strut into place
Support the strut as you start the 14mm nuts onto the strut mount
Push the strut into the spindle
Bush the bolt through the spindle
Start the nut onto the spindle bolt
Tighten the strut mount nuts to 25 foot-pounds of torque
Tighten the spindle nut to 110 foot-pounds
Push the ABS sensor back into its brackets
Push the brake line into its bracket
Put the brake line clip on
Tap the clip on with a hammer
4. Reattaching the Wheel
Slide the wheel into place
Start the lug nuts by hand
Tighten the lug nuts preliminarily
Lower the vehicle to the ground
Tighten the lug nuts to 100 foot-pounds in a crossing or star pattern
Have your car professionally aligned following this repair
Brought to you by 1AAuto.com, your source for quality replacement parts and the best service on the Internet.
Hi, I'm Don from 1A Auto. I hope this how-to video helps you out, and next time you need parts for your vehicle, think of 1AAuto.com. Thanks.
In this video, we're going to show you how to remove and reinstall a front strut. We're going to show you the right front strut, and the left front strut is the same procedure. We do recommend you always replace struts in pairs. This is on a 2003 Maxima. Pretty much, it's the same procedure for any Maxima or even Altima, Infiniti I30; it's the same procedure. There may be some minor differences in how the ABS sensors and cables attach to this. Here's what you'll need to complete this job. You'll need a set of new struts from 1Aauto.com. We sell a nice set of loaded struts with the spring and everything; it makes the job fairly easy, actually. You'll need jack and jack stands; and 14, 19, and 21 mm sockets. You'll need a ratchet and you'll also need a breaker bar and maybe even a pipe for some extra leverage; a screwdriver; pliers; hammer; and a torque wrench.
We'll start off by removing the wheel. You're going to want a 21 mm socket and ratchet or a breaker bar or your tire iron, and you'll probably want to start with the wheel on the ground. Loosen the lug nuts. Then raise and secure the vehicle with jack stands, and then remove the wheel and the tire.
I'm going to remove the 19 mm bolt with a 21 mm nut. There are two of them at the bottom of the strut. You can always use a pipe over your breaker bar to give you extra leverage. Now that we've shown you how to get them out by hand, we're just going to use the impact wrench to zip them off a little quicker. Now, remove the bolts. Notice that the suspension is not supported; the vehicle is supported on the body and not the suspension.
We're going to push the ABS sensor out of the back, and we're going to slide the ABS sensor up on the other side. Take needle nose pliers, and remove the clip for the brake line. Push that down, and slide it out. We'll pry the strut from the spindle and set it off to the side.
There are three strut mount nuts. They're 14 mm. penetrating oil helps loosen them. I'm going to fast-forward, and you can see Don's able to get the nuts off by hand first, and then he just resorts to the impact wrench just to, again, speed things up a little bit. The third one's about to come out. I'm supporting the strut from below so it doesn't fall. Take a strut out.
I'm aligning the top of the strut mount. The F is going to face forward, and you can do that with a screwdriver, and the same way we took it out, it's going to go back in. I'm supporting the strut from below with my left hand and feeding it up through the three holes, and I'm just starting to feed the nuts on. Now, Don's just going to put the new nuts on, and you'll notice that we actually put the same strut back in. There was nothing wrong with the strut. We just replaced the top strut mount. Before we tighten the nuts up top, we're going to make sure that we get our bolts down here on the spindle. Fast-forward as we put both those nuts on and then tighten them preliminarily. We torque the upper strut mount nuts to 25 foot-pounds. I'm tightening up the lower strut nuts to 110 foot-pounds.
Slide the ABS sensor on the left side back into place and on the right side. Now, I'm going to be pulling the brake line through and then up, and once that's seated, I'm putting the clip back on from the back. Tap it. It might require a little bit of tapping to fully seat it. Just put the wheel and tire back on. Tighten the lug nuts preliminarily. Then put it down on the ground and torque the lug nuts to 100 foot-pounds and definitely recommended that you get a front end alignment after this repair.
We hope this video helps you out. Brought to you by www.1AAuto.com, your source for quality replacement parts and the best service on the Internet. Please feel free to call us toll-free, 888-844-3393. We're the company that's here for you on the Internet and in person.
Tools used
21mm Socket
Socket Extensions
Flat Blade Screwdriver
Torque Wrench
14mm Socket
Pry Bar
17mm Socket
Ratchet
1/2 Inch Breaker Bar
1. Remove the top of the strut
Pop the trunk and move the carpeting out of the way
Pry up the clip securing the trunk trim and pull it up.
Unbolt the 14 mm bolts at the top of the strut.
2. Remove the wheel
Loosen the lug nuts
Raise and secure the vehicle
Remove the lug nuts and wheel.
3. Remove the bottom of the strut
Use a breaker bar and penetrating oil to unbolt the 17 mm strut bolts on the bottom
Pull the strut down and out.
4. Install the new strut
Bolt the strut back in, torquing your 14 mm bolts to 20-30 ft lbs
Insert your spindle to the lower end of the strut and raise your control arm until the bolt holes line up.
Torque the bottom 17 mm nut to 75 ft lbs
5. Replace the wheel
Put the wheel on and hand tighten the lug nuts.
Lower the vehicle and torque the lug nuts to 100 ft lbs
Brought to you by 1AAuto.com, your source for quality replacement parts and the best service on the Internet. Hi, I'm Don from 1A Auto. I hope this how-to video helps you out and the next time you need a part for your vehicle, think of 1AAuto.com. Thanks.
In this video, we're going to show you rear strut replacement on this 2003 Nissan Maxima. Procedure's basically the same for any 2000-2003 Maxima as well as the Infinity I30. We're going to show you the right hand side. The left hand side is basically the same procedure. You'll need new struts, a pair of new struts from 1AAuto.com. We always recommend doing these in pairs. A jack and jack stand, 17 and 21 mm sockets with your ratchet and you'll either probably need a breaker bar or a pipe for some extra leverage. You'll need a 14 mm socket with a smaller 1/4 in drive ratchet, couple of the bolts are hard to get to, kind of tight, and then you'll also want a flat blade screw driver.
Starting in the trunk, take the trunk mat, flip it over, get it out of your way, as well as the spare tire cover. We've got one connector there. Using a flat blade screwdriver, you're going to find the indent, which happens to be right there. Pry it. What should happen is that it will lift out and come out. Next, you're going to see a trim piece around the rear carpet area and if you can just see the carpet pads and pull it out of the way, you'll find your nuts for the top of your strut mount.
The first one that you can see pretty easily comes out easily with a 14 mm socket and a 3/8 ratchet. The second one, the one that's not so easy to see or get to, the best bet is a 14 mm socket again, but you want a 1/4 drive ratchet, which is a much smaller length ratchet and you can see Don contorting himself into the trunk and getting to it there. Okay, you'll want to remove the rear wheel. If you don't have the benefit of air tools, you'll probably want to loosen the lug nuts while the vehicle's on the ground, then jack up and then secure the vehicle and jack stands. Remove the lug nuts, which are 21 mm and remove the wheel and tire.
Using a 17 mm socket, 1/2 in breaker bar, remove the lower strut bolt and using our pipe over our handle, get a little extra leverage and apply smooth pressure. While we're removing the screw, we want to make a note of the placement of the bottom of the coil spring. It's facing the front of the car. Okay, just fast forward as Don takes that bolt the rest of the way out. Sometimes, kind of pulling up or down on the suspension while you're pulling this bolt out helps get it out a little quicker. Important to note while that bolt is coming out, the body of the car is supported and the rear suspension is hanging free.
We've got the old strut, torn up boot. The exact same replacement part from 1A Auto, new boot, new mounting hardware, and new strut mount. Should go in exactly the way as the old one came out. We've got the new strut ready to go in. Make sure you remove the nuts and remember your placement on the bottom coil, facing the front of the car. Sometimes as you find it necessary, apply pressure the lower control arm. Okay and we'll speed up while Don's putting that bolt in and as you saw I just came in there, pulled down on the suspension, made it a little easier for Don to be able to wind up that lower bolt hole. You want to torque to 75 foot pounds.
Okay and put the top bolts in. You see Don just folds both seats down in the back and can reach right in and get that first bolt in nice and easy. The second bolt though is a more of a challenge. You can see the only way to really do it is get right in the trunk again and use your left hand, curl it in there and start it on and then use your 1/4 in drive and 14 mm socket and just tighten it up as best you can. The torque specs on these are probably about 20-25 foot pounds. As long as you get it in there and basically as tight as you can with that 1/4 in drive ratchet, you should be all set.
Okay, and just fast forward. Make sure you put the trim back in place and then the one clip that fastens in place to hold it. Keeping the fast forward going here. Put your tire back in place, start the lug nuts by hand, make sure they don't cross thread, then tighten them up preliminarily. With the vehicle back on the ground, tighten or torque your lug nuts to a hundred foot pounds and use a star pattern to tighten them.
We hope this helps you out. Brought to you by www.1AAuto.com, your source for quality replacement parts and the best service on the Internet. Please feel free to call us toll free 888-844-3393. We're the company that's here for you on the Internet and in person.
SCA85027
In Stock
Product Reviews
Loading reviews
5.00/ 5.05
5 reviews
5 Stars
4 Stars
3 Stars
2 Stars
1 Star
5
0
0
0
0
Work great!
A
April 10, 2018
These parts fit my '02 Infiniti I35 just fine. The installation instructions generally pretty good for the front structs. There wasn't as much information for the rear struts, but it wasn't too hard to figure out what to do. I did end up needing to use a spring compressor on the rear struts in order to rotate the top into the right position. I tried just using a big screw driver to rotate the top, but there was too much friction from the rubber bumper.
Complete Strut Assemblies
Daniel
June 7, 2018
First let me start off by saying I am NOT a professional. I like things simple; my coffee black, my scotch older and my cars faster. This is not my first time purchasing from 1A, but my first review so here it is: Using these was one of the better choices I have made. Watching the 1A Auto video that goes with the struts, the tools listed and a mere 4 hours later I had the struts, sway bar links and sway bar bushings installed and my Maxima back on the ground. It was really that easy. One piece of advice though: if the bolts line up in their top holes and the bottom doesnt line up with the knuckle take a large screwdriver and rotate the bottom of the strut so it will line up. It may make a few loud popping noises, but youll be fine.
Strut package
K
April 6, 2019
Very easy to install. Made to factory specifications. Would buy again.
Shocks/struts/window regulatorl
J
January 28, 2020
Great parts. Great value. Will be ordering from 1aauto again!
GREAT CHOICE.
Earl
September 29, 2021
GOOD STRUTS. HAD SOME DIFFICULTY INSTALLING THE FRONT PAIR. THE TWO REARS WAS A BREESE.
Customer Q&A
Who is the manufacturer of the struts?May 22, 2018
David H
10
We have a few different aftermarket companies build these parts specifically for us, as our 1A Auto house brand. They are manufactured to the same OEM specifications as the original part that came with your vehicle. If you have any further questions, please don't hesitate to ask.
May 22, 2018
T I
Are they made in the USA? I'm from Canada and don't want to pay dutyJune 22, 2018
Edmond F
10
We have a few different aftermarket companies build these parts specifically for us, as our 1A Auto house brand. As the items will be shipping from our warehouse in the US, there will be duty fees on top of the shipping cost to Canada. If you have any further questions, please don't hesitate to ask.
June 22, 2018
Jessica D
Are these the right one for a 2002 Nissan Maxima SE?March 16, 2020
Matthew C
10
Yes these parts will work your 2002 Nissan Maxima SE.
March 16, 2020
K B
10
Idk if the Nissan maxima and infiniti are interchangeable at all I think they are but they fit my 02 infiniti i35 perfect and I did really think they were a good product
March 16, 2020
S T
10
Yes. I installed them with no problems. I either used my Haynes manual or a video from this website. With the top mounted and snugged in, the bottom may not line up. I used a pair of water pump pliers to make it line up.
March 16, 2020
Daniel B
10
Yes they will work. The ride quality was lacking to say the least. They will work but I would not recommend them.
March 16, 2020
DIANA S
10
Yes, according to the information you provided, this part will fit your vehicle. Please let us know if you have any other questions!
March 16, 2020
Emma F
Will this make your car lower?January 4, 2023
B R
10
This will not make your car lower. Height will remain the same as factory height. Your car will drive much better especially if you have worn struts or coils.
January 4, 2023
Jose G
Customer service
877-844-3393
Monday - Friday 8:00am - 9:30pm ET Saturday - Sunday 8:00am - 4:30pm ET
Infiniti is a registered trademark of Nissan Motor Co., Ltd. 1A Auto is not affiliated with or sponsored by Infiniti or Nissan Motor Co., Ltd.See all trademarks.
Enter Vehicle Year Make Model
Specify your vehicle's year, make and model to guarantee fit.
Year
Make
Model
Options
Drivetrain
This part doesn’t fit a . Select from parts that fit.