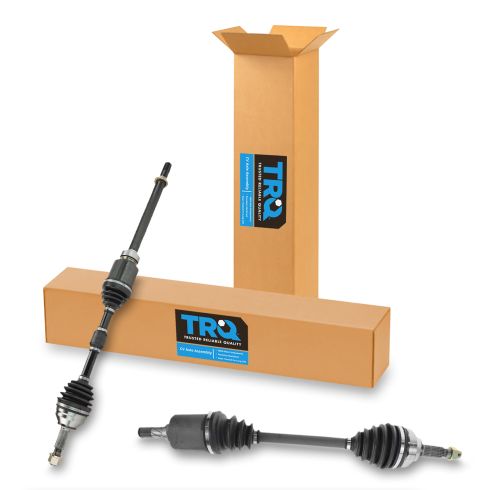
1AACS00112-Nissan Rogue Sentra Front Driver & Passenger Side 2 Piece CV Axle Assembly Set TRQ CSA82467

Replaces
2010 Nissan Rogue Front Wheel Drive Front Driver & Passenger Side 2 Piece CV Axle Assembly Set TRQ CSA82467

Product Reviews
Loading reviews
4.77/ 5.0
39
39 reviews
Very satisfied
October 3, 2018
Great! Quick shipping, excellent quality, easy installation. How-to video was helpful. Highly recommend!
Great part, fit perfectly
December 17, 2019
The new part was more solid and better built than the oem part. Thanks!
Great Quality Parts
February 21, 2020
I would definitely recommend this product. Great quality product, affordable cost, and direct fit to my 2008 Altima. I will continue buying more parts for my car for future needs as long as 1aauto cost stays reasonable.
returm policy needs to change!
May 10, 2020
passenger side axle did not arrive with passenger side . box was empty. replacement part arrived to late for me to use.returned item but i had to pay 32.00 for shipping.seems that should have been on your dime.
Review
August 8, 2020
Fast delivery! And great parts that fixed my car right up! I will definitely be buying more parts from this company.
Good
August 21, 2020
Good
September 15, 2020
The price and the product was reasonable and affordable and super fast shipment
Worked as described.
September 16, 2020
Worked as described. Quality was ok.
NO ISSUES WITH SO FAR
November 22, 2020
I PURCHASED TW CV AXLES AND INSTALLED IN MY NISSAN ROUGUE. EASY INSTALL AND HAD NO ISSUES AFTER THEY WERE INSTALLED. VEHICLE RUNS SMOOTH. (1 MONTH AFTER INSTALL)
Top of the line
February 19, 2021
TRQ parts are so good.The quality is OEM
My ride feels so brand new.
Shipping is really fast.
Service 1A
June 7, 2021
Excellent service and very fast and reliable
2 CV axle set
June 7, 2021
Came as described with no damage. Also great price for a set of 2
August 10, 2021
A+++
Must try, warranty is good thing
August 25, 2021
I bought a pair for my 2010 rogue and they are holding out nice. the mechanic shop wanted to charge me 250 a piece and my family mechanic charged me 100+ for not only the work but also changing the brake fluid and engine belt. Buy the part's have a good mechanic and your be fine.
September 7, 2021
Worked fine on 2009 Altima coupe
Recommended part for 08 Nissan Altima
October 12, 2021
Axles have been installed and working well. Are as described.
November 4, 2021
Fit exactly as it said it would.
Great fit
December 10, 2021
Drives well after installation. Recommend replacing the seals while that deep in the repair.
December 27, 2021
Always earlier than predicted. 100% right parts!
Good
January 20, 2022
Good
2008 Nissan Altima Axle
January 31, 2022
Fit perfectly and appear to be of high quality.
2008 Nissan Altima Driver/Passenger CV Axles
February 10, 2022
Parts appear to be great quality parts, and were just recently installed on my Altima. First set was damaged in shipping by UPS, and !A Auto sent replacements quickly. The only thing that seems to be consistently damaged (even with the second shipment), is the metal seal rings that go on the axle that seal the spline into the transmission. I would recommend that these be shipped separate from the axles, since the axles are somewhat heavy and get handled a lot during shipment. I ended up using the seals off of my old axles.
CV Axles
May 21, 2022
Great product, has everything you need for an easy installation.
July 24, 2022
Look great
left and right CV axles!
August 2, 2022
well made product and very satisfied with my purchase! thanks Jim
October 26, 2022
They are great parts they feel better than the ones that came with the car.
Great experience.
November 28, 2022
Fits perfect. Such a better ride experience.
2011 rogue
January 21, 2023
Perfect fit
CV Axles 2012 Nissan Rogue - Great fit.
February 6, 2023
Came fast, great fit. Great price. Would buy again.
Great product
May 8, 2023
I have bought both driver and passenger sides CV axles for my 2013 Nissan Rogue after watching their video on YouTube. The axles fit perfectly, reasonable price and fast shipping.
May 17, 2023
3 tiny pin hole
Good value for the axle
May 25, 2023
It was easy to find, and installed smoothly. Great item for the price.
Excellent costumer services support
October 16, 2023
We received the product in perfect condition and quickly.
February 14, 2024
Very good quality
March 24, 2024
Is good parts work
July 11, 2024
Perfect fit for my car. Plenty to help support from 1A.
Great Product!
October 14, 2024
Installed easy enough. Fit great. I would definitely recommend.
Great price
October 28, 2024
Great price!
November 10, 2024
Love it and works great thank you I highly recommend 1A Auto!!!!
Customer Q&A
Are u joints inside the part?
March 15, 2020
10
Thank you for your inquiry. These will be complete assemblies with the CV joints inside the boots. Please let us know if you have any further questions.
March 15, 2020
A C
What is the torque specifications for the lock plate and also the carrier bolts in case I need to take that out? Not sure if carrier is the actual part name it's what holds the axle and place I think maybe it connects to the engine.
August 26, 2020
10
Thanks for your inquiry. Written and video installation instructions are found on the product page under the "How-To & Tools" tab.
We're constantly adding new installation video instructions. If we do not have one for your vehicle on the product listing page, please check again at a later time or check our Video Library to see similar repairs here: https://www.1aauto.com/videos
August 26, 2020
T I
Will this fit 2.0L?
October 10, 2020
10
This part will not fit your vehicle. We may have a part that is listed to fit.
Please enter your vehicle's year make and model in the search bar at the top of the page. On the left hand side of the page it will give you the option of narrowing the search with your engine size.
October 12, 2020
Christa R
Does this include ABS Ring?
October 23, 2020
10
This kit will not include the ABS tone ring.
October 23, 2020
Jessica D
10
Axles do not include an ABS ring. This is likely located on the wheel/spindle assembly
October 23, 2020
D A
Will this work on an awd rogue?
February 5, 2021
10
This part is specific to vehicles with a particular set of options. We will need more information about your vehicle to confirm the fit.
The information we will need in order to assist you is your VIN.
February 5, 2021
Emma F
Nissan is a registered trademark of Nissan Motor Co., Ltd. 1A Auto is not affiliated with or sponsored by Nissan or Nissan Motor Co., Ltd.
See all trademarks.


