Brought to you by 1AAuto.com, your source for quality replacement parts and the best service on the Internet.
Hi, I'm Mike Green. I'm one of the owners of 1A Auto. I want to help you save time and money repairing or maintaining your vehicle. I'm going to use my 20-plus years experience restoring and repairing cars and trucks like this to show you the correct way to install parts from 1AAuto.com. The right parts installed correctly: that's going to save you time and money. Thank you and enjoy the video.
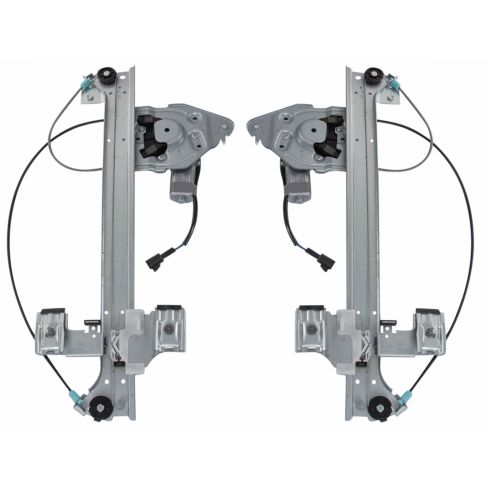
In this video, we're going to show you a rear window regulator replacement. If your window regulator has made a popping or grinding noise in the back door on one of these Trailblazers, or Envoys, or any of the GMC mid-size SUVs this is what you need to do. Tools you'll need are a 7 millimeter and 10 millimeter socket with ratchet extension, and a small flat blade screwdriver.
Start by using a small screwdriver. You want to pry up this little trap door here. Pull it out. There's two 7 millimeter bolts there. Then on your door handle you can see four slots. You want to take your screwdriver, push in there and pull out. So push and then pull out on this bezel, and then there's another one right up here, and one here, and then the last one up here. That comes right off. Your power switch, just work your screwdriver underneath, and it pops up and out. Then there's a tab right here. You can just put your screwdriver in, push and pry it out, disconnect that. Now, I'll remove these two 7 millimeters screws. We'll just fast-forward just taking those two 7 millimeter bolts out. Once you have all that out you work your hands underneath and start, that'll be easiest if you start hearing a thump and you pull the panel, a brisk pull, and it comes off. You can see it has all the pins just going down the holes. Carefully remove your water shield. You want to do this without tearing it because you do want to reuse that. It keeps the water from getting into the door panel.
Now, there are three 7 millimeters bolts holding your speaker on. You want to remove those seven millimeter bolts, and then there's probably a bit of adhesive just holding that plastic triangle that holds the speaker. Pull that right off.
Your window regulator mounts fairly easily. There are three bolts. They are 10 millimeter: one here, one here, and one down here. Then it mounts to the window with two 10 millimeters nuts that you can see right through that hole: one there and one there. Now, that's with the window all the way up. If your regulator is broken, you can usually move the window up and down by hand, so you can see, these are pretty easy if the window is all the way down. You can see I've got my switch connected and my key is on, so I can run the window down and you can see it's in down position those are very easy to get to.
Loosen to these two nuts here. I'm going to take my window, pull it up, and slide the window right up, and stay there. Okay, your lead for your motor right here, use a small screwdriver, push in on its tab right that way, and it comes out even easier. Now, using a 10 millimeter with extension and ratchet. This harness actually is clipped to our regulator so I'm just going to pull that out and then there are just couple of hooks at the top, so you just lift up the regulator, pull them down, and then the regulator comes right off.
A new regulator from 1A Auto, and it goes back in the exact same way. It goes in, and then there's a little hook, see, just put it right there, that hooks hinges up right here into the right spot. Here it is. Start our bolts in. I'm going to hit fast-forward here as we just start those bolts in and then tighten them up. Loosen up these bolts. Now, you can move your window down. Make sure it contacts. You want it to contact and be lined up right where it was before. Push it into the regulator. I have my key on so I'm going to plug my lead back in and run my window all the way up. Now, I'm going to tighten those nuts that hold the clamps that clip the regulator to the window, these up right through here. I'll plug our switch here, to the speaker. I'm going to fast-forward as I start those three seven millimeter screws that hold that speaker, and tighten those up. Then we'll put our water shield back on and ready to put the door panel back together.
Put the door panel back on. Make sure that your harness it's into this little cavity, pull it through, and you should be able to just pretty much put the panel into place, look back here to see the little blink pin and where it's supposed to go, and look up over here and make sure you match those two pins, and you're all good. Connect our switch, push it down, and it has a little line up pin, it goes into a hole in the handle. Make sure you push on all four corners, and put in the two 7 millimeters bolts. We'll fast-forward as we put those bolts in and tighten them up. You want them nice and snug. They aren't to be overly tight though. Now I'll push this back into place. One good thing is just to make sure your door is unlocked and you're all set.
We hope this helps you out. Brought to you by www.1AAuto.com, your source for quality replacement parts and the best service on the Internet. Please feel free to call us toll-free, 888-844-3393. We're the company that's here for you on the Internet and in person.