Replaces
Genuine original equipment part (OEM) that was factory installed on your vehicle by the manufacturer.
Item Condition:
New
1 Year Warranty
This item is backed by our 1-year warranty. In the event this item should fail during intended use, we will replace the part free of charge. This warranty covers the cost of the part only.
FREE Shipping is standard on Orders shipped to the lower 48 States (Contiguous United States). Standard shipping charges apply to Hawaii, Alaska and US Territories. Shipping is not available to Canada.
Expedited is available on checkout to the United States, excluding Alaska, Hawaii and US Territories as well as P.O. Boxes and APO/FPO/DPO addresses. Final shipping costs are available at checkout.


Created on:
Tools used
Brought to you by 1AAuto.com, your source for quality replacement parts and the best service on the Internet.
Hi, I'm Mike from 1A Auto. I hope this how-to video helps you out, and next time you need parts for your vehicle, think of 1AAuto.com. Thanks.
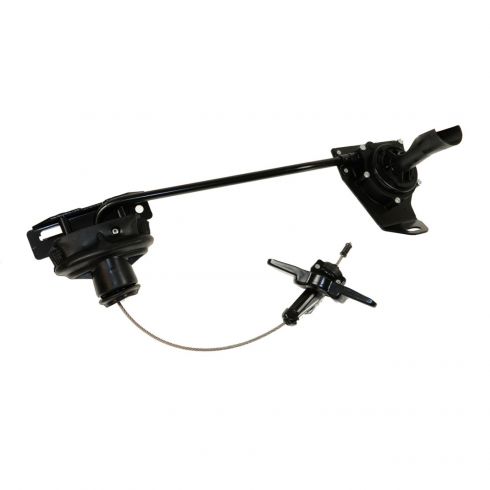
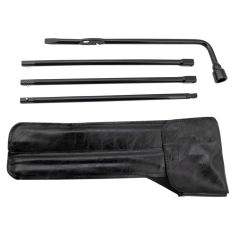
In this video, we're going to show you how to replace the spare tire hoist and this is 2003 GMC Envoy. It's pretty much the same procedure for all these GM SUVs, Envoy, Rianier, and Trailblazer as well as the Isuzu Ascender. If everything goes right all's you're going to need is a new spare tire hoist from 1AAuto.com, a 15mm socket and ratchet and flat blade screwdriver. For us, pretty much nothing went right, so we ended up using a Sawzall and a torch and we'll get into that during the video.
To start out, remove the cover that hides your spare tire tools and you'll want to pull out first the bent tire iron portion and then one of the straight links. Then, on the straight links, on one end is a larger square end and then there's a small square receptacle down at a 45 degree angle. You get the rod on there and then if everything goes right you can turn it counterclockwise and your tire will lower all the way down. Our tire stops. These vehicles have a secondary safety latch, so if you go down and you get down to about here and it stops your secondary safety latch has engaged. We didn't get a very good shot here, unfortunately, but to disengage it you can check your manual, but basically the process is you put a jack . or it tells you to use the jack that comes with your vehicle ., and put it right under the hoist carrier that goes to the center of the wheel and jack it up and the force of that is supposed to disengage the secondary latch. Guess what, on our vehicle, the latch was so frozen it didn't happen that way.
Regardless, if your wheel came down or if your secondary latch is still engaged, you should be able to remove the three bolts that hold the carrier. There's one here, and one there, and then, if you pull the tire down, you can remove the one in here. When you do that, the tire and hoist will come down. Here I'm fast forwarding, I'm using an extension to get that bolt that's on top of the wheel and I run into problem number two.
Here are the two problems I've run into. My first problem is the red arrow which is pointing at the corroded and rusted secondary latch mechanism. Like I said, you're supposed to be able to just jack the center of the tire back up and that's supposed to disconnect but it won't. Then, the blue arrow points to a broken clip nut. That's the bolt that holds the hoist over the wheel. I can't even unbolt the hoist and bring the whole hoist and wheel down at the same time. My latch won't disengage and the bolt won't come out, so I'm basically forced to cut through that secondary latch. I'm using a reciprocating saw to do that. You could use a reciprocating saw or you could use a torch. After cutting through that secondary latch the tire finally will come down. You can see I've used a torch to cut the head of that bolt off and then I'll pry off that part of the hoist. Now, I turn my attention to the other part of the hoist, the winch side, and the bottom bolt, the clip that clips onto the fender and holds the bolt. The clip nut breaks just like that first one had and then actually the one that goes into the side of the frame comes out fine. Here I'm removing that bolt the rest of the way and I've cut the head of the bottom bolt off. You can see some of scorching and stuff. After cutting that off, I can pull that down and out.
Once you get everything off, you're going to want to remove the old clips and replace them with new clips. I've got three new clips. Just take the clips and push them into place. Use a hammer or something to push them and then the last one goes right in here. You'll want to make sure that the bolt side is opposite of where you're going to put the bolt in.
Take your new spare tire hoist, and put it up into place. Just start those 13mm bolts preliminarily. Then tighten all three of them up. Now just crank your hoist all the way down. Slide your tire underneath, bring this down, lift your tire up and push it down through and that'll come up. If you're taking your tire out, you need to lift it up and then you want to push. Now you can see it. Push it up through. Set up the tire some and then start cranking up. As you're cranking the wheel up, you just want to make sure that it's staying lined up properly. Just keep checking it, as it starts to go up. Then put away your hoist components. Then just close up that panel.
We hope this video helps you out. Brought to you by www.1AAuto.com, your source for quality replacement parts and the best service on the Internet. Please feel free to call us toll-free, 888-844-3393. We're the company that's here for you on the Internet and in person.
Tools used