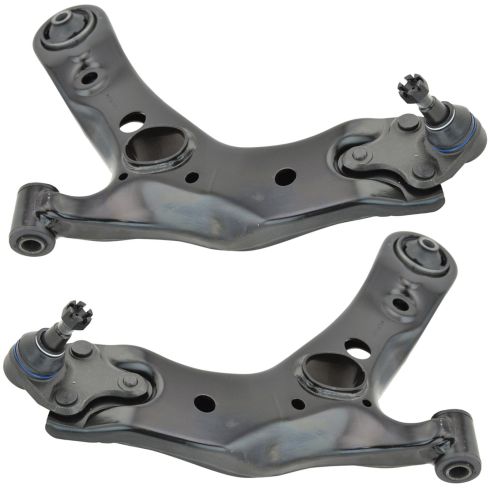
What's up guys. I'm Andy from 1AAuto. In this video I'm going to show you how to replace the front lower control arm on this 2010 Toyota Rav4. If you need this part or other parts for your vehicle click the link in the description and head over to 1AAuto.com.
All right. I raised and supported the vehicle. I'm going to remove the wheel. I'm using a 21 millimeter socket and an air gun. If you don't have an air gun you can use a breaker bar just crack the lug nuts free while the vehicle is still on the ground. All right. Now I want to take the tire off. This one is stuck on there pretty good so I'm going to put one lug nut on so the tire doesn't go flying. And just hit it on the backside of the tire where a hammer, break it free. The reason you leave the lug nut so the tire doesn't go flying.
Now take the lug nut off and pull the tire off. All right. I'm going to take this cotter pin out. Now this one is somewhat of a reusable one so I'm going to use some needle nose and a pic right here and just try to slide this little lock out and then slide the cotter pin out. So, as long as it doesn't break and it doesn't look too bad you can reuse it. Now I'll take a 19 millimeter wrench and I'm going to take this nut off, oh actually slide it on this way. Actually I am going to need a pipe because it's on there pretty good. All right. I'm just going to put a pipe on the end, loosed this up. It makes it a little easier, get a little more leverage. Now I'll just take the nut off. There we go.
Now, I'm going to use a fork to, sometimes they call this a pickle fork, I'm going to use a pickle fork to remove this ball joint because I'm not saving it. If you were saving it there's other tools you can use that won't ruin the boot but generally these pickup forks ruin the boot. So I'll just put that in there and just hit it with a hammer. There we go. Released it. All right. So that's loose. I don't have to worry about that right this second. I want to take this bolt out and then there is another bolt right here.
I'm just going to use a little rust penetrant. Just squirt that bolt down right there. There's a nut right on top. I'm going to take a 22 millimeter wrench and put it on the nut on the top and a 22 millimeter socket with my air gun on the bottom. Take this bolt out. If you don't have an air gun you can use a breaker bar. And then I'm going to loosen this bolt up. I'm going to use a 22 millimeter socket and a breaker bar to loosen it up. This one is really tight. All right. I just switched to a ratchet.
Be careful because the oil pan is right here. One, you don't want to ant damaged or dent the oil pan and two you don't want your ratchet to get stuck. If you have a ratchet that switches right here you could get stuck. Just go a little bit further. See, I got stuck. Luckily my switch is down here. A little bit more. All right. I'll just have to do it by hand or with a wrench. If I had a a 22 millimeter ratchet wrench that would be ideal but I don't so it's just going to take a little bit of time. Okay.
So this bolt is loose but there's a problem if you can't get it past the oil pan. Now certain oil pans have a notch in them and then you can get this bolt out and it's no big deal. Now one option you could take the oil pan down so then you can slide this bolt out but that's a lot of work just to get this bolt out. So what we're going to do is take these bolts out here. I'm going to take this plate off back here, take this bolt out, and then there's one more bolt up here. I'll take that bolt out. I'm going to support this frame while I do that and we're going to pry this down and try to get this bolt out.
So I'm just going to use a screw jack and support this right here and I'm going to start taking those bolts out. Take these two bolts out using a 17 millimeter socket and a air gun then I'll take this bracket off. I'll use a 19 millimeter socket and the air gun. That bolt is a little bit longer. Now I'm going to take a 19 millimeter socket and extension in the air gun. I have to go through the lower control arm right here and the bolts right there. Take that bolt out. Little rusty. Just like that.
Now on the opposite side I'm not going to take these bolts out. I am just going to loosen them up. Just loosen this one up right here. Use the 19 millimeter socket extension and the air gun. Just enough. That's good right there. Now I'm going to loosen this one up with the 19 millimeter socket and the air gun. I don't have to listen to it that much, just a little bit. I don't want this to completely fall I just want to get a little, just be able to drop it down a little. I'll take these two bolts out. Use the 19 just like that, just let that hang, get those loose. Now I can just drop this cradle down a little bit.
What I'm going to do is take a pry bar just get in between the sub frame and the body of the vehicle and just pry down right there. And then you can take the bolt and just slide it out, get just enough room, or you could even try prying in between the sub frame and the engine. Although you don't want to ruin the engine so don't do that. So with that out now we can grab the control arm and just slide it down. You might have to push this in a little bit and then slide it out. Take a pry bar, just get in here, right out there. So let's pry it out. Then you can pry it out from there. That's not going to work. You can get a bigger pry bar and just pry it out. There you go.
Here is the old part, here is the new lower control arm from 1AAuto.com. It comes with the same bushings right there and there. It comes with a new ball joint. It comes with a new castle nut. Take this castle nut off and there's just a protector on that. Take that off before you install it. And it comes with a new Cotter pin as well. Get yours at 1AAuto.com and you'll be ready to rock and roll.
So if you happen to be doing the driver's side the procedure is going to be the same. You're going to have to loosen up those sub frame bolts and stuff. One thing to keep in mind, there is two nuts right here and then if you take this panel off there's two bolts right there. If you're struggling with that you can loosen up this mount right here. That's going to support the engine. So then you might be able to tip it down a little bit more or even put a block of wood and a floor jack underneath the transmission just Jack it up. Very carefully though you don't want to bend the pan or anything or even on the engine side. So that's if you're struggling a little bit with this, try that.
So, the easiest way to install this is put the back part in first. Get this lined up. And I'm just going to get this back bolt started. Might have to remove it but for the most part I'll get this started. Right there. Put the nut on top. Let me just slide this over here, get that lined up there. I'm just going to use my pry bar on the sub frame. Just get in between there. Try to get that bolt lined up. It's not going to line up too well. This is somewhat where you need a helper. You could have someone over here prying, get this started. All right. Let's try this. All right, that's started right there. Now use the pry bar over here. Pry this down and get that started. It's good. Just want to make sure this gets started though and we'll leave those loose. We'll torque those last and we can raise this up. Just use the screw jack.
Then I'm going to take these bolts. These are the 17 millimeter bolts. Use a 17 millimeter socket to get these started. Get these back bolts in, these too. Take this bolt, get that to fold back in. All right good. And then these two back ones over here. Now I'm just going to snug thse all up with the gun first and then I'm going to go around and torque them. Now I'm going to tighten these two with a 17 millimeter socket and a torque wrench to 73 foot pounds. Now I only did these two on this side I did not take the ones out on the other side but if you did then torque those at this time.
Next I'm going to torque these four bolts, there, there, there and there. I'm going to torque that with the 19 millimeter socket and torque wrench to 69 foot pounds. Next I'm going to torque these to that side and the driver's side because I loosened it up to 101 foot pounds. And that's a 19 millimeter socket. And for the body I'm going to torque these to 101 foot pounds both sides. Yep. I can remove the screw jack. All right, I'm going to tighten this bolt up.
Now what they want you to do is put this all back together, put the tire on, and then put this on the ground and have this at ride height and then torque this but that's very difficult to do. So, what I'm going to do is just try to get the control arm as close as I can to ride height so maybe a little lower then that about right there and then I'm going to torque that bolt. The reason why you want to torque it with the lower control arm at right height angle is to keep less tension on that bushing. If you torqued it with the control arm way down then you're going to have a lot of stress in that bushing. It'll just make the bushing last longer.
So, I'm going to use a 22 millimeter socket and a torque wrench. I'm going to torque this to 172 foot pounds. There you go. Go to the gym. Now I'm going to put a 22 millimeter wrench on the top nut on the back control arm bolt. Just snug this up first and then I'm going to torque that. Then I'm going to torque this to the same 172 foot pounds with a 22 millimeter socket. Now it's a little bit difficult because you have to hold the wrench on top while you are doing this. Now they say to torque the bolt not the nut. I'm going to do it from over here. I don't want to smash that rotor. There we go, that's all set. Get the knuckle lined up with the ball joint, pry the ball joint out a little bit. Just wiggle this a little. Take the castle nut, get that started.
Take a 22 millimeter wrench, start to tighten this down. To get the proper torque on this nut if you're going to use a torque wrench you're going to want to talk that to 98 foot pounds which is actually a lot for a ball joint. But what we can do is take a wrench and take a pipe, get a pipe on the end of it and try to tighten it up the best you can. So, I did this pretty good. I think it's all right. And then what you want to do is line up the hole for the cotter pin so you might have to tighten it up even a little bit more. And then we're going to install the new cotter pin that comes with this and slide it through the hole that way. We can try to get it through the back side. All right. It's not going to go in through the back side so let's go through the front side
And then, I'm just going to take some straight cutters and bend over one end at a time. It is a good idea to replace the cotter pin whenever you're doing that. You really shouldn't reuse it even though we said we were going to reuse it. There we go, fold one of those over. Then you can either fold the other one down or just trim it off and that's going to prevent the nut from loosening up. Just make sure it's not hitting the CV boot at all. You don't want to rip the CV boot. You should be good right there.
Now install the tire. Take the lug nuts, install the lug nuts. Now I low the vehicle down to the ground so that the tire's just touching the ground. And I'm going to torque these with a 21 millimeter socket and a torque wrench to 76 foot pounds and I'm going to do this in a star pattern. The reason you do it in a star pattern is so that the wheel gets tightened down evenly. And then, I always like to go around again just to double check. Whenever you do a job like the one we did today you're going to want to go to a local shop and have your alignment adjusted because you don't want to end up with premature tire wear. Whenever you change components or even remove them and reinstall them things change and you want to make sure everything's lined up so you're good to go.
Thanks for watching. Visit 1AAuto.com for quality auto parts shipped to your door, the place for DIY auto repair. And if you enjoyed this video, please click the subscribe button.