Replaces
Part Details
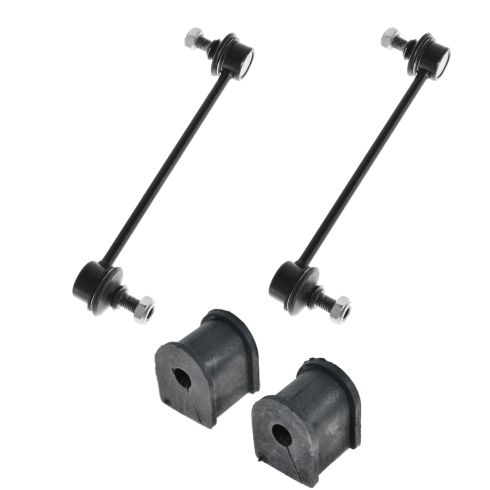
TRQ suspension kits are manufactured using premium raw materials and coatings for extended service life. Each TRQ suspension component is designed to be a direct, maintenance-free replacement to the stock unit. To extend the life of your steering and suspension components, TRQ recommends replacing components in pairs, sets, or kits. All products are fit and road-tested in our Massachusetts R&D facility to ensure we deliver on our promise of Trusted Reliable Quality.
Product Features
Our steering and suspension components are pre-greased and sealed for long life and do not require the extra maintenance typically required by greaseable versions.
Item Condition:
New
Attention California Customers:
 WARNING: This product can expose you to chemicals including Lead and Lead Compounds, which are known to the State of California to cause cancer, and birth defects or other reproductive harm. For more information, go to www.P65Warnings.ca.gov.
Lifetime Warranty
This item is backed by our limited lifetime warranty. In the event that this item should fail due to manufacturing defects during intended use, we will replace the part free of charge. This warranty covers the cost of the part only.
FREE Shipping is standard on Orders shipped to the lower 48 States (Contiguous United States). Standard shipping charges apply to Hawaii, Alaska and US Territories. Shipping is not available to Canada.
Expedited is available on checkout to the United States, excluding Alaska, Hawaii and US Territories as well as P.O. Boxes and APO/FPO/DPO addresses. Final shipping costs are available at checkout.

Created on:
Tools used
Brought to you by 1AAuto.com, your source for quality replacement parts and the best service on the Internet.
Hi, I'm Mike from 1A Auto. I hope this how-to video helps you out, and next time you need parts for your vehicle, think of 1AAuto.com. Thanks.
In this video, we're going to be working on our 1998 Toyota Camry. We're going to be changing out the rear sway bar bushings. These are the same from 1997 up until 2001. What happens with these is they get rounded out over time from that sway bar twisting in there as you go over bumps. As these become bad, when you hit a bump, the sway bar can actually bounce up and down inside of here, making a very harsh clunking sound that you can actually feel hit the bottom of the car. It can be very intimidating, but it's a very minor issue in reality, and it's very simple to repair. If you like this video, please click subscribe. We have a ton more information on this car as well as many other makes and models. If you want these sway bar bushings for your vehicle, follow the link in the description; they're available from 1AAuto.com. Here are the items you'll need for this repair.
Grab onto the hub cap and remove it from the wheel. We're going to use a 21 mm socket and breaker bar to remove all five lug nuts. We'll crack them loose now, raise and support the vehicle, and then finish removing the lugs. We've put our vehicle on a lift to make it easier to film for you, but this job can be easily done with a jack and jack stands. Remove the wheel and tire.
The sway bar brackets where the bushings are held can be found here just by the brake hoses in front of the actual wheel hub in the rear of the vehicle. These bolts are very prone to breaking, so we've soaked them in penetrating oil for a couple of hours before starting this job. To remove them, we're going to use a 12 mm socket and ratchet with an extension. You want to go very carefully here. If you feel these starting to bind on you, switch the ratchet and tighten them back down as far as you can, back them out, and just work them as necessary, so you don't break them off inside of the bracket.
Remove the bracket from the bushing and remove the bushing from the sway bar. It's always recommended that these parts be replaced as a pair, so we'll repeat these same steps on the opposite side.
Here we have our old sway bar bushings that we removed from our Camry and our new parts from 1AAuto.com. As you can see, these parts are exactly the same shape and size. They're both made of very high-quality rubber. You can see that we have the slot on the bottom here that will allow us to slide these onto our sway bar as well as the notch that'll keep them secure inside of the bracket. What happens a lot of time with these is you can see the rubber gets all worn out here, and these actually aren't too bad, but they were making a little bit of noise. That sway bar will actually travel up and down inside of this bushing instead of twisting the way it's designed to, which causes issues with handling as well as making a pretty loud clunking sound that sometimes gets bad enough you can actually feel it thump against the floor. It sounds really intimidating, but in reality, it's a very minor part that's very simple to change. It can really restore the ride quality and the confidence that you have in the handling of your vehicle. If you have any of these issues with your car, these new sway bar links from 1A Auto are going to go in direct-fit just like your original equipment and fix you up right.
Split the sway bar bushing, place it over the sway bar on each side, place the bracket over the bushing, hook the front tab in, line it up, and start your two 12mm bolts. Then repeat these steps on the opposite side.
Once everything's lined up and the bolts have been started, bring them down with a 12mm socket ratchet and extension. Torque these bolts to 14 foot-pounds.
Reinstall the wheel and tire. Get all the lug nuts down as tight as you can by hand. Lower the vehicle carefully back onto the wheel and tire. Torque the lug nuts to 76 foot-pounds in a cross pattern. Line up the notch in the hubcap over the valve stem, and tap the hubcap back into place.
Thanks for tuning in. We hope this video helps you out. Brought to you by www.1AAuto.com, your source for quality replacement parts and the best service on the Internet. Please feel free to call us toll-free, 888-844-3393. We're the company that's here for you on the Internet and in person.


