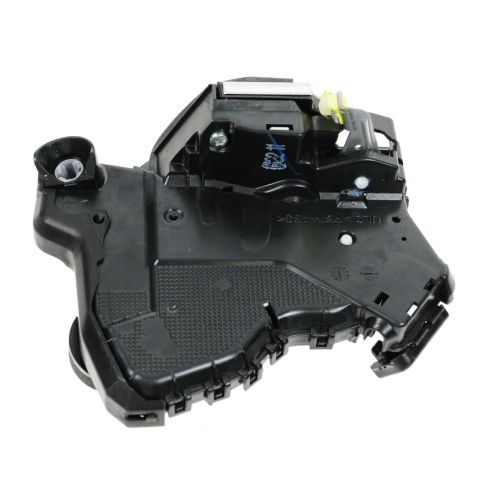
1ADLA00081-Toyota Lexus Scion Front Driver Side Door Lock Actuator DIY Solutions BSS00059
Replaces
2011 Toyota Camry Front Driver Side Door Lock Actuator DIY Solutions BSS00059
Product Reviews
Loading reviews
4.67/ 5.0
48
48 reviews
great product
February 25, 2017
Was price just right, was easy to install, work great. yes I would recommend this product to a friend.
Good fit
March 5, 2017
No issues with door lock actuator. Easy to install.
Perfect replacement for oem
March 8, 2017
Repair took about 1 1/2 hours since I'd never disassembled this Lexus door. The new part fit perfectly and fixed the problem. Now that I know how to do the job, should only take 30 minutes if any of the other locks fail. Fast shipping, too.
Great service
March 15, 2017
100% satisfied with the service and shopping experience. Thank you!!
March 29, 2017
The driver side door actuator that was ordered works perfectly. It was unfortunate that you did not stock the passenger side one since it went on me while I was waiting for delivery. I will probably be ordering two more for the rear doors from what I read about my particular truck (2013 4Runner). I hope you stock those.
Door lock actuator for 2012 4 runner
June 18, 2017
I originally priced a door lock actuator through the stealership and it was around 500 bucks. Then I found an OEM one on eBay for 250 bucks and then I found the one on 1aauto for around 40 bucks. It was pretty much a no brainer after that. Haven't had any issues with the actuator.
November 28, 2017
i can't believe its the same exact one and no problem installing it .
great price fast shipping
December 11, 2017
Got my part for a fraction of the price dealer wanted,working good so far.shipped fast even with standard shipping
Excellent customer service and door actuator / part worked perfectly
January 1, 2018
I would highly recommend 1A Auto! Excellent customer service and my door actuator / part worked perfectly! 5 * for the company and 5 * for the perfect shipment and receipt of part. Door works properly now for a 10th of the price of a dealership repair. Thank you much! I'll be recommending you to all my friends and family!
Actuator
January 6, 2018
Drivers door lock would not unlock or lock from the key fob or the door switch on my 2012 Camry. Bought this actuator and installed it following a couple of videos on YouTube. One showed me how to remove my door panel and the other video provided by 1A auto gave me enough instructions for an older camry that I was able to get it installed in my 12. Installation took about an hour and a half. I'll take the $50-60 I got in the job over $500 at a dealership anyday. If you google this problem it's very common on the newer camry models. Anyone with half a brain can do it. Don't get took by a dealership. Actuator has been in for a week and is working well. I'll update this review if I have trouble with it but for now I'm happy with the part and support provided from 1A auto.
Good product and service
February 2, 2018
It fit my car worked well so far, I will order for the rest rear doors.
Shipped fast and really good support, I recommended.
Don't underestimate the knowledge of your customers
March 18, 2018
March 18, 2018
Dear sirs:
Truthfully, ordering the lock actuator from you turned out to be a big mistake. It absolutely did not fit my car even though it was supposed to fit. After checking online, I could not find anyone who had a correct fit and I had to order it from a Toyota Dealer. The part that I got from the dealer was a perfect fit. down to the very color of it. But it cost over 4 times a much. Whew!
I have been a loyal customer and I plan to use your company in the future. I DID feel like your people were condescending to me. Instead of listening to me they tried to convince me that I was the problem but I patiently explained the situation to first one person and then the other. I was even told that because I had gone as far as to "open a case" (something like that) that they could not allow me to return it for my money back. I got upset and asked if they were trying to force me into making a video and going on youtube with it. I told them that I didn't plan of doing that b
Worked great for my 2013 prius C
April 4, 2018
I bought this based on the thoroughness of the installation video provided by you all for this part. The video was for a camry, but I was able to watch the video and compare that my prius c door was almost the same!
I had to replace my driver front door lock actuator because over time it quit physically locking the door whether i would use the remote or the "lock" electronic button. the only way i could lock the door was to flip the physical lock switch from inside the vehicle, and the only way I could unlock it was by removing the teeny metal key out of my keyless keyfob. That was annoying.
My dealership wanted a TON of money to fix this, but your part was perfect, and a fraction of the cost. Using the video instructions I was able to complete this in a reasonable amount of time. I even was able to make sure I had all the required tools for the job before beginning. I will definitely reorder from you.
Awesome!
May 17, 2018
This worked amazingly for my 2014 Camry Hybrid LE on the drivers side front door. Just hit 80,000 miles and this one died and then the passengers side front door a week later. Toyota dealer wanted $350 for this part plus $180 per door to install. This cost me $56 and less than a half hour and works well. I will be ordering the passengers side one today.
Great Value
May 22, 2018
Dealer wanted to charge $550 for this part and labor, I did it by myself with help from the video in under 2 hours. Part works great.
I saved $1000
June 2, 2018
The dealer wanted $1000 to fix my door lock. The Toyota part was $600. I found the part on 1a auto for $56. It shipped on time and was just the same quality as the oem part. I installed it easily myself in 90 minutes.
Its ok
June 18, 2018
The part works, but definitely has a different feel to it vs the original. Im concerned the interior handle will break due to how hard you need to pull to open the door.
Door Actuator did the trick
July 4, 2018
Good product, but no install help at all. Fortunately Toyota has perpetrated this particular crime of faulty design for many, many, many years and models. Meaning many of my fellow dupes have purchased Toyota/Lexus based upon solid reputation only to have to deal with this issue. A few thoughtful victims make videos for YouTube and if you dig deep enough, you will find what you need. Product worked, but the same crappy little hobbyist motor is used, and could die next month or year. But it beats paying the dealer $500.00!
Great price!
August 8, 2018
The price and quality of the part was great, I would have given this review 5* if the part was deliver faster.
2012 toyota Camry front door actuators
October 30, 2018
Although the actuators have not yet been installed I do rate customer service on the handling of my order not to mention the quality of the parts received. However once installed i shall submit a further review if I may....
Door lock actuator
December 11, 2018
This $46 actuator was a bargain. Toyota dealer wanted $320 PLUS another $340 to install it. I did it myself in 30 minutes.
Fast and accurate service!
December 17, 2018
Thank you so much for the extra advice and options.. First time ordering and received excellent service. Good job
March 13, 2019
Direct replacement for my 2014 Toyota rav4.
2012 Lexus cr200 door lock actuator
March 16, 2019
This part is easy to install with great instructions the part is of great quality and the installation videos on the web site are perfect. I wont buy parts from anywhere else but 1 Aauto.com
It was what I needed
June 27, 2019
I'm not sure if it is the door or the device (leaning toward the door), but it feels different than the OEM when opening the door.
That may be subjective. It fits, it works, it lines up, it goes in much easier than the $450 price to install at the dealer would suggest.
NOTE: There is a small plastic part that goes in the bottom of the lock bar channel. (best I can describe) You'll see it when you start to look at it. None of the tutorials mention it, and it is clear and dropped from the box without notice. I found the yellow one on the original part and changed it, only to find the new one when cleaning up. FYI
Good service and delivery was great. Very pleased so far, but I've only had it for a little while and don't use the car a whole lot, time will tell how it hods up, but for the price and ease of changing it, I have no complaint at all.
Recommend
July 3, 2019
The lock actuator was easy to install and works great!
You can search up a video on how to install.
I highly recommend!
Perfect
July 18, 2019
Part fit perfectly, was easy to install and the how to videos were very helpful. I will shop 1A Auto for all my parts.
Great company
August 1, 2019
Lock Actuator worked great part described perfectly and shipped fast highly recommend
Great so far!
August 3, 2019
Easy to install and working great!!! Glad to be able to use my key fob again.
perfect fit
October 20, 2019
installed working great will order again
Great parts for an affordable price and great instructions to install!
November 24, 2019
First off: I'm a car noob. My local Toyota shop was going to charge me $650 per door to replace the door lock actuator in each of the four doors. With 1A Auto I spent less than $300 total for the parts and tools, and it took me about 4 hours to fix all the doors all by myself. The website provides very detailed instruction videos, and the parts arrived quickly and fit like a glove. Thank you 1A Auto for taking the fear out of getting my own hands dirty (not that dirty, actually) and saving me over $2,000 in the process!
Toyota door actuators
December 28, 2019
These actuators were easy to install. The first one on the front passengers side took 45 minutes and then the front drivers side took 35 minutes easy to replace.
Great replacement part at a great price.
March 15, 2020
Easy to install and fit perfect.
Satisfied customer
March 19, 2020
Very prompt delivery and were a perfect fit for my Toyota Camry
Like a champ
April 7, 2020
Worked perfectly, exactly matched the factory part I took out of the door, would buy again.
Easy
June 23, 2020
the overall process from ordering shipping receiving and installation was easy. I am very grateful for the video that came with the part cuz it made it that much easier for me to to take out the old partner install the new one
Nice
September 6, 2020
Works great. No problems.
Good as new
September 9, 2020
Installed on the 4Runner and works great
Exactly what I ordered
September 29, 2020
The part matched the original exactly. Excellent price. Timely shipping. Very pleased.
Good product and complied to what was advertised - WORKS WELL
October 8, 2020
Saved a lot of money here. The essence is in the step by step walk through to fix the lock. if you did not indulge in doing it yourself, you have already missed the opportunity. It must have taken just about an hour and a half to finish it. I can now do it in half hour if needed to. Gave me confidence to fi a rear view mirror. This time took me less than half hour. 1A delivered. THANK YOU
Perfect product !
November 2, 2020
Was told by dealer that this job would cost around 500 dollars ! I ordered the Door lock actuator from 1A Auto for $ 59.00 and did the job myself with no problem . 1A also had an excellent video that I watched beforehand. Very satisfied customer. Also the part was shipped and received in a few days ! Great service !
Perfect Fit!
January 18, 2021
Buying this actuator from 1A Auto was a great choice! The part fit perfectly and the amazing, step by step How To video was priceless and perfect! I saved $320 over quoted repair at my trusted Toyota mechanic.
Thank you 1A Auto!!
Toyota Door Lock actuator
February 19, 2021
Very well made product so far, no issues in installation & the fitment was spot on. Overall, customer I purchased it for is extremely happy.
Door lock actuator for 2010 Lexus RX 350
June 4, 2021
The actuator fit perfect. I installed a few weeks ago.
Door lock actuator
August 20, 2021
The door lock actuator fit okay there was a bushing missing on the new one. I didn't realize I took it back apart and had to remove the bushing from the old one to put on the new one the picture shows to have a bushing.
December 12, 2021
Easy replacement. Recommend buying door panel removal tools. These made getting panel off a snap.
Great customer service
February 13, 2022
Put it in a 2015 Rav4. Perfect replacement. Only it didnt function properly. Called customer support and they sent another at no charge. Got it in about a week. It works great! Didnt even have to send the other one back!
DO NOT BUY this part from DIY Solutions. Two defective units in a row!
March 24, 2022
After installing this part in a 2015 Rav4 (perfect replacement fit), I discovered that it didn't function properly. From inside the car, with the door locked, you pull the handle and the door only opened halfway. You had to pull it a second time to fully open the door. After talking to Customer Service (see my review for the quick replacement - Jan 14, 2022), they sent a free replacement.
Unfortunately, the replacement failed in the exact same way after less than 2 months. That's less than 100 handle pulls.
Do not buy this part from this manufacturer (DIY Solutions).
Two bad ones in a row means they have a production and quality issue.
Hopefully, 1AAuto will help me find a replacement that works for more than a month or two.
Customer Q&A
Will this work for the driver's side BACK door, as well?
June 14, 2017
10
Pretty sure it is a different part number. Look it up.
June 14, 2017
Daniel S
10
I'm not sure. I think best to call and ask them
June 14, 2017
Annette H
10
This is specific to the front door.
June 14, 2017
Alex P
10
passenger side
November 15, 2017
Marco B
Is this for a tundra or Camry?
December 19, 2018
10
Not sure about the Camry but it did fit my 2010 Tundra.
December 19, 2018
Seth S
10
I installed on my 2012 tundra. Works great
December 19, 2018
Ryan C
10
This is listed to fit many vehicles including both 2007-2016 Camry and Tundra models.
December 19, 2018
Christa R
10
2010 Camry
December 19, 2018
Lynn F
10
I used this on a Camry
December 19, 2018
James B
10
Neither, it was for a RAV 4.
December 20, 2018
Alan S
Will this work for keyless entry?
November 6, 2021
10
Yes, this will be compatible with keyless entry applications.
November 6, 2021
Cristina P
Will this part work on the Front Passenger side door. Mine is not working?
February 2, 2022
10
This is for the driver side only.
February 2, 2022
Cristina P
10
Currently, we do not carry this part for your vehicle. We're always updating our inventory so please check back soon!
February 2, 2022
Cristina P
10
I ordered one of these and although it worked it did not function correctly. Spend the extra money and get a higher quality actuator
February 2, 2022
James M
10
The part I had was for the driver door, they also have one for the passenger door and that's the one you need
February 2, 2022
A M
Toyota is a registered trademark of Toyota Motor Corporation. 1A Auto is not affiliated with or sponsored by Toyota or Toyota Motor Corporation.
See all trademarks.


