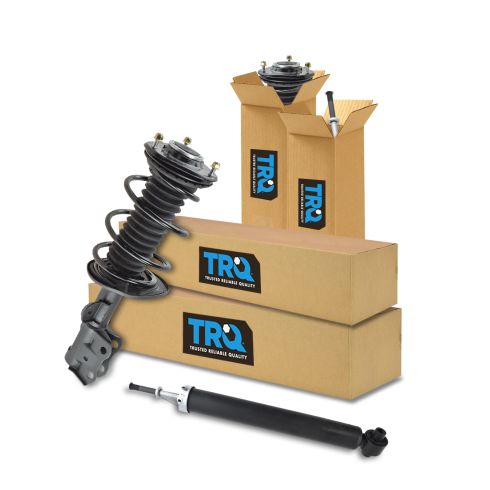
1ASSP01655-Toyota Prius Prius Plug-In Front & Rear 4 Piece Complete Strut Assembly & Shock Absorber Kit TRQ SKA62116

Replaces
2014 Toyota Prius Plug-In Front & Rear 4 Piece Complete Strut Assembly & Shock Absorber Kit TRQ SKA62116

Product Reviews
Loading reviews
4.45/ 5.0
33
33 reviews
Shocks/struts on 2010 Prius
September 8, 2018
I just wanted to thank 1A auto for a really great product. I also really appreciate you guys putting out a how to video for installation on YouTube. That was super helpful! I had never installed shocks/struts before but your video was very instructive and gave me the confidence I needed. The shocks/struts were of excellent quality and fit my car perfectly . I also bought your control arms and those went in perfectly. That video was also outstanding. Looking forward to more projects. Thanks again!
Excellent value pack.
July 27, 2019
Everything needed to change out all four corners of the car in one package.
Just installed this on our 2011 and our 2012 prius as both are in the mid 100 thousand miles. In both cases ride and handling improved noticeably.
Package was easy to install, requiring no special tools (you will need a big torque wrench) and 1AAuto has very good videos that walk you through it step by step.
Extremely please with the results and the pricing.
Awesome brand and Great service
December 9, 2019
The shipping time was above expectations and the brand of the parts are excellent. My husband was able to install them on my 2010 Prius and now it drives soo smooth!!
April 1, 2020
Fast shipping exact fit for my prius.
Strut
July 30, 2020
Good parts
perfect fit
August 4, 2020
The instructional video made the work easy. I did need a 24" breaker bar for some of the bolts.
Perfect fit
November 3, 2020
Great improvement to the handling and ride. Easy to install the front set of struts. Rear set of shocks took a little more work to install. Not as easy due to corrosion to the bottom shock bolt. Took a commercial impact wrench to break it free. The shocks only took minutes install once the old set were removed. Super pleased with the change in the ride and handling.
Had no issues
November 4, 2020
Bought, installed and had no issues with it. Parts came on time as well
Part appears good Quality
January 20, 2021
The parts appears to be good quality and with life time warranty not much to lose either then shipping I assume.
If there was choice I would give 5 stars on part quality . However parts bolts didn't align correctly on 2011 Toyota Prius. I called CUST service and tech case was open . Its takes 1-3 days to get feedback back from tech support but I got reply in 1 day. The struts needed to be clock to align the bolts. Very simple information which CUST service should have been able to tell me on my first call , I shouldn't have to wait 1 day. The installation video doesn't have this information suggest Tech add it so someone else doesn't run into this issue .The parts were very easy to install. I see one review highlighting shock were difficult. I used a jack under spring as shown in install video but raised it match the bolt holes. This made install very easy. I am only DIY and this was my first order..
Shocks and struts
March 16, 2021
All parts fit exact, satisfied with the purchase along with fast shipping and a instructional videos.
Good parts source- easier than ordering from local parts supply house
April 5, 2021
The parts came as specified, and installed perfectly. The accompanying videos were very helpful.
OE Quality Grade
May 12, 2021
Beyond happy with the shipping speed / turnaround for orders. All parts were spot on, even the lower control arms. My experience with aftermarket arms is along the lines of not a perfect fit, however these were near perfect.
front struts and rear shocks for 2013 toyota prius 3rd generation
July 4, 2021
I could not believe the auto-shop was going to charge me $1400 labor just to replace both rear shocks and both front struts. that was only labor and not tell me what the cost for parts. Well I went to 1aauto and bough all 4 parts for about $350 parts and all my labor. You get better bargain when you buy whole thing than piece at a time. Thanks to the videos 1aauto I was able to do it all on my own. It made my job easier knowing how to do the job. I would use them again to buy parts for my 2013 toyota prius 3rd generation. 1.8 l engine. parts fit perfectly like oem
Quality Parts & New Bolts
July 19, 2021
I was very pleased with these shocks for several reasons: a) it comes with a full set, b) they truly felt quality and fit properly in a 2015 Toyota Prius Two, and c) it had all the new bolts I needed. You'd expect less quality and less effort into a product that is sold for much cheaper than at parts stores. It really made the job smooth.
[{"url": "https://wac.edgecastcdn.net/001A39/prod/media/pNISJll75W64CYGsite/bc444debf6f3ed208cc15342e0d5eb43_1633541566946_0.jpeg", "caption": "Perfect fit"}, {"url": "https://wac.edgecastcdn.net/001A39/prod/media/pNISJll75W64CYGsite/74dd017b21db62aa9a46ea22fbe1b115_1633541705053_0.jpeg", "caption": ""}, {"url": "https://wac.edgecastcdn.net/001A39/prod/media/pNISJll75W64CYGsite/08e0b08e62612b60ff5cffe3892d74ff_1633541705053_1.jpeg", "caption": ""}]
October 6, 2021
Great fit just like oem
Great kit, fast shipping.
October 7, 2021
Great suspension for the price. I received them and installed them right away. about 3 hours start to finish for a first time. no fit issue. Fell in place without problem. Only challenge was loosening the lower bolt on the rear suspension. A tip, do not loosen the nut but loosen the bolt. The nut has indentation that keep every in place and impossible to loosen. If you work with the bolt it is a breathe. Learn the hard way on the first one. I try long extension bar with no success. Use impact gun no luck either but when I did the bolt, came loose easily. For the front you can work with the nut (large 22mm size) .
the shipping was super fast.
Slightly harder than brakes, and yes, replace the brakes while you are doing this!
October 12, 2021
This was much easier than I thought it would be. Everything fit in perfect. 2010 Prius. Loosened everything up with wheels down, then lifted to remove/replace.
December 3, 2021
When it is cold , the front shocks make tap
Rear shocks
January 26, 2022
Rear shocks are way to stiff, might change the rating if it get better.
February 1, 2022
Ride quality is similar to OEM. However, the front left strut constantly clunks when hitting any bump on the road.
quality and fit
February 6, 2022
the parts fit as original and the owner was happy
Great
March 27, 2022
Perfect ride
Great except all the email spam
June 8, 2022
Price was great. Shipping was quick. Instructional videos were awesome. Just be prepared for a massive email attack with opportunities to make further purchases.
Bad quality
July 15, 2022
Very poor quality , it is very solid, the front strut makes a noise when You hitting any bumps, honestly its broke my back , my old struts were better than these, I regret why I bought it ,don't waste your money and your time
All is Well and as it Should Be!
March 26, 2023
Installation was super easy, the parts seems of good quality and the ride feels refreshed and good. All in all a very good experience.
Amazing
June 5, 2023
excellent quality I already bought it for a car and now I am going to buy it for another that I have I recommend it 100%
Struts
June 13, 2023
Product was what it was and fit well... will let u know how long they last but great price!
October 21, 2023
very happy with product and company
November 30, 2023
It's very stiff
Great Ride
February 17, 2024
My mechanic said everything fit easily without any problems, it was a seamless install. The car drove significantly better with these upgrades, night and day difference.
Great price and easy to install. Work great.
February 24, 2024
Fit perfectly and car rides much better now. When I installed struts I accidentally left the right side sway bar a little loose and car made a clunking sound so make sure you hold bolt with Allen wrench when tightening both top and bottom nuts on sway bar.
I can't believe what a difference ride is with new struts and shocks now let's see how long they last. Great price.
Prius shocks and struts
August 14, 2024
Great replacements and excellent installation video. My 2010 Prius rides so much better now.
Every cloud has a silver lining.
September 5, 2024
The parts fit like they were supposed to...I didn't give a five-star rating for a couple of reasons:
1. One of the boxes holding the struts was damaged and had holes in it. This allowed some parts to fall out of the box (three nut that belonged at the top of the strut), but the strut looked undamaged.
2. I contacted 1A AUTO to notify them of this and get replacement parts. I was informed that these struts come from a third party and that they do not have the nuts in stock.
This was troubling because I wanted to install the components ASAP. However...to their credit...they told me that if I could source the nuts locally they would reimburse me for the purchase!
So while this was not a perfect experience, it worked out in the end.
I would recommend 1A Auto for your needs!!
Customer Q&A
Is this oem or what is the quality?
June 3, 2019
10
1A Auto's house brand parts are manufactured by various aftermarket companies specifically for us and built to your vehicle's exact OEM specifications.
June 3, 2019
Emma F
Are these twin tube nitrogen filled?
June 2, 2020
10
Hello Mitch! These are not twin tube design shocks, just single tube gas filled shocks.
June 2, 2020
T I
Do these shocks and struts lower the ride of the vehicle or are they adjustable? If so, by how much?
October 4, 2020
10
Thank you for your inquiry, Orlando! These are designed to factory specifications, so it will set the car to the original factory height. They are not adjustable.
October 5, 2020
T I
Installed the front struts but like some people have pointed out it makes a clunking noise when you go over small bumps, seems to come from right side more then left. Anyone have any idea if this can be fixed and how to fix it ?
February 18, 2024
Toyota is a registered trademark of Toyota Motor Corporation. 1A Auto is not affiliated with or sponsored by Toyota or Toyota Motor Corporation.
See all trademarks.


