Hi, I'm Mike from 1A Auto. We've been selling auto parts for over 30 years.
Hey, everyone. Sue here from 1A Auto, and today we're going to be working on our '03 Volvo V70, and we're going to replace the rear strong arm hatch struts. If you need this part or any other part for your car, click on the link below and head on over to 1AAuto.com.
Open your tailgate, and the rear wagon cargo lamp is located right in the center of the hatch, on the inner trim piece. I like to take a small screwdriver, and I'm going to use a couple of tools here. I'm going to pry it with that, but then I take my body trim piece and I can wedge that right up in there, and then I can kindly pull it down, and then there you have the bulb access and the lamp. To discard it, just push down on that green tab on that connector and then we have the lamp assembly.
Now, the dome light down, you've accessed the mounting screws for this back light. It's a T25, and we're just going to pull that bolt right out. Grab our body tool, trim tool, and pull down. There we go. Then we have another T25 right here. This is the right rear window area, so the upper trim. We're going to do the same with this. I'm going to grab it and just pull it down. Set that aside. Right behind the passenger seat on the right side quarter, there's a bolt inside this spot. Looks like it's the holder for the back screen of the hatch. It's a 10 millimeter socket, and discard that bolt. You just got to really grab this firm and pull. I'm just going to grab this access panel, put this aside so that I can get in here. That's an extra protector for the bulbs.
Now that I've taken that bolt out, before I can pull the tail piece out I have to disconnect this piece, so it's just pull it like that and there's the panel access, and now I can take this cover completely out and discard that. Now the location of the strong arm is out in the open and you can get to it. We're on the passenger side, and we have the top clip. The clips can be a little difficult. They're really not hard to do, it's just that they have such a strong spring to them that they want to bounce right back. There we go. And then there's another one just like it up here. Okay, so once you have released the pressure on the clip, you slide the clip out. It's got a little pinned ribbon to it like that, and that holds the ball part in there. Nice. The answer is yes, it doesn't hold up by itself, the door, the lift gate.
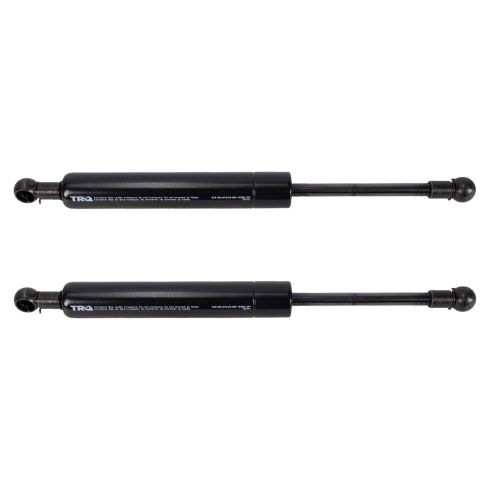
Here we have the rear tailgate hatch strong arms. These are from 1A Auto, and this is the factory one we just pulled out. The actual one that we're going to reinstall, everything is the same length far as the piston goes, but it is extended out longer, so that tells us that these are worn down, the gases are breaking down in it. Same pin design connection on both ends. If you need this part, or any other part for your car, click on the link below and head on over to 1AAuto.com.
So obviously, we can't work with one arm, so we got a prop rod and we held ours up. You can use maybe a broomstick, take the broom part off, or a shovel, anything you can find that's going to cause it to hold nice and sturdy, and that way you can do this job a little bit easier. You can see now the design of that clip, how it goes around, and the pin slides in. I don't believe that I'm going to be able to put that back together without the pin out, so I am going to install the pin, make my life a little easier. Let me move this one, and now we can spin it and line it up. Okay, I can tell that that's a little bit off. There we go. I just pushed on the strut a little bit towards the in door, towards the hatch area. Now, I can put the clip back in. Much easier when you can see it. There you go. Strong arm's up.
Now, you're going to do them in a pair like I strongly recommend, so do the same steps on the other side. To reinstall the corner trim piece, we've got to pull down on this anchor. It's kind of spring loaded, so use one hand and guide that down. Then I'm going to pull back on this side panel. Now I can re-line up everything here. There's tabs along the outside trim here, just push on it. You'll hear them snap into place. You got one here, push that in. Now we're free to connect the side panel. I'm going to remount that. There's a bolt back there that is a 10 millimeter socket. Snug that up. There we go.
Now we have a top trim piece, so you can see the guide tabs and the actual ... There is two round tube style holes that are going to clip right into there, and then the long pin goes up in there. I like to guide that in first, then I'll guide the back pin. There we go. There is a Torx screw, and that's a T25, and that goes right in here. The molded form that's going to, it's like an insulator for the back assembly. You can see the little cutout of the ears in the pattern in that side panel. Let's get it in that way first. Line up those tabs, and then we can push it right into the plastic. It's in there nice and firm. Then the last panel, we've got two ear tabs on the bottom here that go down on the floor panel, and then just push it. It locks into place.
Now, we're going to install the piece on the tailgate in the center. First thing I'm going to do is put that wire through, so that I can use that plug in the dome light. Guide these up in, clasp between, and then just give it a good snap up. Now, this has a little screw that goes in the center here, and it's a Torx head T25. Now we're going to plug in the rear cargo light, snap that in place, and you can see the tabs on this, so there's two little tabs on it by the electrical end, and then the push ups, so we're going to guide it in this way, and then snap it up.
Thanks for watching. Visit us at 1AAuto.com for quality auto parts, fast and free shipping, and the best customer service in the industry.