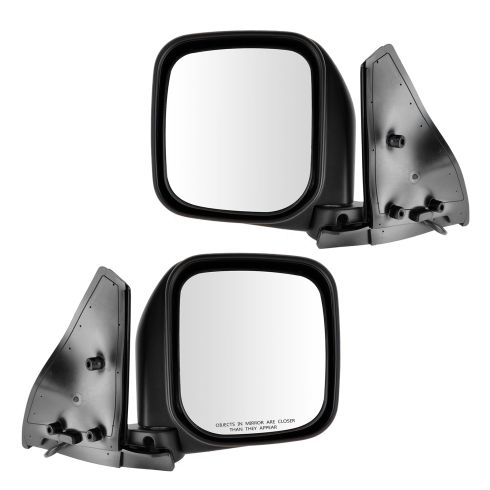
1992-00 Mitsubishi Montero Driver & Passenger Side 2 Piece Power Without Memory Paint to Match Mirror Set DIY Solutions MIR04272
Out of Stock
$137.95
Notify When Available
Description
Vehicle Fit
Warranty & Shipping
How-To & Tools
Part Details
Kit Includes: (1) Passenger Side Mirror (1) Driver Side Mirror
Cover Color: Black
Cover Finish: Smooth
Quantity: 2 Piece
Fold Away Mechanism: Manual
Mounting Hardware Included: No
Mirror Color / Finish: Paint to Match
Manual Remote Control: No
Aspherical Glass: No
Blind Spot Indicator: No
Heated: No
Integrated Puddle Light: No
Housing Color: Black
Housing Turn Signal Indicator: No
Mirror Turn Signal Indicator: No
Mirror Memory Type: Without Memory
Adjustment Type: Electric
Exact fit - To obtain proper fit and function confirm your vehicle has the exact mirror options listed.
Complete Repair in One Purchase - Stop searching for parts individually and complete your repair with a customized kit or set from DIY Solutions.
High-Quality Parts from Trusted Brands - DIY Solutions' kits and sets are selected from the best automotive brands and include hard-to-find and even obsolete parts you may need for your vehicle.
Guaranteed Fit - DIY Solutions ensures its selected parts are quality-tested to guarantee fit and function.
Paint To Match Note:
"Paint-to-match finish" refers to a smooth, paintable surface. This item is not painted. Paint offers better coverage and adhesion, but it is not necessary for installation.
Direct-fit replacement Manufactured with high quality materials Mirror glass meets or exceeds DOT standards
Item Condition:New
Attention California Customers:
WARNING: This product can expose you to chemicals including Chromium (Hexavalent Compounds), which is known to the State of California to cause cancer, and birth defects or other reproductive harm. For more information, go to www.P65Warnings.ca.gov
Lifetime Warranty
This item is backed by our limited lifetime warranty. In the event that this item should fail due to manufacturing defects during intended use, we will replace the part free of charge. This warranty covers the cost of the part only.
FREE Shipping is standard on orders shipped to the lower 48 States (Contiguous United States). Standard shipping charges apply to Hawaii and Alaska.
Shipping is not available to a P.O. Box, APO/FPO/DPO addresses, US Territories, or Canada for this item.
Expedited is available on checkout to the United States, excluding Alaska, Hawaii.
Final shipping costs are available at checkout.
How to Replace Side Mirrors 1992-99 Mitsubishi Montero
Created on:
Tools used
Socket Extensions
Phillips Head Screwdriver
10mm Socket
Ratchet
Trim Tool Set
Pick
1. Removing the Door Panel
Pop out the center of the push clip
Pry off the speaker/sail panel with a trim tool
Pry off the trim buttons on the door pull
Remove the two Phillips screws from the door pull
Remove the Phillips screw from the door handle trim
Pop off the door handle trim
Pry out the clips from the perimeter of the door panel
Disconnect the master window switch
Disconnect the light
2. Removing the Side View Mirror
Remove the 10mm nut from the door tweeter
Remove the door tweeter
Remove the two 10mm nuts from the mirror
Pull the mirror out
Disconnect the wiring harness
3. Installing the Side View Mirror
Connect the wiring harness
Insert the mirror into place
Tighten the two 10mm nuts to the mirror
Insert the door tweeter into place
Tighten the 10mm nut to the tweeter
4. Installing the Door Panel
Connect the courtesy light wiring harness
Connect the master window switch wiring harness
Press the door panel into place
Press on the door handle trim
Tighten the Phillips screw to the door handle trim
Remove the two Phillips screws from the door pull
Press the trim buttons on to the door pull
Press the speaker/sail panel into place
Pop the push clip on
Hi, I’m Mike from 1A Auto. We’ve been selling auto parts for over 30 years!
To get our door panel off, there's two push clips here. These aren't the original ones. This is an older vehicle, so some of the clips are a little different. But if you have the originals, they're probably the push-in style. You'd push in on the middle. It would unlock it, and then you'd pry them out. This style has the center ones that just pop out. Then you can just pull the push clip out. Do the same for both of them.
We're going to remove this black trim piece in the A-pillar. You can probably just use your plastic prying tool. You can get this from 1AAuto.com. Work it under here. Just pry it off. There's clips behind these three clips. You need to remove these two little trim covers to get to screws behind them. I'm going to use a small pick tool. You can buy this set from 1AAuto.com.
Just carefully get behind here and pop it out. There's two Phillips head screws, so we use our Phillips head screwdriver and remove this one. Do the same for the other one. If you pull the door handle, there's a screw hidden behind here, a Phillips head screw. Remove that. Pop this trim cover out. Slide it over the door handle. We'll use our door trim prying tool. You can get this from 1A Auto. Going to try to find the clips. Usually you start at the bottom, and sometimes you can find a little spot where you can get your fingers under there and work it up. Then squeeze this. It should help pop it apart. Work your way along the door. Then we'll lift the door up and off of the door panel, and take it off. Then unplug it from the master window switch. Push in the lock on this side. The lock can be hard to push in. Then unplug the light. Turn the door panel this way. Push the lock in. We have the door panel.
To get to the mirror nuts, we're going to pull the door tweeter out. This truck has one. Some don't. Going to use a 10 millimeter deep socket ratchet and extension. This bolt here is for the tweeter. Undo it. Now I'll get one of the nuts off the studs for the mirror, because it's also holding the bracket for the tweeter. Pull that out. A little white plug here, push that in. Unlock the tweeter. Put it aside.
Remove these two nuts. Pull the mirror off the door. This particular truck does have vent visors. I'm just going to carefully slide it underneath the vent visor. Then the plug is right here. Unclip the plug. Pry it up, so we pry it up like that.
To reinstall the mirror, we'll plug it back in. It can only go into the connector one way. Click when it locks into place. On this one, I'm going to have to feed it underneath the vent visor, but a truck without it, it should just slide right into the openings. Going to have to maneuver it this way.
I'm going to have to go this way first, just like that. Put this little plate back in. I'll catch this bottom nut, and I'll catch this other bottom nut. Plug the tweeter back in. It can only go in one way. Going to click when the lock's in place. Going to put it back up in place. Going to get this nut captured, and put this bolt back in that was holding it. I'll use the 10 millimeter socket extension and ratchet to tighten them up. Be careful. Don't over-tighten them. You don't want to pull the studs out of the plastic mirror. If you feel them get tight, just stop.
Put the door panel back on. I'm going to turn it so I can plug the courtesy light back in. Kind of get it in here, and then it slides in. Click when it locks into place. Turn the door panel. Plug the master window switch in. Now I'll hang the door panel in place. Get the lock actuator caught. And, it's going to hang on the seal of the door. Push it down. Then we'll push it into place. Clip it in. Push clips will clip into place.
Reinstall this trim. So I'll pull the door handle out, maneuver it through the trim, and put it in place. Put the little screw in place. Install these large, self-tapping screws back into the door handle pull. We'll put these caps back on. They kind of have a certain direction they'll go, and they'll fit smooth. Same for both. Put the A pillar trim back on, it will just clip into place. And, we'll put our little push clips back in.
Thanks for watching. Visit us at 1AAuto.com for quality auto parts, fast and free shipping, and the best customer service in the industry.
Product Reviews
Loading reviews
5.00/ 5.04
4 reviews
5 Stars
4 Stars
3 Stars
2 Stars
1 Star
4
0
0
0
0
Look and work like OEM. Perfect fit.
L
May 11, 2018
Look and work like OEM. Perfect fit. These are not heated mirrors so the connector was not a match. I noticed the connector for the heaters in my old mirrors matched these mirrors connectors. Pulled the pins from my Montero's connector and wired in the connector from the heater harness from the old mirrors. Took a few tries to get the right sequence but got it and turned into a clean install. Could not be happier.
Great.
R
June 18, 2019
They were the perfect fit for my Montero Sport. Simple installation and all around great product.
D
March 8, 2020
Product as advertised, hassle free transaction and quick delivery. Highly recommended parts store!! ????
Zilong
May 6, 2022
Really good!
Customer Q&A
No questions have been asked about this item.
Customer service
877-844-3393
Monday - Friday 8:00am - 9:30pm ET Saturday - Sunday 8:00am - 4:30pm ET
Enter Vehicle Year Make Model
Specify your vehicle's year, make and model to guarantee fit.
Year
Make
Model
Options
Drivetrain
This part doesn’t fit a . Select from parts that fit.