Brought to you by 1AAuto.com- your source for quality replacement parts and the best service on the internet.
Hi, I'm Mike Green. I'm one of the owners of 1A Auto. I want to help you save time and money repairing and maintaining your vehicle. I'm going to use my 20+ year's experience restoring and repairing cars and trucks like this to show you the correct way to install parts from 1AAuto.com. The right parts installed correctly that's going to save you time and money. Thank you and enjoy the video.
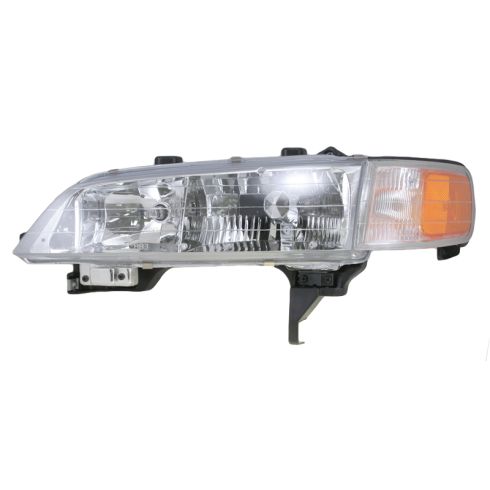
In this video we're going to be doing headlight assembly replacement. This is the whole assembly. If you just need to replace your bulbs it's just a matter of reaching back there, untwisting the retainers, and pulling the bulbs out. This is on a '95 Accord same as a '94 to '97. Tools you'll need are an 8 millimeter socket and driver, a regular screwdriver, a Phillips screwdriver, a 10 millimeter socket and ratchet, and a T40 Torx bit and ratchet. So maybe you're changing your lights because they are broken or whatever and you have to, or maybe you just want to brighten up the front end of your car. A new set of headlights and parking lights can really take miles off the front end of your car.
Remove the front grill by taking off five 8 millimeters or also actually 5/16 standard socket works; one, two, three, four, and on this car this one's broken, but you would want to remove a fifth one that's right down in here. You can see I'm looking from the side right over the headlight, and I'm going to zoom right down in on the grill here. Your next step is you need to get a screwdriver right down in here, and there's a little tab that you have to press down on and then slide the grill forward, and you can see I already got the other side. So see here's the little tab. You basically just need to press down on that with your screwdriver and then it releases the grill. So now you can see the grill comes right off.
Once you've removed the grill, you want to go right in here. This is obviously your parking light, your headlight, and you want to remove this Phillips screw here. Then once you remove that screw you actually just take the parking light and pull it forward and off and then there are five of these kind of Phillips clips. There's one here. One, two, three on the front, and then one more underneath this parking light, and what you do on most of these is you basically just turn this kind of screw out, and it pulls out, and then the whole clip pulls out. So on some of them what you'll need to do is kind of need a regular screwdriver up in there and pry up while you start turning the screw. Now you can see the screw's actually coming up. I'm actually holding down on that screwdriver to hold the pin in place. So you want to remove those five pins from the top.
So once you've gotten those clips out we'll go up underneath and there's the tire and there is a screw right on this side. You need to remove that. There are some bolts under here closest to the tire you don't need to remove this one. You need to remove this one here which you can see on this car it's already been taken out, and then also there would be one on there except it's missing on this car, one on there, missing on this car. You do need to remove this one, and then again right up underneath there's that Phillips screw.
Now that you've got those out down below you can twist out your bulbs here and put the lights up here. You're going to pull out. It has a clip right here on this side and then the same thing, pull out, and then shake it a little bit, and you unplug your signal lights here, and then on the other side, and your bumper cover's off. Actually, you can see this tape. That's actually the original tape. This piece of Styrofoam is just kind of a filler panel. It's taped on and you want to remove it, and then you're going to remove four bolts. If you're just doing one side, you can just remove the bolts on that side, pull the cushion out and pull the headlight out; but it's just as easy to do all four so you can take the lights right off.
So now I'm going to remove the cushion with four T40. These are T40 screws. Then your impact absorber just comes right off. So once the bumper cover is off and the impact absorber off then there's four bolts that hold the assembly on; one, two, one here, and then one here. Before I do the last one, I'm going to reach in here. You can see this little thumb tab, just kind of press on that thumb tab and then wiggle the connector to pull it free. I can't quite reach the high beam one so I'm going to wait until after I pull the headlight out to do that one. Now the headlight pulls out. I've got to reach back in here and disconnect this high beam and there's the assembly out. So see. Here's my old headlight, the new headlight a whole lot clearer and brighter. Everything is going to bolt in the same. The only other thing I have to do as well is I have to switch over this clip here that holds the grill on.
So to get the clip out, you just kind of use a screwdriver, press, then it comes out and it pushes right into the front and you want that on the top for the new light. Remove the parking light here then the new light will go in just like the old light. Fit those through there, and now I'm going to put my bolts in. I'm just going to put them in by hand because I want to get the whole thing assembled and then back as far as I can first. So, my new style light. These I just pulled the old bulbs off. They just have the thumb tabs so they just plug right in. I'm going to put this back on and there's a little pin here that goes into this hole and then a lineup tab here that goes into here, and then two lineup tabs back here that go into there. Line all that stuff up. Put my screw in. I'll actually have to take this apart when I put the bumper cover back on, but just for now I'm going to push the light back into the fender here so this is all nice and tight, and then tighten these up.
So I'll plug in my bulbs. I probably should have plugged in this high beam before I put the light in, but I can get to it well enough here. Do a test. All right, and we're in business. So now I'll replace the other side and then I'll put the whole bumper and grill back together. Once you get the grill on you can then line these up again a little bit, and then they adjust by these screws right here. Now here I'm just going to go fast forward through putting the impact absorber back on. You do that with some T40 Torx bit. Then putting the Styrofoam back on and even fast forward through putting the whole bumper cover back on. If you want to see the bumper cover go back on in regular motion just check out our other video for remove and replace the bumper cover, but probably by watching this you can get the idea of what you need to do and we hope this helps you out.
We hope this helps you out. Brought to you by www.1AAuto.com - your source for quality replacement parts and the best service on the internet. Please feel free to call us toll free, 888-844-3393. We're the company that's here for you on the internet and in person.


