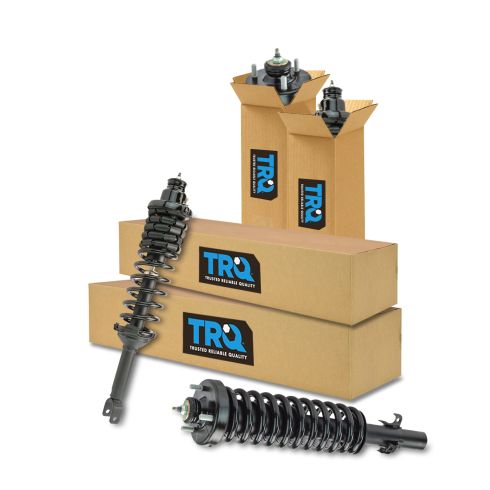
Kit Includes: (2) Rear Shock & Spring Assemblies (2) Front Strut & Spring Assemblies
Quantity: 4 Piece
TRQ fully loaded shocks and struts are manufactured using premium raw materials and calibrated to restore original ride comfort. TRQ shocks are fully loaded featuring a pre-loaded bearing plate, upper and lower spring isolator, upper spring seat, coil spring, boot kit, and premium strut. TRQ recommends replacing your shocks or struts in pairs to ensure even wear of components and improved ride comfort. All products are fit and road-tested in our Massachusetts R&D facility to ensure we deliver on our promise of Trusted Reliable Quality.
Product Features
Loaded Struts: Pre-assembled application specific design
Application Specific Design: No modifications necessary
Matched Pair: Improved comfort and extended service life
Restored Performance: Reduced body sway and vibration
Replacing struts used to require specialized tools to compress, remove, and transfer the old spring and mount. Our Pre-assembled, complete strut & spring assemblies come with all new parts and make the job much quicker and easier for the do-it-yourself mechanic.
Strut & spring assembly contains:
Upper Strut Mount
Strut Bearing
Coil Spring
Boot & Bumper Kit
Gas-charged Strut
Item Condition:New
Attention California Customers:
WARNING: This product can expose you to chemicals including Chromium (Hexavalent Compounds), which is known to the State of California to cause cancer, and birth defects or other reproductive harm. For more information, go to www.P65Warnings.ca.gov
Lifetime Warranty
This item is backed by our limited lifetime warranty. In the event that this item should fail due to manufacturing defects during intended use, we will replace the part free of charge. This warranty covers the cost of the part only.
FREE Shipping is standard on orders shipped to the lower 48 States (Contiguous United States). Standard shipping charges apply to Hawaii and Alaska.
Shipping is not available to a P.O. Box, APO/FPO/DPO addresses, US Territories, or Canada for this item.
Expedited is available on checkout to the United States, excluding Alaska, Hawaii.
Final shipping costs are available at checkout.
How to Replace Front Struts 1994-97 Honda Accord
Created on:
Tools used
12mm Socket
14mm Socket
17mm Socket
19mm Socket
Flat Blade Screwdriver
Ratchet
1. Remove the wheel
Loosen the lug nuts
Raise and secure the vehicle
Remove the lug nuts using a lug wrench or 19 mm socket and ratchet.
2. Loosen the strut tower brace
Remove the six 12 mm bolts so that you can move the strut tower brace around and out of your way.
3. Remove the front strut shock
Remove the brake lines from the strut using your 12 mm socket and ratchet.
Remove the 14 mm bolt and 17 mm nut from the strut bracket.
Drive the strut out of the bracket using a hammer.
Remove the three 14 mm bolts securing the top of the strut.
Pull out the strut.
4. Install the new strut
Put the bracket into place, working it into the bracket.
Hand thread the bolts in on the bracket.
Torque the bottom 17 mm nut to 65 ft lbs and the 14mm bolt should be torqued to 50ft lbs.
Jack up the control arm to alleviate some tension and tighten up the bolts.
Bolt the brake lines back on to the strut using your 12 mm socket.
Bolt in the top three 14 mm bolts and torque to 45-50 ft lbs.
Tighten the strut tower bolts back up.
Put the wheel back on, lower the vehicle and torque the lug nuts to 75-85 ft lbs using a star pattern.
Brought to you by 1AAuto.com, your source for quality replacement parts and the best service on the internet.
Hi, I'm Mike Green. I'm one of the owners of 1A Auto. I want to help you save time and money preparing and maintaining your vehicle. I'm going to use my twenty plus years' experience restoring and repairing cars and trucks like this, to show you the correct way to install parts from 1AAuto.com. The right parts, installed correctly: that's going to save you time and money. Thank you and enjoy the video.
In this video we will be replacing the front strut on this '95 Accord, exact same as any '94-'97 Accord, and very similar for a lot of different Honda vehicles. Tools you'll need are just various millimeter sockets with ratchets and extension. I do make one little mistake. I think I say that the lug nuts on this car are 18 mm, they're actually 19 mm.
Start on these aluminum wheels by removing the center cap. Next, if you don't have the benefit of air tools you want to loosen your lug nuts while your car is still on the ground. Then after you loosen the lug nuts, jack it up and support it. You always want to use a jack and you want to use a jack stand. Then remove the lug nuts and the wheel. These are 18 mm bolts. You need to unbolt the strut tower brace so you can move it around to get to other bolts. This is six 12 mm bolts; two here, two in the middle and two on that side. Now you remove the brace around. You don't need to take it out of the car, you just want to be able to move it.
Once you have your wheel off you want to remove the brake lines bolted to your strut in a couple places. Right here actually, it looks like this was replaced and that's been broken off. These are either 12 or 13 mm bolts. Now you need to loosen this bolt up here and then remove this nut down here. This is a 14 mm; I believe this is 17 mm. Take a 17 mm socket and you're going to want to hold the bolt on the other end here with a wrench. There's the nut off. What you want to do is basically just pull this bolt right out. There's the bolt out. Now, the bracket's unbolted. What you want to do is you want to use a hammer and you want to contact it right here, and also a little bit up here, and drive this off of the strut. Just push the strut back and out of that bracket. The next step in removing the struts is to remove the three 14 mm bolts around the edge. You can see them very easily over there on the driver's side.
Now bring it down some, pull it out beyond your tie rod here, give it a shake and your strut is down and out. Here's the new strut from 1A Auto. Here's the strut out of the car. The beauty thing about these loaded struts is they go right in. You don't have to worry about compressing the spring. You can see all the brackets on the bottom are all the same. It's going to bolt in all the same. This actually appears to be pretty much a new strut from the car. I'm not one to waste so I'm just going to reinstall this strut. Installation is pretty much the same. Put it up and in. There's a little bracket back here it likes to get stuck on. Shake it up into place. Make sure you turn it so the bracket you bolt your line to is facing kind of forward. You can hang it up in there. I'll put my three nuts on top. I'm just going to put them on kind of finger tight just to hold it in place.
Now that you have those nuts in at top, push your strut back, pull this bracket over. Pull your strut in. Slide the bracket up. You can put your bolt, line everything up well. Put your bolt in from under here. You might have to push it down on the suspension a little bit. Make sure everything's good. Put our bolt in here. Put this nut on. Before you tighten up the lower bolt and that pinch bolt you want to support your suspension, put all the weight, and you can see the weight is on the suspension, not on the lift. Now you can tighten up these bolts. You want to tighten these bolts with the weight on the suspension, not the suspension just hanging down. Yes, I know. Do as I say, not as I do because I am tightening it up here without the jack underneath it. You want to have the jack under the suspension as you're tightening these bolts.
Nice and tight. You want to bolt this right here with the 12 mm nut. Very important that these get bolted back together because this is your brake line and you do not want them rubbing or chaffing on anything. You want to make sure you do bolt these back up correctly.
Now we can tighten up the top bolts here. These should be pulled tight, about 45-50 foot pounds of torque. The bottom bolt, the one at the very bottom, the bolt that goes through and then the nut, that should be about 65 foot pounds. The bolt that goes in to hold the clamp on the bottom of the strut, that's about 50 foot pounds. Now we can bolt our strut tower brace back on, put the wheel back on and we should be all set. Now we can put the wheel back on. Then again I'm just going to use my impact wrench, tighten them up a little bit. Once you have the car down on the ground use a nice big wrench. Generally lug nuts you want to tighten up between 75 and 85 foot pounds. I usually just use a breaker bar and get them tight. Take your cap, goes back on and you're all set.
We hope this helps you out. Brought to you by www.1AAuto.com, your source for quality replacement parts and the best service on the internet. Please feel free to call us toll-free 888-844-3393. We're the company that's here for you on the internet and in person.
SCA57078
In Stock
Product Reviews
Loading reviews
4.62/ 5.08
8 reviews
5 Stars
4 Stars
3 Stars
2 Stars
1 Star
6
1
1
0
0
1994 Honda Accord
Shaun
February 27, 2017
The brake lines don't re attach correctly on these on the front struts and the back ones are really twisted and hard to get lined up to re attach at the bottom. Other then that they seem to do the job.
1996 accord strut assemblies
Ryan
March 19, 2017
The parts arrived sooner than estimated and the install was a breeze. The car rides like new again and it actually raised the ride height 1 inch. I will deffenitly be ordering parts again if needed for future repairs.
Shirlene
November 22, 2017
parts fit perfectly I've ordered from them before and I will order again!!Write
Perfect Fit
Junior
March 18, 2018
I purchest front and rear struts for my 97 accord they were a perfect fit. The struts had helped fix a little alignment issue and my ride is more comforable now.
Great Service
S
June 12, 2018
On time, no issues of any kind, thank you for your videos great help.
I would recommend to anyone, excellent customer service
Fast shipping
dETOKZ
July 21, 2018
The struts are excellent I installed them by myself to be cleared here I am not a mechanic but with the help of 1a auto videos on YouTube I was able to watch the video and did myself perfect fit with no problem the car is old but it does run a whole lot better now thanks again for the fast shipping . My advice to anyone trying to do this by themselves unless they know what they doing went you done bring it to a shop near you so they can check them for at no cost if there is any issue you can always go back home and fix them that's what I did luckly I did have any issue went it was inspected just to be on the safe side
Honest Legit Review
R
February 16, 2019
This was a nice bough for the price, the two front struts fit perfectly it was a little hassle but really easy to do, now the two in the back were a pain in my ass since they dont have the curb on the bottom like the Oem do, also they dont have the nut that the oem come with on the strut you need to buy one to make it like the original. Besides that they seemed to be doing the job right yes they are higher then the oem but thats normal how it should be I can already tell the ride is doing a lot better. I just need (as for everyone should) get an alignment on all 4 of my wheels I hope they can change the form they are made & make it to the oem like.
2016 Chrysler town and country
Jake
August 28, 2024
These work great if your replacing worn out or broken struts and shocks. They are not an upgrade over the original ride but work great for replacing old ones. I saw in some reviews people were expecting the ride to be better than how it came from the factory and they just won't do that. But still a good part.
Customer Q&A
How low do these leave a car ?March 2, 2017
Oscar S
10
It puts the car at the stock height. Due to the age of the vehicle, if you are replacing factory struts it will most likely raise the height a touch compared to where it sits right now.
March 2, 2017
Michael T
10
These parts will not lower your vehicle, but place back to factory height. In some cases our customers have noted a height raise because of the new springs.
March 2, 2017
Alex P
10
I installed them in mine, once the springs settled it was about the same height as stock.
March 3, 2017
Nathan T
10
The car stays the same height as stock suspension
March 3, 2017
Jake M
10
These parts will not lower your vehicle, but place it back to factory height. I noted a height raise because of the new springs to the original height which was awesome! Love it!!
November 23, 2017
Shirlene R
Do these improve the comfort of the ride?April 7, 2019
Carmello K
10
This will restore the vehicle back to its original ride.
April 8, 2019
Emma F
Hello, are these for 2.7L V6 Accord 96?October 12, 2023
John D
10
Yes, this part will fit your vehicle.
October 14, 2023
Meghan R
Customer service
877-844-3393
Monday - Friday 8:00am - 9:30pm ET Saturday - Sunday 8:00am - 4:30pm ET
Enter Vehicle Year Make Model
Specify your vehicle's year, make and model to guarantee fit.
Year
Make
Model
Options
Drivetrain
This part doesn’t fit a . Select from parts that fit.