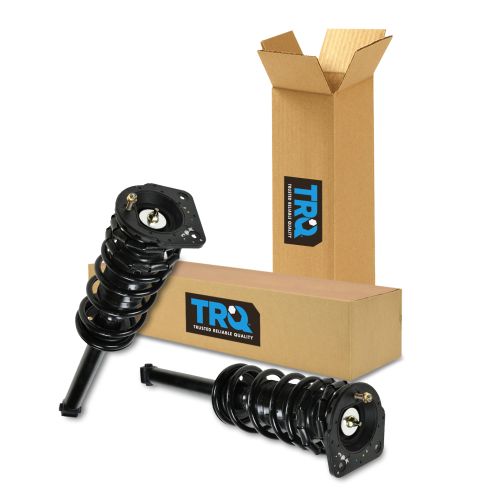
Kit Includes: (1) Rear Passenger Side Shock & Spring Assembly (1) Rear Driver Side Shock & Spring Assembly
Quantity: 2 Piece
Specification
Side Location
Driver & Passenger Side
Location
Rear
TRQ fully loaded shocks and struts are manufactured using premium raw materials and calibrated to restore original ride comfort. TRQ shocks are fully loaded featuring a pre-loaded bearing plate, upper and lower spring isolator, upper spring seat, coil spring, boot kit, and premium strut. TRQ recommends replacing your shocks or struts in pairs to ensure even wear of components and improved ride comfort. All products are fit and road-tested in our Massachusetts R&D facility to ensure we deliver on our promise of Trusted Reliable Quality.
Product Features
Loaded Struts: Pre-assembled application specific design
Application Specific Design: No modifications necessary
Matched Pair: Improved comfort and extended service life
Restored Performance: Reduced body sway and vibration
Item Condition:New
Attention California Customers:
WARNING: This product can expose you to chemicals including Chromium (Hexavalent Compounds), which is known to the State of California to cause cancer, and birth defects or other reproductive harm. For more information, go to www.P65Warnings.ca.gov
Lifetime Warranty
This item is backed by our limited lifetime warranty. In the event that this item should fail due to manufacturing defects during intended use, we will replace the part free of charge. This warranty covers the cost of the part only.
FREE Shipping is standard on orders shipped to the lower 48 States (Contiguous United States). Standard shipping charges apply to Hawaii and Alaska.
Shipping is not available to a P.O. Box, APO/FPO/DPO addresses, US Territories, or Canada for this item.
Expedited is available on checkout to the United States, excluding Alaska, Hawaii.
Final shipping costs are available at checkout.
How to Replace Rear Struts 1995-99 Chevy Cavalier
Created on:
Tools used
13mm Socket
Socket Extensions
Pry Bar
Jack Stands
18mm Socket
19mm Socket
10mm Socket
Ratchet
Floor Jack
1. Remove the top of the strut
Pop the trunk and secure it.
Pull away the carpet
Use your 13 mm socket and ratchet and some penetrating oil to remove the three bolts securing the top of the strut.
2. Remove the wheel
Loosen the lug nuts
Raise and secure the vehicle
Remove the lug nuts and wheel.
3. Remove the bottom of the shock
Unbolt the bottom bolt securing the shock.
Use a breaker bar and an 18 mm socket and some penetrating oil.
You might need a hammer to work the bolts out once you have removed the nuts.
Use a pry bar to pry the spindle free from the strut
4. Install the new strut
Work the strut into place and bolt in the top 10 mm bolts
Torque the three 13 mm nuts to 35 ft lbs
Bolt in the bottom nut and 18 mm bolt and torque to 85 ft lbs.
5. Replace the wheel
Put the wheel back on and hand tighten the lug nuts
Lower the vehicle and torque the lug nuts to 100 ft lbs
Brought to you by www.1AAuto.com. Your source for quality replacement parts and the best service on the internet. Hi, I'm Don from 1AAuto. I hope this How to Video helps you out, and the next time you need a part for your vehicle, this of 1AAuto.com. Thanks.
In this video, we're going to show you how to replace a rear strut on a 2007 Chevy Cavalier. The same procedure from the left side to the right side. As well as many of the model years of the Chevy Cavalier. In order to do this repair, you're going to need a Jack and Jack Stands 19,18,13, and 10 mm sockets, socket wrench, and an extension, and a long screwdriver or pry bar.
Pop your trunk and we're going to do the right side in this video. Pull down the carpet right below the trunk hinge there, and you're going to find a 13 mm nut on a post. We're going to go ahead and remove that nut. I'm going to use a 13 mm socket and socket wrench to go ahead and do this. I'm going to fast forward as I take that nut off. You want to remove the hubcap with a 19 mm socket. If you don't have air tools, loosen the lug nuts before you raise the vehicle. Once you have the lug nuts loose, raise and support the vehicle and remove the wheel and tire. The wheel off, you'll see on the back side there the lower part of the strut. There's an 18 mm bolt that we're going to need to take out. We're going to go ahead and spray it down with some penetrating oil. Make the job a little easier for us.
I'm using an 18 mm socket on a socket wrench, and I'm going to use a pipe to go over the handle of the socket wrench. Give me a little bit more leverage to break that free. Once I've got it free, I'll take the pipe off to be able to swing the wrench a little bit easier. I'm going to go ahead and fast forward as I take that bolt out. Up inside the wheel well on top of the strut assembly, you're going to find two 10 mm bolts. We're going to need to take those out with a 10 mm socket, socket wrench, and extension. I'm going to go ahead and fast forward as I do that. Take that last bolt out. There you go. Let it drop. Apply a little pressure to the break drum there and pull the strut assembly out. Here's a side by side of the old part and the new part from 1AAuto. An exact fit replacement part.
Going back in is a reversal of the process of taking it out. We're going to apply a little downward pressure on that suspension there. Feed the single post that had the 13 mm nut in the truck compartment up through its hole. Then start threading on your 10 mm bolts that go in through there. Get those tightened up. We need to align the bottom of the strut so it fits into the suspension. I'm using a long flatted screwdriver just too kind of pry it so it gets in there straight. Once that's done, we can go ahead and put that 18 mm bolt back through. Use your 18 mm socket, socket wrench and tighten that back up. Torque the 18 mm bolts about 85 ft.-lbs. Back inside the trunk, install that 13 mm nut on top of the post on the top of the strut assembly. I'll go ahead and fast forward as I do that. Reinstall your wheel and tighten down your five lug nuts. I'll fast forward as I do that. Now, go ahead and torque the five lug nuts to 100 ft.-lbs. in a star pattern. Then, reinstall your hubcap by aligning the hole in it for the valve stem on your tire. Then, tighten them up by hand with your 19 mm socket.
We hope this helps you out. Brought to you by www.1AAuto.com. Your source for quality replacement parts and the best service on the internet. Please feel free to call us toll free 888-844-3393. We're the company that's good for you on the internet and in person.
SCA56937
In Stock
Product Reviews
Loading reviews
4.82/ 5.011
11 reviews
5 Stars
4 Stars
3 Stars
2 Stars
1 Star
10
0
1
0
0
Good struts
Joe
October 17, 2015
I put these struts in for my 1997 sunfire. Pretty easy to install with handtools. Prepare to curse at the bottom bolt though. Overall, it rides smoother and is alot better on bumps.
good struts
Charles
November 20, 2015
Just got these in today, easy to install and for that bottom bolt that you curse just heat it with a torch for about 30 seconds and it will spin right off with your air impact tool. Much smoother ride.
quick ship.
Fantastic
A
July 24, 2018
Great product, Great website, always get what I order and fast!! Without a doubt top notch!
Wow is all i can say!
N
August 20, 2018
I bought these shocks because the ones on my car were totally broken. Having never attempted doing this job in my life I decided that it was time I did this myself and the fact I couldn't afford to pay anyone to do it. I watched the video on 1a and did the job flawlessly. Thanks 1a!
Great Product
D
January 10, 2019
I was searching for a great price for struts on my car and while watching a youtube video on how to install them I followed the link for 1a auto and they had the best prices. Othet shops wanted $750-$800 to install a set of struts. I was able to get them installed for half that price thanks to 1a auto.
Perfect fit.
C
June 13, 2019
Easy install, car rides much smoother.
Good parts at a good price
B
May 6, 2020
The parts were good quality and they were a good price
Larry
June 26, 2021
Well they were easy to install but I have a loud popping sound when I go over any little bump don't know what it is but can't be good. Any suggestions would be great
Clunk begone
Andrew
July 24, 2021
Clunk is gone! Good value would buy again
Very pleased customer
Matt
November 29, 2021
Superior ride and stability great buy
Lynn
August 24, 2022
Thank you for promptness in delivery of my rear shock and spring assembly. A perfect fit. Lynn-Illinois
Customer Q&A
how do I know that the strut is bad when it has a spring as well as a shock? I hear clunking but nothing else in the vicinity seems to be worn or damaged.May 20, 2016
D A
10
It may be a sway bar end link or control arm bushing also. Struts can leak or get weak over time. Your upper bearing plate in the strut may be bad also
May 20, 2016
Brian F
10
I also heard the clunking when driving the car and when examining the strut it seemed fine, but once I replaced the struts (from 1A Auto - great price) the clunking went away and the car rides like new. I wasn't sure the clunking would go away if I put new struts on (easier to install than expected) and was very surprised the sound disappeared.
May 20, 2016
Raymond K
10
Trust me, you'll know. Your vehicle can't handle any bumps and it just deeps like there's no bounce to adjust. You can tell by the sounds also. If it's been a few years you might as well just replace them all also. I replaced mine and I've never been happier. Also, easy installation
May 20, 2016
Jarryd J
10
usually if the strut is bad the car will bounce after hitting bumps in the road. some people refer to this as feeling the car "swimming" after hitting bumps. another good way to check is to start pushing down on the car on the trunk. get it bouncing by continually pushing down on it. then stop and see if the car continues to bounce. good struts will stop almost immediatley
May 20, 2016
Matt C
10
The 'shock' will apparently LEAK fluid/oil ... AND for me, my whole left rear end sat lower AND you knew it when you hit any bump, speed hump, etc -- CLONK!! to the bottom! ... AND your "handling" is absolutely FRIGHTENING when it's bad. Totally different handling when you get your new one -- way MORE SAFE! -- Good luck :)
May 20, 2016
Brandon K
10
The price from 1A Auto for the strut and spring assembly is so affordable, that it doesn't make much sense to go crazy trying to figure out, whether it is the spring or the strut that is bad . I replaced mine about four months ago and I have 0 complaints. It is also a much easier job to replace the whole spring and strut assembly, rather than having to decompress the spring to separate them.
May 21, 2016
Thomas V
10
I would push down on the side of the car you want to test. Push a few times and let go and the car shouldnt keep bouncing. If it does the strut is worn out and needs replacement.
May 21, 2016
Judy N
10
Look under the car for signs of fluid loss around the shock. Typically the area will be cacked with dirt and/or grease. Also look for excessive bouncing while going over bumps.
January 10, 2019
D C
Customer service
877-844-3393
Monday - Friday 8:00am - 9:30pm ET Saturday - Sunday 8:00am - 4:30pm ET
Chevrolet is a registered trademark of General Motors Company. 1A Auto is not affiliated with or sponsored by Chevrolet or General Motors Company.See all trademarks.
Enter Vehicle Year Make Model
Specify your vehicle's year, make and model to guarantee fit.
Year
Make
Model
Options
Drivetrain
This part doesn’t fit a . Select from parts that fit.