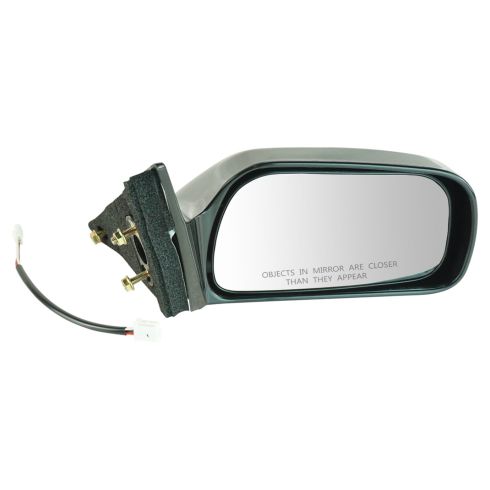
1AMRE00332-1997-01 Toyota Camry Passenger Side Mirror TRQ MRA05204

Replaces
1999 Toyota Camry Japan Built Models (1st VIN Digit J) Passenger Side Power Paint to Match Mirror TRQ MRA05204

Product Reviews
Loading reviews
4.85/ 5.0
34
34 reviews
Amazing!!!
March 25, 2017
I am in love with this website. I happened to order the wrong part. Got in touch with them..was refunded for my old part. I ordered the new part and got it here fast! Not only that, I got an email and in it was a HOW-TO video on how to put that specific part on my exact model. yay! Im not good with anything Car-wise but I didnt have to ask anyone to put the part. I did it myself. I dont know of any website that does this!! I am just plain Excited!! Thank you 1A Auto!
Perfect fit, good quality
July 8, 2017
Good quality part & fit for my vehicle. The price was excellent
A1 Auto Toyota Replacement Parts
July 10, 2017
I recently purchased a replacement Mirror and door handles for my daughters 2001 Camry. and also for one of my company trucks a 2000 Tundra.
Their site was easy to navigate & offered a fair number of alternative choices and combinations as very good prices!
My wait for the parts was short & the quality of the parts was more than satisfactory.
Will use them again ... oh & their online how-to videos were clear and accurate.
Side view mirror
August 2, 2017
Hi, I got the side view mirror I ordered in very quick time. It is exactly like the original and of good quality. It installed right over he old bolt holes with no problems. Its really great to have something the fits for a change. The price was amazing, I thought maybe you were giving these things away. Your website is very easy to use.
Thanks for your great service.
Bob Irving
Mirror Mirror on my car
September 24, 2017
Went well thanks to Josh in customer service, thanks again
side mirror
October 17, 2017
Works perfectly and looks like a new car...many thanks,
Easy intal and fit
November 27, 2017
Perfect fit at a good price. Installation video made it easy.
It fits and it works!
February 10, 2018
This replacement mirror fit well, lining up with original bolt holes perfectly. The only negative thing I could say is that the supplied electrical wiring connector did not match the OEM connector. So I had to cut off both the original wiring connector and the newly supplied wiring connector and splice the wiring, using 3 butt connectors. This was a minor inconvenience and the mirror moves as intended.
2003 Camry mirror
February 20, 2018
Fast shipping and in great condition. Perfect match to original and very easy to install after watching YouTube video. Thanks, will definitely recommend you.
Rear view mirror
February 26, 2018
I am very pleased with my purchase. It arrived in perfect condition and very promptly. Thanks again!!
Works like original
May 22, 2018
Easy video showed exactly how to replace. Everything works flawlessly. Car has 220,000 miles on it and this mirror is the "freshest" part of it.
Great Service, Quality Parts
June 11, 2018
Fast shipping and excellent customer service. Somehow my package got lost in the shuffle with the post office, I called customer service and they were very kind. My part arrived well packaged and looks great on my car. Would recommend and have ordered from this company again.
1997 External Mirror Replacement
June 23, 2018
Both driver and passenger side. Exact fit. Video very helpful. Ordering pair reasonable price.
perfect replacement
October 15, 2018
super easy to install and a perfect replacement.
customer service was so very helpful and nice.
Outside mirror on 98 Camry
December 24, 2018
The part came quickly and it fit perfectly just like the factory part originally fit. Highly recommend this organization for your parts needs.
Almost perfect
January 9, 2019
Very pleased with the purchase, the online videos to help install are great, only downside was the connector on the mirror did not match. It's understandable this happens, so I wasn't mad - but the 1A Auto connector had wire colors white, red, black and the Toyota had colors of green, yellow, blue (I might be off on actual colors - but there were no matches). A simply cheat sheet of which wires could be what colors would have be awesome. The power mirror works, but not with the proper button.
camry passenger side mirror
June 15, 2019
the order was received promptly. It will be installed shortly.
very pleased. reasonably priced.
Sufficient Replacement
July 31, 2019
Needed a new passenger side mirror and found one. It didn't take too long to ship and it was easy enough to put on.
Good items.
February 14, 2020
Items fit well to the 1999 Toyota,Camry,Le and worked great. The how to video instruction is very helpful. Good Shipping. Happy and highly recommend! Thanks!
Mirror Reflects How Customers are Treated at 1AAuto!
February 18, 2020
I had to replace a passenger side mirror that someone knocked off my old 2000 Toyota Camry. When I got the replacement mirror, the screws did not line up with the original placement and would not fit on the car. I called 1AAuto and they said not to worry, I didn't have to pay for or return the mirror they sent, and to donate it to some organization. So all I lost was a little time and inconvenience. I finally went to a junkyard and found a replacement. I like how this company takes care of its customers and think you will have better luck than I did, probably because most of us aren't driving 20 year old cars!
Toyota Camry Passenger Side Mirror
April 19, 2020
The mirror was a perfect fit. The video on 1A Auto showed us exactly how to install the mirror and took away any concerns. Ive bought several items from 1A Auto and Ive always been satisfied.
Passenger side view mirror easy install
January 4, 2021
The quality of this product is excellent. Fits exact & so easy to install. I watched a you tube video & everything was exactly as I watched. Price was great too.
Great part arrived fast and packaged well
January 7, 2021
Part exactly as advertised arrived fast package professionally part in great shape
Excellent quality, great price
March 20, 2021
The quality of the mirror is fantastic. I found a similar mirror on another site for about $15 less. However, the mirror was built extremely cheap. The padding the cushions the mirror on this mirror is very thick and should stop any wind noise from creeping through the wire hole. The installation instructions were simple and straightforward. As a DIYer, I will be coming back from the great quality and instructional resources.
Right Frount Mirror
June 5, 2021
Grate price, Good service, being fitted now
August 29, 2021
wonderful fit
September 18, 2021
Perfect
1999 Toyota Camry Passenger Side Mirror worked like a charm!
October 12, 2021
Worked perfectly! The hardest part was opening the door panel and connecting the wire, but the 1A Auto video was super helpful.
My first time doing a repair like this on my car and I was done in a couple of hours - saving hundreds of dollars!
Exactly what I needed
February 26, 2022
Arrived promptly, Fit well, easy to install. No complaints.
April 24, 2022
Worked great easy to install parts excellent I would recommend this product
June 17, 2022
excellent product
Das Mirror ist zehr gut.
September 12, 2022
Great. (Thought I already did this...)
November 9, 2022
They look good. I thought I was getting mirrors that turn in.
August 21, 2024
It was just what I needed. I could have gone to the junk yard, but for the same price buying the part new guaranteed it would work properly or could be replaced if it didn't. Love the video on how to install it. It was a simple process that only cost me maybe 20 min of time to do.
Customer Q&A
what color is the mirror?
January 11, 2016
10
Black
January 11, 2016
LUIS D
10
Black, you can paint it!
January 11, 2016
Vincent T
10
Black
January 11, 2016
Patricia K
10
Black
January 11, 2016
Jonathan E
10
Hi Francisco! It's black in color. Make sure you get double check where your Camry was made (Japan or USA) by checking the VIN# on your vehicle. Don't get over eager when installing. Check your wiring harness of your original mirror. If you cannot easily see where it disconnects, do not make the same mistake as me and cut it. Remove the door cards and inspect where the wires disconnect (as mine was somehow inside the door card, even though it was apparently supposed to be disconnected at the base of the original mirror). In that case, order the mirror with the long wiring...it disconnects from the base of the new mirror, and if you don't need it, just discard, but 1A does not send the cord by itself..you'll have to buy new twice. Save yourself the headache. 1A is a very good outfit! Good luck!
January 11, 2016
Michael M
10
Black base but you can have it painted by a local body shop or paint it yourself.
January 11, 2016
Brian F
10
Black plastic... Ready to prime and paint
January 11, 2016
Ken V
10
Black
January 12, 2016
Pedro N
10
Black but it can be painted
March 25, 2017
Alfa O
10
I ordered a black mirror even though the original broken one and other mirror is silver. It's easier to paint the original mirror black to match the new black one than the other way around :-)
July 10, 2017
Bryan K
10
Black.
February 20, 2018
Andrew F
10
Black
January 5, 2021
N E
does mirror come in grey?
July 17, 2018
10
Our came in black.
July 17, 2018
James F
10
This mirror only comes in black.
July 17, 2018
Emma F
10
I could not find it in grey.
We went with a black one and planned to paint the remaining grey one black to match because black is an easier color to match than grey. By the way, the mirror fit and works perfectly.
July 18, 2018
Bryan K
Toyota is a registered trademark of Toyota Motor Corporation. 1A Auto is not affiliated with or sponsored by Toyota or Toyota Motor Corporation.
See all trademarks.


