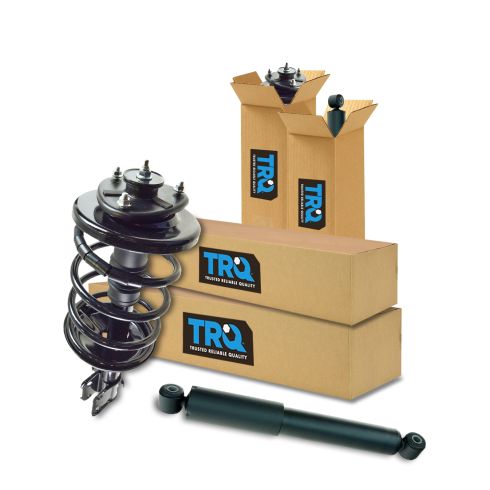
Kit Includes: (2) Front Strut & Spring Assemblies (2) Rear Shock Absorbers
Quantity: 4 Piece
Specification
Location
Front & Rear
TRQ fully loaded shocks and struts are manufactured using premium raw materials and calibrated to restore original ride comfort. TRQ shocks are fully loaded featuring a pre-loaded bearing plate, upper and lower spring isolator, upper spring seat, coil spring, boot kit, and premium strut. TRQ recommends replacing your shocks or struts in pairs to ensure even wear of components and improved ride comfort. All products are fit and road-tested in our Massachusetts R&D facility to ensure we deliver on our promise of Trusted Reliable Quality.
Product Features
Loaded Struts: Pre-assembled application specific design
Application Specific Design: No modifications necessary
Matched Pair: Improved comfort and extended service life
Restored Performance: Reduced body sway and vibration
Our direct fit gas-charged shock absorbers help restore your vehicle's handling and ride quality to just like new.
Replacing struts used to require specialized tools to compress, remove, and transfer the old spring and mount. Our Pre-assembled, complete strut & spring assemblies come with all new parts and make the job much quicker and easier for the do-it-yourself mechanic.
Strut & spring assembly contains:
Upper Strut Mount
Strut Bearing
Coil Spring
Boot & Bumper Kit
Gas-charged Strut
Item Condition:New
Attention California Customers:
WARNING: This product can expose you to chemicals including Chromium (Hexavalent Compounds), which is known to the State of California to cause cancer, and birth defects or other reproductive harm. For more information, go to www.P65Warnings.ca.gov
Lifetime Warranty
This item is backed by our limited lifetime warranty. In the event that this item should fail due to manufacturing defects during intended use, we will replace the part free of charge. This warranty covers the cost of the part only.
FREE Shipping is standard on orders shipped to the lower 48 States (Contiguous United States). Standard shipping charges apply to Hawaii and Alaska.
Shipping is not available to a P.O. Box, APO/FPO/DPO addresses, US Territories, or Canada for this item.
Expedited is available on checkout to the United States, excluding Alaska, Hawaii.
Final shipping costs are available at checkout.
How to Replace Shock Absorber 1999-2004 Honda Odyssey
How to Replace Strut Spring Assembly 1999-2004 Honda Odyssey
How to Replace Shock Absorber 1999-2004 Honda Odyssey
Created on: 2013-01-31
Tools used
Flat Blade Screwdriver
Rust Penetrant
17mm Socket
Jack Stands
19mm Socket
Lug Wrench
Ratchet
Floor Jack
1/2 Inch Breaker Bar
1. Remove the wheel
Loosen the lug nuts with a lug wrench
Raise and secure the vehicle
Remove the lug nuts and wheel.
2. Remove and replace the shocks
Apply penetrating oil to the top and bottom bolts
Use your 17 mm socket and ratchet to remove the shock absorbers.
Reverse the procedure to install them, torque the 17 mm bolts 65-70 ft lbs
3. Replace the wheel
Put the wheel on and hand tighten the lug nuts
Lower the vehicle and using a star pattern, torque the lug nuts to 90-100
Brought to you by 1AAuto.com. Your source for quality replacement parts and the best service on the internet. Hi, I'm Mike from 1A Auto Parts. I hope this how to video helps you out and next time you need parts for your vehicle, think of 1aauto.com. Thanks.
In this video, we're going to show you how to replace the rear shocks on this 2003 Honda Odyssey; same for any 1999-2004. We show you the right hand or passenger side rear and the driver side or left hand rear is the same procedure. Tools you'll need are jack and jack stands to raise and support the car. You will also need a 17-mm socket and ratchet, as well as either a 19-mm socket or your lug wrench.
First, raise and support the vehicle then use a 19-mm socket and breaker bar. If you're just using hand tools, actually, you'll want to loosen the lug nuts when the wheel is on the ground and the vehicle is in park. Loosen the lug nuts first, then raise and support the vehicle. Remove the five lug nuts and remove the rear wheel. So you see my wrench is on the top of the shock absorber. Just spray some Anti-Seize or penetrating oil in there, and then do the same thing down here for the bottom. All right. Speed up here as we loosen that bolt. Don't take it out all the way yet. You can see it requires some force, but you should be able to do it with a regular ratchet handle. Again, fast forward as we loosen, and then we will remove this bolt.
Now back up to the top. Remove the top bolt the rest of the way. And now reverse the procedure, re-install. Use a hammer. Tap the bottom of the new shock onto the shock mount on the bottom. Now, use a jack to lift the suspension just a little bit to line up the top mounting hole and once you get it lined up, then slide the bolt in and start tightening it up. We'll fast forward. You may have to tap lightly on the bolt to get it going and then push firmly on it to start it and then tighten it up nice and tight. Then thread the bottom nut on and tighten that up as well. Both these should be around 65 to 70 foot pounds.
Now I'm going to fast forward to put the wheel back in place. Start all five lug nuts on by hand first and then just kind of preliminarily tighten them and then lower your vehicle to the ground. Now set your torque wrench to 90 to 100 foot lbs and torque the wheel using a star pattern. Whenever you have the brakes apart, just make sure that you pump the pedal a few times. Make sure it's nice and firm. And then before you road test your vehicle, just do test stops from 5 and 10 miles an hour just to make sure the brakes are working properly.
We hope this helps you out. Brought to you by www.1AAuto.com. Your source for quality replacement parts and the best service on the internet. Please feel free to call us toll free 888-844-3393. We're the company that's here for you on the internet and in person.
Tools used
20mm Socket
21mm Socket
Flat Blade Screwdriver
18mm Wrench
Jack Stands
18mm Socket
19mm Socket
Ratchet
Floor Jack
1/2 Inch Breaker Bar
22mm Socket
1. Remove the wheel
Loosen the lug nuts with a lug wrench
Raise and secure the vehicle
Remove the lug nuts and wheel.
2. Remove the bottom of the strut
Apply penetrating oil to the nuts on the bottom of the strut.
Use a breaker bar and penetrating oil to unbolt the 18 mm strut bolts on the bottom
Unclip the ABS sensor wire.
3. Remove the top of the strut
Pop the hood and secure it.
Use a flat blade screwdriver to pry up the little covers to access the 14 mm nuts.
Apply penetrating oil to the 14 mm nuts at the top of the strut.
Hold onto the strut as you remove it.
4. Install the new strut
Bolt the strut back in, torquing your 14 mm bolts to 30 ft lbs
Have someone help you guide the top of the strut into place and get the nuts started under the cover.
Insert your spindle to the lower end of the strut and raise your control arm until the bolt holes line up.
Torque the bottom 18 mm nut to 85 ft lbs
Make sure you don’t pinch your ABS wire and its placed correctly.
5. Replace the wheel
Put the wheel on and hand tighten the lug nuts.
Lower the vehicle and torque the lug nuts to 100 ft lbs using a star pattern.
Brought to you by 1AAuto.com. Your source for quality replacement parts and the best service on the internet. Hi, I'm Mike from 1A Auto. I hope this how to video helps you out and next time you need parts for your vehicle, think of 1AAuto.com. Thanks.
In this video we're going to show you how to replace the front strut on this 2003 Honda Odyssey. Pretty much the same as any '99-'03. I'm sorry, '99-'04. We show you the passenger side front strut placement. Driver's side is the same. We do always recommend that you replace your struts in pairs, as well as you will need to take your vehicle for an alignment after this repair. You'll need a new set of struts from 1AAuto.com. You'll need a jack and jack stands, 8-22mm sockets. You'll need ratchets for those sockets with a breaker bar or a pipe for some extra leverage for some of the big ones, an 18mm wrench, some penetrating oil, and a flat blade screwdriver.
As you can see here, I've got the vehicle raised up and I'm removing the lug nuts with my impact wrench. If you don't have an impact wrench, you want to start with the vehicle on the ground, loosen the lug nuts with a 19mm socket and breaker bar or your tire iron. Then raise and support the vehicle and remove the lug nuts and wheel the rest of the way. You can see here I'm kicking the tire. That's basically just a way if your tire or wheel is a little bit frozen on because of the aluminum, just give it some good kicks and break it loose. Then you can remove the tire. We're going to start by putting some lubricant on the ends of the bolts so the nuts actually come off on the front and the back side. We've got an 18mm wrench and an 18mm socket for the top of the end link. The 18mm wrench goes on the back. Socket goes on the front. Then you just have to use your muscle to tear it apart. I'm just going to speed up here as we remove that nut the rest of the way. Now we can pull the end link out. There are a couple bolts on top that hold the break hose and the ABS sensor. Spray them down with some penetrating oil, as well as the two large bolts that hold the strut. The 10mm socket and ratchet to remove the upper, or the break hose. Then 8mm socket and ratchet or a wrench to remove the ABS sensor wire.
Next we're going to remove these two 22mm nuts so we can pull the bolts out of the strut and remove the bottom half of the strut. Most people have ratchets. If you need a little extra leverage, you can always put a pipe on the end of it and get yourself a whole lot more force on it. As you can see, it works. One step better than the ratchet would be a breaker bar. It is obviously a little longer so you don't need to add pipe to it usually. As you can see, it normally works too. Just see us cheat here as we get out the impact wrench and pull those nuts off the rest of the way. To get these two bolts out, you can see that they're already loose so we really just have to tap them out. Just going to fast forward here. You can just use your wrench, turn the bolts counterclockwise and pull on them and they'll come out, or just use some kind of punch or tool to knock them out from the other side.
Now you just basically need to wiggle them apart and then the bottom of the strut is detected. On the top you can see that there is three covers, and that's how you access the top bolts for the strut. First we'll pop the covers off. The three bolts on the top of the strut are 14mm so we'll drop a 14mm socket down there and... Fast forward as Jeremy removes two of the bolts. We're going to leave one on for right now. If you do drop one down in there you can actually just take that plastic cover, the cover that has the three holes in it, pull up on it, and you'll see me do it later, pull up on it and a couple clips come loose and you can reach underneath there and grab the nuts if you drop them. Now we'll loosen up the last nut and you see the strut start to drop down. As you can see, the new one looks a lot like the original one, except obviously brand new. It will look and fit and bolt in just like the original one did. You want to put the top in first. Make sure you put the ABS sensor wire in the right spot. That's going to go under the strut. While one person is lifting up, you can actually lift up this roof here. Grab your new bolts. Help guide it up in there. Turn it a little bit the other way. Guide it up in, and start your bolts.
I'm just going to fast forward as Jeremy reaches under that cover, puts on the rest of the bolts and then kind of preliminarily tightens them. If you didn't have a helper, what you could do from the last scene is put one of the lower bolts into the lower strut mount area and then just use a jack to jack up the suspension to help you guide the strut into place. Now we're going to torque these top three strut bolts to about 34 pounds. I'm just going to fast forward as we, as Jeremy tightens up the last two bolts, then puts that plastic cover back down in place. Make sure all the clips are secure, and then put the three little plastic covers that go over top of the bolt holes into place. We can basically align this by sticking something through the bolt holes. Now make sure the ABS wire is in the right spot and you should be able to get the knuckle into the middle of the strut. Fast forward here as Jeremy pushes those bolts through, puts the nuts on and just kind of preliminarily tightens them up.
You'll want to torque these bolts to between 115-120 pounds. Speed it up here as Jeremy bolts on some of the final components, the 8 and 10mm bolts that hold the ABS sensor and the break line, as well as a little bit later you'll see him put the strut, the stabilizer link strut back on. Obviously we're showing you the passenger side. You always want to replace these struts in pairs and as well have your vehicle aligned after you do this type of repair. Put your wheel back on and start all your lug nuts just by hand first, and then while the vehicle is still in the air just kind of preliminarily tighten them with your socket and ratchet or as I'm doing with my impact wrench. Again, use your torque wrench and you want to tighten your lug nuts between 95 and 100 foot pounds. Use a star pattern as you tighten.
We hope this helps you out. Brought to you by www.1AAuto.com, your source for quality replacement parts and the best service on the internet. Please feel free to call us toll free 888-844-3393. We're the company that's here for you on the internet and in person.
SKA60913
In Stock
Product Reviews
Loading reviews
4.88/ 5.016
16 reviews
5 Stars
4 Stars
3 Stars
2 Stars
1 Star
15
0
1
0
0
Great fit
G
March 19, 2017
Took old ones off put in new with no problems i love 1a never disappointed when buying from 1a
Parts ordered
Dennis
June 14, 2017
Shocks and strut are working great
The headlight casing there's some missing rubber seal on the corner side of signal light parts I was planning to return it but needed the headlight have to use it
DIY STRUTS AND SHOCKS INSTALLATION
Orlando
September 20, 2017
Thanks to your detailed installation videos, I was able to perform a complete front struts an rear shocks installation in less than 4 hours. It was on point. I was able to save over $1000. Thank you
Honda Odyssey Shocks and Strut
R
December 11, 2017
I have a 2004 Honda Odyssey. This was my first DIY for shocks and struts on any vehicle. The videos were excellent and made the job very easy. I was able to do the installation by myself in 3 to 4 hours. All parts fit well, I did needed to slightly bend a brake line bracket on one of the Struts (may have gotten bent in shipping)
Great Price, Service and Vidros My Go To Shop
B
January 12, 2018
Changed my own shocks and struts on my wifes Honda minivan with the help of 1aauto you tube video
And saved hundreds with there parts package
And saved $300 in labor by doing it myself with the confidence of seeing it done with there instructional video
Ordered online and called in to confirm and in less than a week UPS dropped off the parts at my door
My first time using 1aauto but definitely wont be the last
Worked as described
Matt
March 14, 2018
perfect fit - videos from 1A Auto were spot on...only thing i had to do that was a little different...i had to remove the Driver side windshield wiper arm...to get the plastic piece off covering the nuts on driver side ...but it was quick and easy....i did it with one person but having two would make it much easier..for the front..backs are easy
Also me
D
March 18, 2018
Easy to install and the van rides so much smoother not bad pricing neither
Great deal
A
September 26, 2018
Very well recommend it to everybody that has and owned a vehicle. What else can you ask warranty for life when buying from them
honda odyssey Struts
D
November 1, 2018
I received the wrong struts but I was given credit for them and was told to donate them to one of our local auto. trade schools. I ended having to buy the correct struts locally since I already had one of them off. Even though I got the wrong parts their customer service was top knotch.
Cant wait to install
Timothy
December 14, 2018
Fastest delivery ever as standard shipping 2 days. Bought other parts just waiting to install now
Surprised
James
March 27, 2019
I was shocked about the parts. Better than I expected.
Front and Rear Struts and Shocks
K
June 12, 2019
Components are working well. Vehicle is driving a lot better. The ride quality has been improved dramatically.
2003 Honda Odyssey Complete Front & Rear struts & shocks
J
February 17, 2020
Perfect fit and van rides solid.
Great value.
Donald
August 8, 2022
Parts were exact match to original equipment and installed without complications. My Honda feels like a new ride with the new struts and shocks. Plus, I got a very good price on the parts and fast delivery.
Works great for now, time will tell
Sy
May 21, 2023
Works great for now, time will tell. These units are *heavy* so get some help when you install or just remove the entire cowl for ease of access if you're working alone. Or get straps and an extra jack to help.
2003 Honda Odessey
Julia
August 3, 2023
I Droped off the van with the parts to my mechanic. All the parts fit without any issues and functioning as they should.
Customer Q&A
Customer service
877-844-3393
Monday - Friday 8:00am - 9:30pm ET Saturday - Sunday 8:00am - 4:30pm ET
Honda is a registered trademark of Honda Motor Co., Ltd. 1A Auto is not affiliated with or sponsored by Honda or Honda Motor Co., Ltd.See all trademarks.
Enter Vehicle Year Make Model
Specify your vehicle's year, make and model to guarantee fit.
Year
Make
Model
Options
Drivetrain
This part doesn’t fit a . Select from parts that fit.