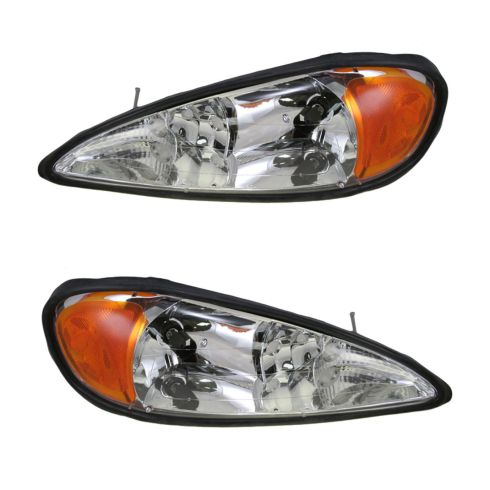
Kit Includes: (1) Passenger Side Headlight Assembly (1) Driver Side Headlight Assembly
Quantity: 2 Piece
Specification
Side Location
Driver & Passenger Side
Product Features
Direct Fit - No vehicle or wiring modification necessary
DOT, SAE, and FMVSS Compliant - Meets on-road use regulations
Matching set for a restored look
Complete Repair in One Purchase - Stop searching for parts individually and complete your repair with a customized kit or set from DIY Solutions.
High-Quality Parts from Trusted Brands - DIY Solutions' kits and sets are selected from the best automotive brands and include hard-to-find and even obsolete parts you may need for your vehicle.
Guaranteed Fit - DIY Solutions ensures its selected parts are quality-tested to guarantee fit and function.
Assemblies may include halogen or incandescent test bulbs that should be replaced before installation.
Item Condition:New
Attention California Customers:
WARNING: This product can expose you to chemicals including Chromium (Hexavalent Compounds), which is known to the State of California to cause cancer, and birth defects or other reproductive harm. For more information, go to www.P65Warnings.ca.gov
Lifetime Warranty
This item is backed by our limited lifetime warranty. In the event that this item should fail due to manufacturing defects during intended use, we will replace the part free of charge. This warranty covers the cost of the part only.
FREE Shipping is standard on orders shipped to the lower 48 States (Contiguous United States). Standard shipping charges apply to Hawaii and Alaska.
Shipping is not available to a P.O. Box, APO/FPO/DPO addresses, US Territories, or Canada for this item.
Expedited is available on checkout to the United States, excluding Alaska, Hawaii.
Final shipping costs are available at checkout.
How to Replace Headlight 1999-2005 Pontiac Grand Am
Created on:
Tools used
Flat Blade Screwdriver
Phillips Head Screwdriver
Slip-Joint Pliers
1. Remove headlight
Pull up the two plastic clips on either side of the headlight.
Lift up the plastic cover.
Use your pliers to pull up on the two tabs.
Pull the headlight forward and out.
Disconnect the bulbs and wiring.
2. Aim the lights
Measure the adjustor bolts on the old light and adjust the new ones to match.
Transfer the old wiring clip onto the new light.
3. Install headlight
Note the peg holes in the car that line up with the adjustor pegs.
Plug in all the wiring and bulbs.
Line everything up and put the light in.
Replace the tabs and clip the cover back on.
Brought to you by www.1AAuto.com-- your source for quality replacement parts and the best service on the Internet.
Hi, I'm Mike Green. I'm one of the owners of 1A auto. I want to help you save time and money repairing and maintaining your vehicle. I'm going to use my 20+ years' experience restoring and repairing cars and trucks like this to show you the correct way to install parts from 1AAuto.com. The right parts installed correctly, that's going to save you time and money. Thank you and enjoy the video.
In this video we'll be replacing a headlight on this '99 Pontiac Grand Am, the same as any '99 . '06 Grand Am. It is a fairly simple procedure. The tools you'll need are a flat blade screwdriver, pliers, and a Phillips screwdriver. Now maybe you want to replace your headlight because it got broken or damaged, or maybe you want to give your Grand Am a little facelift. You can see what I mean by there's kind of a half and half shot with a new headlight on the driver's side. As we pan over and see the whole thing you can see that replacing your headlights can give a pretty good facelift to your car that makes the front of this car look just about new actually.
Removal of the headlight is actually pretty easy. There are clips on this plastic trim piece here. You want to pull up the middle of the clip and then you can pull the clip itself out. This clip here you want to undo as well. Move this tray here. This comes out from under there. Underneath here there are two tabs; one here and one right down here. I'm going to reach in with my pliers and pull up on those tabs. You can kind of shake them back and forth a little bit to get them. You can pull them back some too. They have a little walking tooth here so you pull back on them and then up. The inner one can come out. The outer one just stays in there. It could take some force to pull your light free. Make sure this outer one is up. We should be able to see here- Then you can disconnect your signal. You just pull on the headlight and twist here. You want to disconnect this clip. I just get my screwdriver in there like that and pull it out, and there's your headlight.
What we want to do is kind of preliminarily aim it. What we'll do is we'll measure each adjuster. From there to there I got just about 5/8 of an inch and I have adjusted this one to be the same. You got to make sure you measure from the same point; 5/8 of an inch and 5/8 of an inch. Down here you can see I've got about an inch and on my new one I've adjusted it out to about an inch. Then the same thing with this one here, I measured it out.
These are the adjusters and you just use a screwdriver to turn them in and out. It is the same here. Move the screwdriver in and out. This one here- imagine this is on the car. This is how you would adjust it. You go right underneath the headlight and then if you want to move it you basically hold on to this plastic piece and then turn your screwdriver to either make it shorter or smaller.
Once you have had that preliminary adjusted the other thing I like to do is take the old clip off, and you should just be able to use a pair of pliers. Then put it into the new one. It's always good to use those clips just because they keep the wiring harness where they wanted it in the factory. The last piece is your new headlight. You'll want to align these things up. This one you want the screws straight up, adjusting the screw pretty much straight up. Then on this you want this aligned pretty straight up.
We're getting ready to put the light in. Let's just take a look at all the square peg round holes. Here's your lower adjuster. You can see it's kind of a square block with two ridges. You can see right here that's where that actually goes. So it's made to line up in there. Same thing with this; this is your lower one. I got it upside down. It's round shaped with big long ridges. That's designed to go into this slot here. Then your upper one again is another block with the ridges on it. It goes up into this one. You can see they're all designed so that it can only go in a specific way. Basically, when you put the light up in there you're going to want to do the side first, get it in, and then do this side because you can reach in from the top and side and move these around just a little bit to get it in. That's where you want to make sure that you set it up pretty much like the light you took out so it will go in there easily.
Now we're going to put the light back in. I like to start by making sure this gasket didn't fall off. Put that in and lock it. I like to start from the inside out. Put that in and lock it. Connect the headlight. Then connect the parking light, side marker light I guess. Then I'm going to put the wiring harness into the little grommet we switched over. It's all set to go in. Let's start by getting this one in. You have to reach in there just a little bit to guide it. Before you push it too far, I'm just making sure that I get this gasket kind of right. Then I'm going to, with my thumb, just hold it so doesn't slide out of there. Now I can see all these from up here and making sure that they're going where I need them to go. That bottom one is in. My top one I can reach in here a little bit and it's in. Then again, just making sure this gasket is going where it should go.
Before I push too far I've got to lift up, up here, got a lift up on that to make sure that the light can go through. Now let this slide out, but it should go back in. It went back in pretty good. I'm going to put this in. It looks like I'm in down here. I've got that in. Then this one, I'm just going to push a little more. To make sure I'm just pushing in and jiggling the metal as well. It just went down in. You might need to grab on with your pliers and push down, but I managed to get it in. It's all locked.
Now to just finish up, tuck that down in. The smaller clip goes on. Push the pin down to lock it. Then the larger pin over here; push the pin down and lock it. Then test your headlights, make sure all of the signals and side markers work. Then you're all set. I hope this helps you out.
Brought to you by www.1AAuto.com-- your source for quality replacement parts and the best service on the Internet. Feel free to call us toll-free 888-844-3393. The company that's here for you on the Internet and in person.
Product Reviews
Loading reviews
4.52/ 5.023
23 reviews
5 Stars
4 Stars
3 Stars
2 Stars
1 Star
18
3
0
0
2
Angelo Anthony Gillono
June 10, 2012
Excellent fit and superior quality product. Price was right and I made a few dollars on the parts them selves. Good shipping.
Easy Replacement
Frank
February 20, 2017
The replacement headlight was purchased for my son's car. We had looked at other retailers and 1A Auto was by far the best price. I would have liked some installation documentation with the units. The adjustment blocks on the units were not the same as the original we removed, so we were not sure what the recommended set distances were. The headlight produces light that has a number of scalaps, which the original units didn't produce, but my son kind of likes that.
Great service, great products
Victoria
April 11, 2017
Was very pleased with all aspects of purchasing through your website. Thank you.!!
purchase of parts
Jimmy
May 11, 2017
I have purchased headlight replacements for (2 of my vehicles and have been quite satisfied with the product and service.
Great fit, poor beam
Todd
July 3, 2017
The fit was great and they looked good. The beam is bad. Sent pics to you last week and awaiting a response from your service/quality group.
Inexpensive and fast
P
September 3, 2017
Very good product at a reasonable price. The best thing is the parts were an exact fit. Had my new headlights within 3 days.
Perfect Fit - 2001 Pontiac Grand Am Headlight Pair
Steven
November 14, 2017
Arrived on time.
They came with plastic wrap to keep them clean during install. They look Great!!
Thanks,
Steven
nice
S
November 23, 2017
I was really happy with the headlights the only thing was a broken little plastic clip for ajustment that probally happened in shipping i just bused an old one off my old headlight
Headlight for Grand Am
S
December 26, 2017
Direct fit and the shipping was very fast I'm very pleased
Grand Am headlights
David
January 25, 2018
Fit , cost, appearance couldnt be better, and free shipping.
Bad quality
J
March 18, 2018
Upon receiving the package, i was hesitant to open the box after seeing "made in taiwan" stamped all over it. I proceeded to open them up and the headlights look really nice. The adjusters are a little cheap, but i gave them a shot. The headlights fit nice, and i then had to pull them back out and swap the adjusters out with my originals after trying to adjust them and only certain ones were working. Minor setback, no big deal. But then i turned the lights on that night... and these have a horrible projection pattern and I'm probably going to have to put my originals back in. The way the light reflects from inside the housing leaves a lot of dark spots and it is just overall horrible. If you don't plan on driving at night go ahead and buy these, they will at least make your car look better during the daytime
Headlights for Grand Am
K
April 1, 2018
The website was very easy to use. The product came wrapped very well and in excellent condition. Very fast service too. Ordered on a Sunday and received on a Wednesday with regular shipping. Will definitely use again.
Excellent fit and finish
D
August 20, 2018
These lights fit perfectly and really restored the front end. Nice bright lights, tight gaskets and easy installation!
Awesome lights
Jim
October 23, 2018
Wow awesome deal and amazing lights so glad I got them from here was my first purchase and so impressed!!
M
November 22, 2018
Just like the factory ones and pretty easy to install
Headlights
K
July 5, 2019
The headlights work perfect they fit good I will rebuy from A1 Auto
Always great service!
J
October 27, 2019
I have used 1A Auto for parts several times. Always fast deliveries and good quality parts. They are always packaged very well, and I have never recieved a damaged product! Keep up the good work! Two thumbs up!
great Service
R
May 13, 2020
Extremely pleased with service and quality of product
Easy replacement
Glen
September 13, 2020
the replacement headlights fit like OEM. they came with a headlight bulb, which was a nice touch!
A1 Components - headlight set
Kennethz
July 10, 2021
Very Fast shipping. Fit and looked perfect. I always trust A1 for the best quality components.
Mark
April 21, 2022
Great
Sherri
May 20, 2022
They were everything I hoped they would be. I highly recommend 1A auto to my friends and co-workers.
michael
March 4, 2023
GREAT
Customer Q&A
Are these halo or led ?January 6, 2019
Michael E M
10
Neither, these are standard halogen style lights like your originals!
January 6, 2019
T I
10
HALO
January 6, 2019
S U
10
halo
January 6, 2019
Chad E
10
Halogen
January 7, 2019
Bob's C
Are these headlights Glass?January 11, 2019
James J
10
No they are plastic
January 11, 2019
M A
10
No but they are made of good durable clear plastic. Been over a year now since I installed and no problems or fogginess agood buy but change both for a even brightness
January 11, 2019
Scott E
10
No these headlights are plastic,
January 11, 2019
Christopher A
10
The headlights are made out of a plastic that looks like a glass.
January 11, 2019
Emma F
10
No
January 11, 2019
D U
10
Their plastic
January 11, 2019
Israel R
10
1ALHP00018-1999-05 Pontiac Grand Am Headlight Pair are plastic.
January 11, 2019
Steven H
10
no
January 11, 2019
S P
10
No, I don't thinks so. I believe the lens cover is clear plastic.
January 14, 2019
C H
The bulbs sent are for testing only and not to be used for driving correct?September 4, 2021
Bradley M
Customer service
877-844-3393
Monday - Friday 8:00am - 9:30pm ET Saturday - Sunday 8:00am - 4:30pm ET
Pontiac is a registered trademark of General Motors Company. 1A Auto is not affiliated with or sponsored by Pontiac or General Motors Company.See all trademarks.
Enter Vehicle Year Make Model
Specify your vehicle's year, make and model to guarantee fit.
Year
Make
Model
Options
Drivetrain
This part doesn’t fit a . Select from parts that fit.