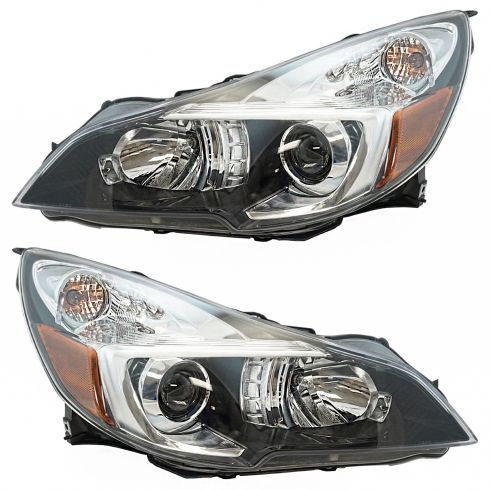
Hey friends, it's Len here at 1AAuto. Today, I'm working on a 2013 Subaru Outback. I'm going to be replacing some headlamps. It's going to be a very easy job. I want to be the guy that shows you how to do it. If you need these or any other parts, you can always check us out at 1AAuto.com. Thanks.
Okay, so one of the first things we're going to do obviously is pop the hood, then we have a clear view of what we're doing up top here. We've got some pushpins here, here, coming along, there, there. Okay?
We're going to remove all these, and I'm going to put one in just a little bit and I'm going to leave it like that. That's going to help hold the bumper so it's not going to fall off when I'm underneath there doing other stuff.
Here we go. For these, all you do is take a small screwdriver, lift the center, and then we should be able to pull it right up. Let's see, there we are. If you lift the center too far, it actually puts it back into the lock position. Okay? You have to have it about halfway. Put that there.
We're just going to do this, and we'll come across the whole front here. Grab this one out of here. All of these are the exact same, so you can use whichever one you want. I'm just going to put this right in the center here, and just leave it. I don't have to push it down or anything.
Okay, now we're going to raise the vehicle. So we've got some push clips. We've got one here, here, here, and then the same on the other side. We're going to do the same as the top. Just try to pull out the center. Let's see if we can drop it down a little bit. These ones are definitely more packed with dirt than the tops, of course. So they're giving me a little bit more of an issue. We got all those out.
Right here, there's another one. This one looks like it's broken off the bumper cover already, so I'm not going to worry about that. But you should take it off if yours is still attached. One in the center, then there should be one here that's missing as well, so pop that out.
Anyway, we'll get this one out and then we're going to continue onto the other side and remove all those as well. All right, get the last one out. We'll bring it back down a little bit and we'll get the bolts out from inside the wheel well area. Okay?
Got our last clip out. Now we can go ahead. We're going to get up in here. This should just come down a little bit. Right up in here, you can see where the fog lamps are, the assemblies, we can go ahead and turn this.
There's our fog lamp bulb. If you wanted to replace the fog lamp bulb, all you do is just squeeze this little clip right here. Disconnect it, and there's our fog lamp bulb. We'll set this aside for now.
Right here on the corner of the bumper, there's another push clip. So I'm going to use my pocket screwdriver like I've been doing, give it a little twist, give myself some space to get my tool in there, my little forky tool. I love this thing. Get that popped. I'm just going to draw the clip out. There it is. Okay.
Then we can slide the bumper cover off a little bit. Should come loose. We're going to do the same thing to the other side of the vehicle real quick, and then we should be clear to start popping this bumper cover off.
Now I'm going to go ahead and grasp onto my bumper. I'm going to go from the side here, see if I can just kind of tug it out. It should want to pop right off, just like that.
I've got my little clip in here, that's going to prevent my bumper from falling off and hitting the ground. I'll just put my hand in and behind, it seemed like it worked pretty good on the other side. All right, here we go.
So there we are, now we've removed our front bumper cover. Here we are friends. The bumper cover's off. We've got a clear view of what's going on. Let's discuss where our bolts are.
We have a bolt here and a push clip. Okay? Coming down here, bolt, push clip, bolt. Come along ... this, move that out of the way. Here's a bolt right there. Bolt, bolt, bolt. Okay? Let's get to removing these. We're going to do all the bolts first, and we'll do the push clips after.
It's like we're sticking right here. We got our little push clip, right? Let's get that push clip out of the way. That's what it looks like. Get the push clip out. This piece right here, should just come right off. Just the headlamp bracket. See if I can lift it up a little bit. My little forky tool under there. It's the same as the other one, set it aside.
Okay, we're going to have wiring, so we don't want to pull this out too far. I don't want to ruin anything. Here's our wiring harness. There's a little squeeze tab right where my index is. Give it a little squeeze. Give the whole thing a little wiggle. We'll take a look inside, make sure you don't see any funny colors. No water or moisture, debris, rainbow colors. I think it looks pretty good. We'll set that aside. Now we've removed our headlamp assembly.
Over here, we have our original headlamp assembly from our 2013 Subaru Outback. As you can tell, the lens itself is getting a little faded. All right? It's not looking too healthy. It's ready for replacement. You know, it did its job for a long period of time. So what I figured is, let's go ahead and replace it with a quality 1AAuto part over here.
We went with the black beveled edge because I believe that that looks much better, at least on this particular vehicle. You can get them with the chrome if you want to, just to state.
The mounting, everything's the same. Okay? You got your mounting hole over here, same right there, up top, all the way up top. We can bring her around, bring this one around. As you can tell, the insides are the same. It's got all the same stuff. Okay?
You got your head lamp areas, you've got your high beam areas, you've got your marker light areas, you got your wiring harness right there. Everything in here is brand new, obviously. You've got your adjustment screw, that's for adjusting your headlamps. As you can tell, this is a quality part. I don't see any reason why I wouldn't want to install this into a vehicle, so I'm going to go ahead and do it.
If you need this, or any other part, you can always check us out at 1AAuto.com. Thanks.
We've got our assembly, we're going to go ahead, connect our connector here. It should just press right in. We're going to listen for a click noise. There it is. We'll give it a little tug. It feels pretty great to me. Take my hand out of here. This up to where it wants to go. It should just slide right in. That looks pretty great. It's got a little nub here, the nub goes in that hole. Everything looks like it's lined up. Looks pretty great to me.
We've got this, we'll get this back on here. Got a little nub here, that goes in this slot. Just got to put it around the front part of the headlight first, or the inner portion I should say. It should go in there, and then this should just slide right in, like that.
Now we're clear to start putting in some bolts and push pins. You can pick which one you want to start with. I want to go with push pins. That's just going to kind of hold things in place while I start bolting it in. Slide it in there, push in the center. Booyah.
Upper. Should want to ... there it is. Very nice. Okay, got a whole bunch of bolts. I'm just going to start them all in. We're not going to tighten anything down until we make sure everything's started. That's just going to make it so we can move stuff around if we have to, okay?
This thing's got some pretty sweet horns. You should check out the video on that. We got everything started in, let's go ahead and tighten it down. 10 millimeter, start wherever you want. Feels good. Let's see if I can get it going here. Just had to get everything lined up there. Feels good. Come along, that one down there. There it is. Come over here, very nice. Perfect.
Now what you would do, do the same exact thing to the other side of the vehicle. Once you do that, we're going to try them out.
Okay, so here we have our old lens. As you can tell where the headlamps going through it, where the light's going through it's getting blocked by the outer lens because the scratches and its dullness. Then we come over to our brand new quality 1AAuto lens, there's zero light getting blocked, so we're going to have a much brighter light emittance coming through. It's going to be a better focused beam. Then as you come across, you can see we have a beautiful beam over here, and meh, over there. So, let's keep rolling.
Now it's time to go ahead and install our bumper assembly. We're going to carefully bring it around. We don't want to scuff any paint, we want to keep it low on the sides. Bring it up. I'm just going to put one push clip in on the top for now, leave it in here. That's just going to keep it from falling on me.
Now we can go ahead and start lining everything up. Start with whichever side of the vehicle you want. This should just come right along, sit just underneath your headlamp assembly. I'm just going give it a little bonk, a little loving bonk. That's my thing, bonk, bonk. There we are. Love it.
Around over here, we're going to do the same exact thing. I'm just going to lift it up. Get it into its little channel. So these little clippy do's, they go on the upper channel in there. You've got the bottom channel with all the ridges, and then above that you've got the next channel up, it goes in between that and your headlight assembly. So you want to make sure those are sitting up on there. You want to pull your bumper kind of tight. Okay? Bring it around. You got some little clippy do's over here on the sides. This clippy do needs to go up there. So we'll just give the bumper a little tug, give it a little loving bonk. Bonk, bonk. Here we are. Perfect.
All right, we'll go ahead and do some push clips here. Make sure everything stays where we wanted it. You can either start or finish with these, whatever you want to do. Like I said before, with these clips, if you pull this all the way up, it kind of locks these pitons out. Okay? So you have to kind of make sure it's just floating there in the center somewhere, so these petons can sit in that groove. If you're having a hard time putting it in, you probably have it either up too high or down too low. Once you get the perfect combination there, it just flows.
We're going to put it in our little push clip inside the fenderwell here. See if we can get everything lined up. I'm going to see if I can push this in. There we are. Your inner fenderwell should run inside your bumper cover. If you notice it's sitting out, just pop it in. We'll do the same thing to the other side of the vehicle real quick. We'll continue up with it, and we'll finish up along the bottom.
Here we are, we've got our fog lamp. I'm just going to connect it back in. This is an H11 bulb. Put it in under here. There it is, locked in. Feels great. Let's tuck it in. Just going to go like that. Like that. There we are. Okay, we'll do the same thing to the other side and then we're going to go ahead and put in some push clips.
We've got some push clips. I'm just going to go ahead and try to put them in, give it a little twist if you have to. Push in the center. These things are nice and clogged up with dirt and debris. There we are. There should be one here. This one was broken, we didn't remove it.
This is a basic tutorial on how to aim the headlights on your vehicle.
Find the axis of your headlights, this is usually indicated with a small dot or the headlight bulb size on the lens. If not, it's the actual center point of your headlight bulb.
Transfer this mark to a vertical wall with a preferably dark color that'll allow you to back up 25 feet. Pull up and find the center line of your vehicle, as well as the center line of your headlight axis.
Mark the wall with the height of the headlights and a straight line going across at that access height. Back your vehicle up 25 feet from the wall to the front edge of your vehicles headlights. Turn your headlights on and locate the adjusting screw, usually on the backside of your headlights.
You'll want to rotate this until the passenger hotspot or focus of the beam is approximately two inches below the line, and the driver's side is four inches below the line. We change the heights on each side so you can still get a good beam to the offside of the road on the passenger side, and have the driver's side low enough to not blind oncoming traffic.
Thanks for watching. Visit 1AAuto.com for quality auto parts shipped to your door, the place for DIY auto repair.
If you enjoyed this video, please click the subscribe button.