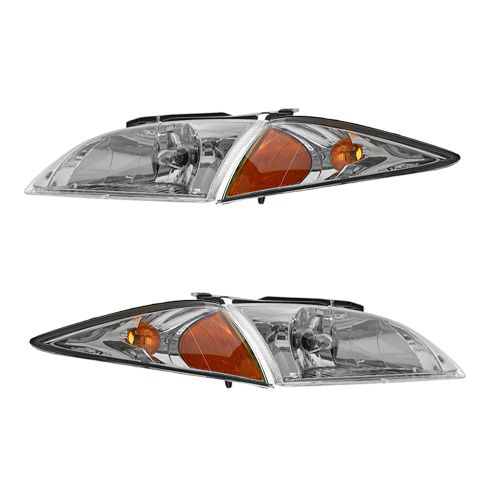
Complete Repair in One Purchase - Stop searching for parts individually and complete your repair with a customized kit or set from DIY Solutions.
High-Quality Parts from Trusted Brands - DIY Solutions' kits and sets are selected from the best automotive brands and include hard-to-find and even obsolete parts you may need for your vehicle.
Guaranteed Fit - DIY Solutions ensures its selected parts are quality-tested to guarantee fit and function.
Assemblies may include halogen or incandescent test bulbs that should be replaced before installation.
Features and Benefits
Direct Fit - No vehicle or wiring modification necessary
DOT, SAE, and FMVSS Compliant - Meets on-road use regulations
Matching set for a restored look
Item Condition:New
Attention California Customers:
WARNING: This product can expose you to chemicals including Chromium (Hexavalent Compounds), which is known to the State of California to cause cancer, and birth defects or other reproductive harm. For more information, go to www.P65Warnings.ca.gov
Lifetime Warranty
This item is backed by our limited lifetime warranty. In the event that this item should fail due to manufacturing defects during intended use, we will replace the part free of charge. This warranty covers the cost of the part only.
FREE Shipping is standard on orders shipped to the lower 48 States (Contiguous United States). Standard shipping charges apply to Hawaii and Alaska.
Shipping is not available to a P.O. Box, APO/FPO/DPO addresses, US Territories, or Canada for this item.
Expedited is available on checkout to the United States, excluding Alaska, Hawaii.
Final shipping costs are available at checkout.
How to Replace Corner Light 2000-03 Chevy Cavalier
How to Replace Headlight 2000-02 Chevy Cavalier
Created on:
Tools used
Flat Blade Screwdriver
1. Removing the Parking Light
Remove the six clips on the panel above the lights. Pry up the center and pull the clips up and out.
Remove the panel.
Put a flat blade screwdriver in behind the light and pry out the clip while pulling on the parking light.
Twist the socket out.
To replace the bulb pull it straight out and push the new one into place.
2. Replacing the Parking Light
Twist the socket into place.
Line up the parking light and push it into place.
Replace the panel above the lights.
Replace the six clips.
Brought to you by 1AAuto.com, your source for quality replacement parts, and the best service on the internet.
Hi. I'm Don from 1A Auto. I hope this how to video helps you out. And the next time you need a part for your vehicle, think of 1AAuto.com. Thanks.
In this video we're going to show you how to service the parking lights on this 2000 Chevy Cavalier. Pretty much the same as any 2000-2002. We're going to do the passenger's side, which is the right hand side. The procedure is the same for the left hand side. You'll need a flat blade screwdriver. That should be the only thing you need, but a pair of pliers might help as well.
Lift up your hood, and there are six clips to remove that hold the panel on. You see I'm pointing them out right here. Use a screwdriver or a pair of pliers, and pull up the center of the clip. And then you should be able to grab onto it, and just pretty much kind of shake it back and forth, and pull it up and out.
I'll just fast forward here as we remove the rest of those clips. And you can see some of them take a little bit. You kind of pry up, and get that center pulled up, then work them out. And now that panel just bows up in the middle and lifts out. To release the parking light, there is a little clip that you access right down through there, and pry out with the screwdriver. You see we're prying out, and we're actually pulling on the light at the same time. It takes a minute just to kind of get everything right. You got to release the clip and pull. And then usually when it comes out, it comes right out. And you can see the clip right there. And you can just twist the socket. There's a little tab to press on. Twist and it comes out. If you're looking to change the bulb, it just pulls straight out, and put a new one back in.
New light from 1A Auto is on bottom. It's all the same, just newer, clearer, and not broken, if yours is broken. There are three tabs on the light that line up with three holes in the headlight and fender. Reinsert the bulb, and twist it to lock. Then put the light in. Look back in the back to make sure that those three pins are lined up at the holes, and once you get them lined up, you give it a good firm push, and it snaps into place. And put that trunk panel back in place. Kind of work it under one side, bow it up in the middle, work it in under the other side, and then put your six clips back in place. And you should be all set. The clips, you want to make sure that the center is pulled out. You put the main portion of the clip back in, and then you push the center down to lock it in place.
We hope this helps you out. Brought to you by www.1AAuto.com, your source for quality replacement parts, and the best service on the internet. Please feel free to call us toll free 888-844-3393. We're the company that's here for you on the internet and in person.
Tools used
13mm Socket
Flat Blade Screwdriver
Ratchet
1. Removing the Headlight
Remove the six clips but prying up the center of the clips and pulling them free.
Remove the panel.
Pry the clip on the back of the parking light while pulling on the edge of the parking light.
Push the tab on the socket and twist to free the parking light.
Remove the two 13mm bolts on the headlight.
Pull the headlight up and out and pull the connector free.
2. Changing Bulbs
Turn the ring on the back of the headlight counterclockwise.
Pull the socket out.
Pull the bulb free.
Replace the bulb.
Push the socket back into place.
Replace the ring and turn clockwise to lock it.
3. Replacing the Headlight
Plug in the wiring harness on the headlight.
Line the headlight up with the two holes on the car and fit it into place.
Replace the two 13mm bolts.
Reinsert the bulb in the parking light.
Line the parking light up with the three holes in the body of the car and push into place.
Put the trim panel back into place and reinsert the six clips.
4. Adjusting the Headlights
Use a Phillips screwdriver in the two screws at the top of the headlight. This adjusts the angle of the lights.
Park 20ft. from a wall.
The headlight should point straight ahead.
The light from the high beam should be one inch below the light of the headlight.
Brought to you by 1AAuto.com, your source for quality auto replacement parts and the bets service on the internet.
Hi, I'm Don from 1A Auto. I hope this how to video helps you out. The next time you need a part for your vehicle, think of 1AAuto.com. Thanks. In this video, we're going to show you how to service the headlights on this 2000 Chevy Cavalier, same as any 2000 to 2002. We're going to just show you the passenger, the right hand side, the left hand side or the driver side is the same. We're going to show you both if you need to change the whole headlight, if your headlights are cloudy or broken or just worn. You can replace them with a nice new clear set from 1A Auto. We'll also show you how to service the bulbs. The only tools you'll need. You'll need a flat blade screwdriver or a pair of pliers. You'll also need a 13mm wrench or a socket with a ratchet.
Lift up your hood and there are six clips to remove that hold the panel on. You see I'm pointing them out right here. Use a screwdriver or a pair of pliers and pull up the center of the clip and you should be able to grab onto it and just pretty much kind of shake it back and forth and pull it up and out. I'll just fast forward here as we remove the rest of those clips. You can see take a little bit, kind of pry up and get that center pulled up then work them out. That panel goes up in the middle and lifts out. To release the parking light, there's a little clip that you access right down through there and pry out with a screwdriver. You see we're prying out and we're actually pulling on the light at the same time. It takes a minute just to kind of get everything right. You got to release the clip and pull. Usually, when it comes out, it comes right out. You can see the clip right there. You can just twist the socket. There's a little tab to press on, twist then it comes out. There are two 13mm bolts at the top of the headlight to remove. I will use a 13mm socket with a ratchet, a 13mm wrench would work fine here too. Just grab the headlight, pull it up and out. On the back, just pull the connector off. If you're just looking to service the light bulb, turn the ring counterclockwise, pull it off, the bulb comes out and you can put your new bulb in. Then put the ring back on. New headlight from 1A Auto is on the left. You can see it's clear even though the headlights on this car are in good shape. It's all the same in the back. It's going to mount just the same as the original. Put the new light in place and plug it in. Then there are two tabs in the bottom that go in two holes in the body of the car. Get it in and set them in place. Then I'm going to speed up here as we put the two 13mm bolts back in place.
There are three tabs on the light that line up with three holes in the headlight and fender. I'll reinsert the bulb and twist it to lock then put the light in, look back in the back to make sure that those three pins are lined up with the holes. Once you get them lined up, you give it a good firm push and it snaps in place. Put that trunk panel back in place. Kind of work it under one side, bow it up in the middle, work in it under the other side and then put your six clips back in place and you should be all set. The clips, you want to make sure that the center is pulled out. You put the main portion of the clip back in and then you push the center down to lock it in place.
To aim the new headlight, there are two screws you can get to with a Philips screwdriver. Basically what you want to do is park your vehicle on a flat surface with a wall or a vertical surface 20 feet away. The headlights should point straight. If you orient it left to right, the headlight should point straight ahead. The high beam headlights should be at the same level if you were to measure to where the headlight bulb is in your headlight from the ground to that level. The concentration on the beam 20 feet away should be the same height for the high beams and it should be one inch below that level of your bulb for the low beams.
We hope this helps you out. Brought to you by www.1AAuto.com, your source for quality auto replacement parts and the bets service on the internet. Please feel free to call us toll-free, 888-844-3393. We're the company that's here for you on the internet and in person.
LHT04091
In Stock
Product Reviews
Loading reviews
4.17/ 5.06
6 reviews
5 Stars
4 Stars
3 Stars
2 Stars
1 Star
3
2
0
1
0
Great Product
Anthony
February 24, 2017
I order these back in December but one of the cornering lights arrived damage. I contacted Customer Support, they shipped a replacement one out to me, free of charge and did not ask for the old one back. The sit of light assemblies has been working in the car without any further issues since they were installed.
Pretty good price
James
June 25, 2018
Good customer service had to go through 4 drivers side headlights before I got one that wasn't broken. Warranty covered all of this. Would recommend
Great Product but Delivery Suffered
Robert
September 5, 2018
I purchased this product, and it works great. It was easy to install, and the provided videos really helped with with installation. However, I received the product two days after the promised date. All was good, but shipping was an issue as I was waiting on the package only to have it arrive late.
Perfect
Steven
October 15, 2018
Quick and easy replacement and now I can see so much better.
Fantastic
Keith
February 8, 2022
Product fit perfect and looked just like the originals did....20 years ago!
cheap broke month just driving down the road
Randy
November 26, 2023
I was driving down the road last week, and out of nowhere, the turn signal clips broke, and it fell off, flapping in the wind at 55mph. The look on the young family next to me in traffic telling me it was falling off was funny.
Customer Q&A
What kind of bulb does it take?February 6, 2016
Heather H
10
Headlight bulb 9007
Turn signal bulb 3457
February 6, 2016
Mary R
10
The kit comes with bulbs. But in case they don't it takes the regular bulb that are recommended by the manufacturer and available at any parts store
February 6, 2016
Todd M
10
I went to store and got one from the headlight guide. but the kit has lights included. REPM100402 is the number of bulb
February 7, 2016
Shelly C
10
Hello, these will accept the OEM bulbs. You can reuse your current bulbs for the installation.
February 8, 2016
Brian F
10
Both headlights and corner lighs take the stock Cavalier bulbs. Actually the headlights came supplied wih a new bulb. Fitment was good in the vehicle.
February 9, 2016
Rick K
Customer service
877-844-3393
Monday - Friday 8:00am - 9:30pm ET Saturday - Sunday 8:00am - 4:30pm ET
Chevrolet is a registered trademark of General Motors Company. 1A Auto is not affiliated with or sponsored by Chevrolet or General Motors Company.See all trademarks.
Enter Vehicle Year Make Model
Specify your vehicle's year, make and model to guarantee fit.
Year
Make
Model
Options
Drivetrain
This part doesn’t fit a . Select from parts that fit.