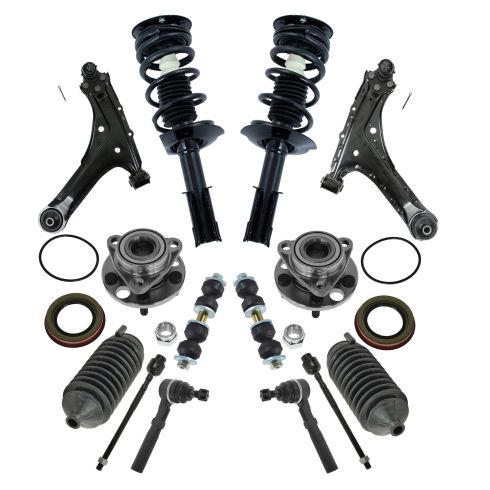
Kit Includes: (2) Front Sway Bar Links (2) Front Lower Control Arms with Ball Joints (2) Front Strut & Spring Assemblies (2) Front Outer Tie Rods (2) Front Steering Rack & Pinion Bellows (2) Front Inner Tie Rods (2) Front Wheel Bearing & Hub Assemblies
Quantity: 14 Piece
Specification
Steering / Suspension Option
with RPO Code FE1 (Soft Ride Suspension)
Location
Front
Product Features
100% New: Manufactured to tighter tolerances for extended service life
Upgraded Elastomer: Premium seals to extended service life
Moly Greased: Specifically-designed grease shield to reduce premature wear
Restored Performance: Refreshed steering system for improved road-feel
TRQ drivetrain kits are manufactured using premium raw materials to restore original performance. Each TRQ drivetrain component is designed to be a direct, maintenance-free replacement to the stock unit. To extend the service life of your drivetrain, TRQ recommends replacing wheel hubs, bearings, and constant velocity (CV) drive axles at the same time to ensure even wear of components and improved ride comfort. All products are fit and road-tested in our Massachusetts R&D facility to ensure we deliver on our promise of Trusted Reliable Quality.
Replacing struts used to require specialized tools to compress, remove, and transfer the old spring and mount. Our Pre-assembled, complete strut & spring assemblies come with all new parts and make the job much quicker and easier for the do-it-yourself mechanic.
Strut & spring assembly contains:
Upper Strut Mount
Strut Bearing
Coil Spring
Boot & Bumper Kit
Gas-charged Strut
Install Tip: When replacing steering components, have a professional alignment performed afterwards. This ensures proper tracking and even tire wear.
Our steering and suspension components are pre-greased and sealed for long life and do not require the extra maintenance typically required by greaseable versions.
Item Condition:New
Attention California Customers:
WARNING: This product can expose you to chemicals including Lead and Lead Compounds, which are known to the State of California to cause cancer, and birth defects or other reproductive harm. For more information, go to www.P65Warnings.ca.gov.
Lifetime Warranty
This item is backed by our limited lifetime warranty. In the event that this item should fail due to manufacturing defects during intended use, we will replace the part free of charge. This warranty covers the cost of the part only.
How To Install Front Sway Stabilizer Links 1995-2005 Pontiac Sunfire
Created on:
Tools used
Torque Wrench
Complete Metric Wrench Set
Complete Metric Socket Set
1. Raise and secure the vehicle
Lift and secure your vehicle with its model specific safe support points.
Make sure your jack stands are set and the correct height on an even surface and your e brake is on if all four wheels aren’t off the ground.
2. Remove the stabilizer link
Use a wrench to secure the top of the link and a socket and breaker bar on the bottom.
Remove the stabilizer link.
3. install the new stabilizer link
Thread the stabilizer link, bushings and washers into the control arm and sway bar.
Use your wrench to secure the link and a socket and ratchet to tighten it up.
The torque spec is 13 foot lbs.
Brought to you by 1A Auto.com. Your source for quality replacement parts and the best service on the internet. Hi, I'm Mike Green. I'm one of the owners of 1A Auto. I want to help you save time and money repairing and maintaining your vehicle. I'm going to use my 20 plus years experience restoring and repairing cars and trucks like this to show you the correct way to install parts from 1AAuto.com. The right parts, installed correctly. That's going to save you time and money. Thank you, and enjoy the video.
In this video we'll be showing you how to replace a stabilizer link on this 1997 Pontiac Sunfire. Basically the same as any '95 to '05 Cavalier and very similar to a lot of GM front stabilizer links. All you'll need is a couple wrenches and wrench size will vary. Okay sway bar links on the Sunfire Cavalier. Obviously you want to raise and support your vehicle, and you want to raise the front wheels off the ground evenly. You don't want to just put the left wheel up in the air or the right wheel up in the air, because the stabilizer bar is designed to act against that. So you'll actually just make it more difficult for yourself to take it apart. So when you raise the vehicle, on these vehicles you probably want to place the jack right here on this pinch weld behind the front wheel. You can raise it here and then support it here, and then raise the other side and do the same thing. Okay so here we are under the vehicle. We're looking towards the front of the car. Here's your stabilizer link, you can see these have been replaced recently.
So I'm just going to show you how to take them out and put them in. What can happen on these is these rubber bushings can wear out and then you have a metal on metal, or metal on metal down here. Also, what can happen is these studs can rust and just break. Some symptoms of your sway bar links being broken is your car will lean more in turns, and also another symptom if one of these bushings wears out, you'll hear a clanging when you go over bumps when your car is straight, but then if you're turning and you hit a bump you may not hear the clang because the sway bar will be counteracting the turn and just pulling itself tight against the metal. So these replacement sway bar, these replacement links are 9/16ths. Probably the originals are 13 millimeters. But it's pretty easy. You just want to get under here. Most likely if you have your originals on here, once you start doing this they're probably going to break. You just remove this bolt, you need to hold this nut with a wrench. So there's your link out. So when you put the link back in, you want to put a washer on, and then a bushing, and then you put the stud up through the control arm.
You put the bushing on with these stepped sides go into the holes. So it goes into that hole there. You can see here that stepped side goes into the hole in all cases. Whenever the bushing's against metal, you want them in the hole like that. So we have a bushing, put that up through. Now we need a washer. Then after the washer, there's a spacer. Then another washer. Then a bushing, and again the stepped side goes up into the stabilizer bar. Then a bushing on the other end, with the stepped side going down into the stabilizer bar. And then a washer. Generally these washers are just a little bit dished to hold the, actually they look pretty flat. They're a little dished to hold the bushing kind of within itself. They squeeze together. This is a lock nut so it's only going to thread on a little ways at first, and then you're going to get some resistance. Take your wrench, and hold. Torque specs on this is 13 foot pounds, so it doesn't have to be too tight. But what I like to do is kind of go slow at first. Make sure everything gets seated correctly. Make sure all these bushings are going where they need to go. Go a little further. Basically this goes all the way, the bolt goes all the way until it bottoms out. And that's basically it.
We hope this helps you out. Brought to you by www.1AAuto.com. Your source for quality replacement parts and the best service on the internet. Please feel free to call us toll free 888-844-3393. We're the company that's here for you on the internet and in person.
PSA43282
In Stock
Product Reviews
Loading reviews
There are no reviews for this item.
Customer Q&A
No questions have been asked about this item.
Customer service
877-844-3393
Monday - Friday 8:00am - 9:30pm ET Saturday - Sunday 8:00am - 4:30pm ET
Chevrolet is a registered trademark of General Motors Company. 1A Auto is not affiliated with or sponsored by Chevrolet or General Motors Company.See all trademarks.
Enter Vehicle Year Make Model
Specify your vehicle's year, make and model to guarantee fit.
Year
Make
Model
Options
Drivetrain
This part doesn’t fit a . Select from parts that fit.