Brought to you by 1AAuto.com, your source for quality replacement parts and the best service on the Internet.
Hi, I'm Mike from 1A Auto. I hope this how-to video helps you out, and next time you need parts for your vehicle, think of 1AAuto.com. Thanks.
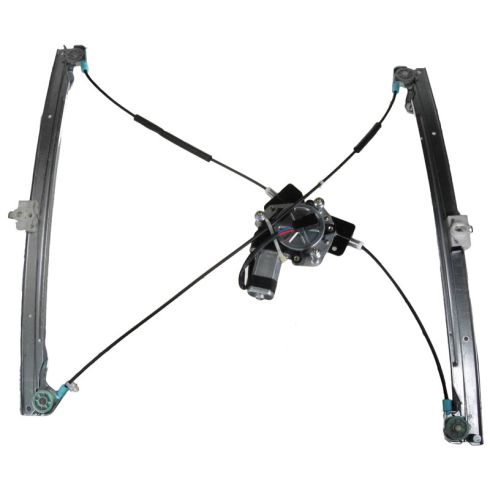
In this video we're going to show you how to replace a window regulator, a front regulator, in this 2003 Dodge Caravan. The window motor is seized on this vehicle. Items you'll need include a new window regulator from 1AAuto.com, Phillips screwdriver, T30 Torx driver, pliers, 10mm socket and ratchet, and a 10mm wrench. If your motor is seized like on this one, you'll need some wire cutters.
Let's start by opening up the door. There are three Phillips screws to remove. One in the door pull there, one behind the door handle, and then one down at the bottom. I'll just fast-forward and use a Phillips screwdriver to remove those three screws. Now, you want to feel around the door for the clips, and you'll pull firmly out and release all the clips all the way around. Mine actually came off pretty easy, because some of them are already broken. You lift the door panel up, and pull it out. There's a white clip that holds the rod. Just use your screwdriver to push that off the rod, and then flick around and pull the rod down and out. Then there are three harnesses. The first one has a tab that you just pull down on and release. It actually has a tap that you pry out a little bit. I'm prying it out with my fingernails. Then the two that hook into the switches just have a tab on the side. Push the tab with a finger, and then pull them down. The tab's actually towards the front of the vehicle.
Four Phillips screws hold the speaker on to the door. We'll remove those screws, and I'll fast-forward here. Once you removed the screws, pull the speaker out and off, and then there's a connector behind, just press on the tab on the connector and pull it off. Now, you'll want to carefully remove the water shield, even though I'm fast-forwarding here, you want to pull it all around the edges. You don't want to rip it or tear it, because this helps keep water and moisture out of your door panel, so just slowly pull it off to expose the inside of the door.
Three T30 Torx screws hold the motor onto the door, so I'm going to use a T30 Torx bit ratchet extension and remove those. Actually, what I find is that they're held on in the back by some rubber nuts, and you'll see me reach back in behind, and hold the rubber nuts for a little bit, and then they actually start spinning. Just grab a pair of pliers, and you can reach back there, and hold them in the back, and then remove the T30 screws the rest of the way. There's a close up in one of the rubber nuts. You'd see, if you'd take some pliers, it's pretty easy to reach back in there. Just a little difficult, because you can't see, but just grab on to the rubber nuts with the pliers and remove the bolt the rest of the way.
If the cable broke, then you'll be able to move the window up and down. On this vehicle, the window motor has seized up, so I have to cut the cables with a wire cutter in order to move the window. Down in here, let me just pry open the clip. Same thing over here. Once you get the clips off, then push the window off of those clips that are on the window track. Now there are four T30 screws: One there, one there. These hold the window tracks in, so you want to loosen those up. Now lift the rails up and take the bolts out.
Since my cable is cut, mine comes out easily. I just pull each rail out of each side. If your regulator is still intact, then you'll want to remove the front rail through the front section first, and then rear rail. If you watch when I install it, I'll do a reverse of the procedure of me installing it. Then you want to take your window out, lower the nose of the window down, and pull it back up and out.
Remove those T30 bolts out of the brackets of your old regulator, and then start them into your new regulator. Okay. The two bolts that are closer to the rail as opposed to the ones that are further away goes to the top. Just stick the one down in, with the motor with it. I'll put this top in. Now I'll be looking here, hanging that one up. This one's down in place, slide them down in. Set in here. Top went through. Bottom one is in place, just slide down in. All right, if you want these harnesses on the outside, you got two clips here, one should be there, one I'm going to slide up actually off. This one will clip in right here. I'm just going to fast-forward here.
The new motor comes with bolts and nuts that are on the back, so I'm taking the nuts off the back first. Then I'll mount the motor to the door, and reach in behind, put the nuts on, and tighten them up. Reconnect the harness.
At this point, we're going to just hook one of the power switch window in, and turn the key on, and just give it a quick test. The harness is slightly different on the new window motor and regulator, so we're just going to wire tight it in place so it doesn't wander around.
Now we're going to tighten up the bolts for the window regulator rails. Now put the window down in, and you put the nose down in first, or the front down in first. There's a certain position that you just find a little bit by trial and error. You have to make sure that the nose or the front is right in the front window track, and also get the rear started in to the window track, and then you push it down into the door a little bit, and then rotate it back. It's one of those things you just got to find the right spot, and you'll see it goes in easily. Then make sure that it's in and it's on the track correctly. It slides up and down easily. Then come around to the other side, and make sure that the pins that are on the window snap into the wholes on the regulator, and engage the clips. You may need to loosen up the bolts that hold the regulator track in place in order to just adjust where the regulator clips are, and get everything together. Then once you're sure it's engaged, you can tighten up those bolts again for the window tracks.
Once that's set, you could try again, reconnect the switch, turn the key on, and run it up and down, make sure everything seems to go good. Once you're done testing it, disconnect the switch and shut off the key.
You'll want to reinstall the top inner weather strip. We'll fast-forward here as I put that door shield or the water shield back on. If you wanted to use some spray adhesive stick, you could do that. Make sure that all the wires come through correctly. Then reconnect the speaker, and secure the speaker with the four Phillips screws.
Reinstall is reverse the procedure. You want to connect the harnesses. The harnesses are color-coded. The black one goes into the black switch, the gray into the gray switch. Then the smaller one is the door lock switch. You press them up until the click and lock in place. Then put the rod back up in place, and flip around and on. Then lift the door panel up, and get that door lock through. Lift the panel up onto the window ledge, and there is a slot that the top of the panel goes down into and locks it in place. Then you just got to go look in behind to line up the clips. There are two larger line up pegs, but what happened on this one is that the top clip actually just got a little bit out of line. It's holding the door panel out. As I'm trying to work my way up there, notice that to get the top clip to go in correctly, and then I can go all way around with the other clips. Once you get them in, and you're confident they're going in correctly, just do a nice fist tap right around where each one of the clips is to lock it in place. Replace the three screws, one at the bottom, the one in the door pull, and the one behind the door handle.
Thanks for tuning in. We hope this video helped you out. Next time you need parts for your car, please visit 1AAuto.com. Also check out our other helpful how-to and diagnosis videos.