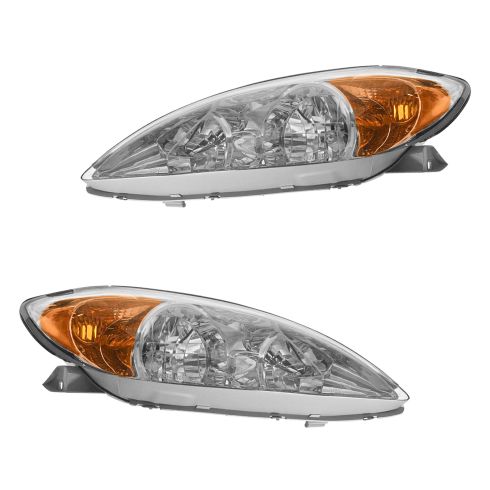
Kit Includes: (1) Passenger Side Headlight (1) Driver Side Headlight
Housing Color: Chrome Bezel
Quantity: 2 Piece
Specification
Side Location
Driver & Passenger Side
Trim
XLE
Product Features
Direct Fit - No vehicle or wiring modification necessary
DOT, SAE, and FMVSS Compliant - Meets on-road use regulations
Matching set for a restored look
Complete Repair in One Purchase - Stop searching for parts individually and complete your repair with a customized kit or set from DIY Solutions.
High-Quality Parts from Trusted Brands - DIY Solutions' kits and sets are selected from the best automotive brands and include hard-to-find and even obsolete parts you may need for your vehicle.
Guaranteed Fit - DIY Solutions ensures its selected parts are quality-tested to guarantee fit and function.
Assemblies may include halogen or incandescent test bulbs that should be replaced before installation.
Item Condition:New
Attention California Customers:
WARNING: This product can expose you to chemicals including Chromium (Hexavalent Compounds), which is known to the State of California to cause cancer, and birth defects or other reproductive harm. For more information, go to www.P65Warnings.ca.gov
Lifetime Warranty
This item is backed by our limited lifetime warranty. In the event that this item should fail due to manufacturing defects during intended use, we will replace the part free of charge. This warranty covers the cost of the part only.
FREE Shipping is standard on orders shipped to the lower 48 States (Contiguous United States). Standard shipping charges apply to Hawaii and Alaska.
Shipping is not available to a P.O. Box, APO/FPO/DPO addresses, US Territories, or Canada for this item.
Expedited is available on checkout to the United States, excluding Alaska, Hawaii.
Final shipping costs are available at checkout.
How to Replace Headlight 2005-06 Toyota Camry
Created on:
Tools used
Flat Blade Screwdriver
10mm Socket
Ratchet
1. To replace the bulb
Reach into the engine bay behind the headlight assembly and twist and pull to remove the bulb.
Unplug the bulb.
Plug in the new bulb and twist and push it back in.
2. Remove the headlight assembly
Remove three 10 mm bolts- two around the headlight assembly you are working on and the one by the opposite headlight assembly.
Use a flat blade screwdriver to remove the pushclip on the bumper cover in the center.
Remove the pushclips on the bumper cover on the wheel well.
Remove a fourth 10 mm bolt in the bottom outside corner of the headlight that you have exposed by partially freeing the bumper cover.
Unplug the bulbs.
3. Install headlight assembly
Plug the harness into the new headlight assembly
Clip the headlight into place.
Use your 10mm socket and ratchet and bolt the assembly back in.
DO NOT TOUCH the bulbs- the oil from your fingers will burn into the light and foul your bulb.
Clip the bumper cover back on and use your 10 mm socket and ratchet to bolt the bolt by the far headlight back into place.
Brought to you by 1AAuto.com, your source for quality replacement parts and the best service on the internet.
Hi, I'm Mike Green. I'm one of the owners of 1A Auto. I want to help you save time and money repairing and maintaining your vehicle. I'm going to use my 20-plus years' experience restoring and repairing cars and trucks like this to show you the correct way to install parts from 1AAuto.com, the right parts installed correctly. That's going to save you time and money. Thank you and enjoy the video.
In this video we're going to show you how to change the headlights on this 2005 Camry, same as 2005 and 2006. The tools you'll need are a flat blade screwdriver and a 10-millimeter socket and ratchet or a wrench. We're going to change a headlight bulb. It's pretty easy. You reach back in here, and your bulb is right here, counterclockwise; you're going to shake and pull the bulb out, have the bulb out. You want to have the bulb out. There's actually a little tab here to press on, and the bulb unplugs, plug it back in. Put it back in and pop it into place.
That's the same for the outer one as well as the driver's side, the driver's side is a little harder to get to but we'll fix it. If you have a clouded or fogged head light like this one you're going to want to replace it. Start by removing three 10-millimeter bolts here, one right here, then a couple for the bumper cover. You will want to remove both bolts, the one near the headlight you're working on and the one opposite, near the other headlight. In the middle of the bumper cover is a little clip. Just use a screwdriver, pry it underneath and the clip pops out. Up underneath the wheel well there are two clips you're going to pry out. You twist this one and then pry it out and then there's one that you pry out here and it pops out like the middle clip on the bumper cover.
You just want to push and pull your inner fender over and that reveals a 10-millimeter bolt right there. Now you want to pull your bumper cover out. It will reveal a 10-millimeter bolt right here. Now take your light, shake it down a little bit. Put your screwdriver right in the corner here. Pop that out. Now on the back of the light, these little tabs again. Disconnect this. You can turn counter-clockwise, pull it out. This connection again, there's a little tab here, pull that out, and then one more light here. Counter-clockwise. Pull that out and the light comes out.
Old light on bottom, new light from 1A Auto. I'll let them speak for themselves. For replacing just take note, there's a little clip right here, and this part of the light, you've got to make sure it goes down into that clip. So we will just put the light in place; reconnect our harness connection. Okay. There's also a tab here. It goes into this clip here. What I've found is usually you kind of get the inside into the bumper here, and pull this down through, and back on the cover a little bit; make sure it's going into the right spot. Put it in the right place. Lift up. Push the light back in. Now I'm going to pull this cover out some. Hold the light in place here and start this bolt.
I'm going to speed it up here while I tighten up this 10-millimeter bolt on the side, and you do want to be pushing back on the light. Push it back into the fender while you're tightening it. Now push in and get the bolt that goes up into the fender started. We'll fast forward as we tighten that up. Now you've just got to make sure that your inner fender is pushed back up in where it belongs. Now reinstall the two retaining clips that hold the inner fender.
Now we'll finish up by putting that retainer back in the center of the bumper cover and then putting our three bolts back in place and tightening them up. That's how you go from this to this.
We hope this helps you out. Brought to you by www.1AAuto.com, your source for quality replacement parts and the best service on the internet. Please feel free to call us toll-free 888-844-3393. We're the company that's here for you on the internet and in person.
LHT03194
In Stock
Product Reviews
Loading reviews
4.55/ 5.011
11 reviews
5 Stars
4 Stars
3 Stars
2 Stars
1 Star
9
0
1
1
0
easy video to follow
Lyle
January 22, 2017
Thank you very much for the video on installing my sons headlights. You were a life saver!! The video described in great detail on how to remove and install the headlights.. They fit perfect!! The headlights were very well packaged and were in excellent condition.I will defiantly buy from you again and again.Great job !!!! I will highly recommend you to all my friends!!
Headlights
J
September 19, 2017
They worked what more can I say about a pair of headlights for a car to reach 50
perfect fit arrived promptly
paula
October 23, 2019
We use 1 A for parts because the parts fit and work, and the you tube tutorials are great!
Thanks 1A
Decent price. Quality so so.
Thomas
January 4, 2020
The quality of the housing appear decent but now OEM quality. The adjustability seems difficult. I cannot raise one side high enough. Let see how long it will last. I would go with oem. Night visibility is critical.
Headlight
Charlie
May 6, 2020
Didn't fit exactly like the original.It wasn't snugged.It left a gap in between the frame.
head lights
set-trq-wma51639/i/1awmk00035"
August 2, 2020
lights came fast fit and look great i can now see clear at night again thanks 1aauto
Nice pair of eyes for my baby..
carmen
January 22, 2021
Omg my car looks so good now and I can see better at night lol....????
Carl
October 27, 2021
Could use some directions on where aiming adjusters are- particularly the horizontal.
Installation video was really helpful. Product was a great fit.
Will come back if I need something else.
Daniel
November 6, 2021
Perfect thank you very much
Buy now
Michael
November 14, 2021
Headlights fit perfect ??
02 camery headlights
Mark
March 27, 2024
The lights that were replaced were original equipment,so you can imagine the way the new lights will pop. They were easy to install and a video is available . New lights make your car safer.Visibility has been improved tremendously
Customer Q&A
Are these assemblies already treated with a UV protectant or do they discolor quickly?November 12, 2016
Patrick V
10
Had them for a year and still look good
November 12, 2016
Paul M
10
Hi Patrick. i no longer own the vehicle but I know the headlights stayed crystal clear for the two or so years after they were installed. I honestly don't know if they were treated or not. Value wise and ease of installation was worth it.
Kevin.
November 12, 2016
Kevin R
10
I have had these lights on my 02 Camry now for approximately two years. I live in /Florida. Need I say more? These lights are still crystal clear even in the Florida heat and sun.
November 12, 2016
Rexford R
10
Not sure. but I can tell you almost one year later and they still look brand new.
November 12, 2016
Brad M
10
These lights have not discolored at all. They were the exact fit and would recommend this product.
November 13, 2016
Josh R
10
Ours have been installed for a little over a year and we have not noticed any discoloration. YMMV
November 15, 2016
Anna J
10
They will be warrantied against any discoloration.
November 15, 2016
Derek C
Are these glass or plastic? I'm looking for glass.November 5, 2022
Charles S
10
These headlights are plastic.
November 7, 2022
Kelly S
Customer service
877-844-3393
Monday - Friday 8:00am - 9:30pm ET Saturday - Sunday 8:00am - 4:30pm ET
Toyota is a registered trademark of Toyota Motor Corporation. 1A Auto is not affiliated with or sponsored by Toyota or Toyota Motor Corporation.See all trademarks.
Enter Vehicle Year Make Model
Specify your vehicle's year, make and model to guarantee fit.
Year
Make
Model
Options
Drivetrain
This part doesn’t fit a . Select from parts that fit.