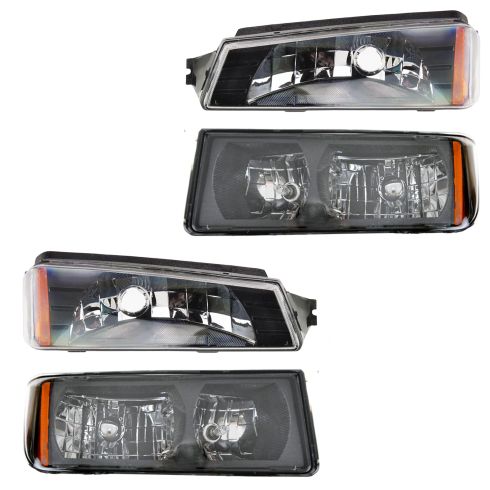
Complete Repair in One Purchase - Stop searching for parts individually and complete your repair with a customized kit or set from DIY Solutions.
High-Quality Parts from Trusted Brands - DIY Solutions' kits and sets are selected from the best automotive brands and include hard-to-find and even obsolete parts you may need for your vehicle.
Guaranteed Fit - DIY Solutions ensures its selected parts are quality-tested to guarantee fit and function.
Assemblies may include halogen or incandescent test bulbs that should be replaced before installation.
Features and Benefits
Direct Fit - No vehicle or wiring modification necessary
DOT, SAE, and FMVSS Compliant - Meets on-road use regulations
Matching set for a restored look
Item Condition:New
Attention California Customers:
WARNING: This product can expose you to chemicals including Chromium (Hexavalent Compounds), which is known to the State of California to cause cancer, and birth defects or other reproductive harm. For more information, go to www.P65Warnings.ca.gov
Lifetime Warranty
This item is backed by our limited lifetime warranty. In the event that this item should fail due to manufacturing defects during intended use, we will replace the part free of charge. This warranty covers the cost of the part only.
FREE Shipping is standard on orders shipped to the lower 48 States (Contiguous United States). Standard shipping charges apply to Hawaii and Alaska.
Shipping is not available to a P.O. Box, APO/FPO/DPO addresses, US Territories, or Canada for this item.
Expedited is available on checkout to the United States, excluding Alaska, Hawaii.
Final shipping costs are available at checkout.
How to Replace Lower Headlights 2003-06 Chevy Avalanche 1500
How to Replace Headlights 2003-06 Chevy Silverado 1500
Created on:
Tools used
Flat Blade Screwdriver
1. Removing the Headlight
Push the lock tab and slide the headlight out
Twist the bulb socket counterclockwise out of the light
Remove the headlight
2. Removing the Lower Headlight
Pry out the L-pins
Pull the L-pin straight up
Pull the housing out a bit
Disconnect the wiring harness
3. Installing the High Beam Housing
Feed the housing into the body
Connect the wiring harnesses
Press in and lock the L-pins
Turn the screw to adjust the lights
4. Installing the Headlight
Turn the bulb sockets clockwise into the light
Line up the headlight with the clip slot
Click the headlight in
To open the hood on this 2005 Avalanche, open your door. Pull the release. The secondary release is actually under the emblem here. Push it to this side, and lift the hood up. To change this headlamp, you first have to remove the turn signal lamp. Reach down, push this tab in. Push this tab in right here, pull it out. Now, we're going to pull the headlamp away from the grill, off the tabs that it's mounted on. Push this in. Turn it counterclockwise to remove the bulb and socket. Turn the marker light bulb counterclockwise to remove it.
There are two pins, L-shaped pins, one here and one here. I'm going to unlock those to remove the light. I'm going to use a flat-bladed screwdriver to pop it out. Pull it straight out. Same thing over here. Pull it straight up and out. Put those aside. Headlamp is free. I'm going to unlock the connector on the lamp on the bulb and push it down. Pull it off. I'm going to undo the other side. I'm going to pull the clip or the lock on it away from the headlamp, and I'm going to push down on the connector at the same time to pull it off. Then, you can lift the light up and slide it out.
Here's our old yellow and discolored headlamp. It's all pitted from going down the road. You can't really see that well out of this. This is our new one from 1aauto.com, perfectly clear. You're going to have great night vision with this. It comes with two new bulbs, and look at the old one. It has the same style of mounting and the same shape. It'll fit great and look great.
I'm going to take our new head lamp. I'm going to feed that up like that. That has the adjustment for it. I'm going to plug in our connectors. Place it into the little mounting area. We'll reinstall these L-pins. This one will slide down just like that, and I can move it around a little bit to line it up. You flip it over and lock it in. Same thing with the other side. You need to wiggle the headlamp a little bit to get it in there. You want to flip it over and lock it. The headlamp is installed.
Now, reinstall your turn signal lamp. Turn this clockwise to lock it. Install the side marker bulb. Turn it clockwise to lock it. Put these tabs into the radiator support. Push this up and in. If you need to adjust the aim of the headlamp, you can turn this screw in or out.
This is a basic tutorial on how to aim the headlights on your vehicle. Find the axis of your headlights. This is usually indicated with a small dot or the headlight bulb size on the lens. If not, it's the actual center point of your headlight bulb. Transfer this mark to a vertical wall with a preferably dark color that'll allow you to back up 25 feet. Pull up and find the center line of your vehicle, as well as the center line of your headlight axis.
Mark the wall with the height of the headlights and a straight line going across at that axis height. Back your vehicle up 25 feet from the wall to the front edge of your vehicle's headlights. Turn your headlights on, and locate the adjusting screw, usually on the back side of your headlights. You'll want to rotate this until the passenger hot spot or focus of the beam is approximately two inches below the line and the driver's side is four inches below the line. We change the heights on each side so you can still get a good beam to the off side of the road on the passenger's side and have the driver's side low enough to not blind oncoming traffic.
Thanks for watching. Visit us at 1AAuto.com for quality auto parts, fast and free shipping, and the best customer service in the industry.
Tools used
No Tools Needed
1. Removing the Headlight Assembly
Open the hood.
Pull up on the lock bar and pull it out.
Pull the headlight out.
Disconnect the two harnesses from the headlight.
2. Replacing a Bulb
Turn the socket counterclockwise.
Pull out the bulb.
Push a new one in.
Twist the socket clockwise to lock it.
3. Replacing the Headlight Assembly
Connect the two harnesses to the headlight.
Line up the tabs and push the light down and back into place.
Push the lock bar into place until it locks.
Remove the plastic covering.
Brought to you by 1AAuto.com, your source for quality replacement parts and the best service on the internet.
Hi, I'm Mike from 1A Auto. I hope this how to video helps you out and next time you need parts for your vehicle, think of 1AAuto.com. Thanks.
In this video, we're going to show you how to service the head lights. We're going to show you how to replace head lights if you want to buy a new set from 1A Auto. We'll also show you how to just change the bulbs if that's all you're looking to do. You may need to change your head lights if they're clouded or faded or cracked or chipped or damaged in any way. If they are damaged or you want to replace them, just go onto to 1AAuto.com and you'll find a new set of great head lights for your truck and we'll get you back on the road seeing clearly.
Open up the hood by pulling the lever here. Reach under the center of the hood. You'll see a little lever right here. Push it towards the center of the truck and lift up. Head lights are pretty easy. There's actually a little lock bar right here. Pull it up out of the clip. Then you might have to work it back and forth. You should pull it towards the center of the truck. This pulls right out and then your head light tilts back out. And right in behind, your head lights are connected. You don't have to have the battery disconnected. As long as the truck's off, there's no power going through here, just pull back on these tabs and push off the connectors, then your whole assembly comes out.
And if you're just looking to change the light bulbs, at this point, all you have to do is turn the light bulbs counter-clockwise, pull them out and put new ones in and then reconnect the bulbs and then go from there.
If you've had some damage or your lights are clouded or faded, the new light from 1A Auto is going to go in there, just like the original. It plugs in. The bulbs plug in, just like the originals. And on the bottom, there are 2 tabs that go in the slots here. You feed it in, behind the grill. Then peek back in there, until you can see those tabs going into their own spots. And once they're in, you can line it up right here, push it back in, put the pin in and through. If you just push it through, it locks down in place again. And as it's a new light, peel off the plastic.
We hope this helps you out. Brought to you by www.1AAuto.com, your source for quality replacement parts and the best service on the internet. Feel free to call us toll free, 888-844-3393. We're the company that's here for you on the internet and in person.
LHT08794
In Stock
Product Reviews
Loading reviews
4.88/ 5.016
16 reviews
5 Stars
4 Stars
3 Stars
2 Stars
1 Star
14
2
0
0
0
Very Nice, Truck Looks NEW!
K
August 23, 2017
Found these replacement lights for the Chevy Avalanche at 1A Auto and they were by far the least expensive of where I shopped on the Internet. Came very fast and in in excellent condition. Installed them in minutes, it was plug & play, the easiest installation possible. Love my new headlights and parking lamps. Oh yes their customer service helped me at first, answered my questions and found me the order numbers on their website, very helpful, very polite. I will call them again for future business. Thank you 1A!!!!!
Chevy avalache replacment light lens
F
October 1, 2017
Parking and headlight lenses were perfect fit and oem quality with super easy install. They even came with high and low beam bulbs installed . Delivery was quick and the 1A auto videos are among the most helpful on youtube. Its not easy to find parts for avalanche truck but this worked outvgreat.
Won't be my last order from 1A
C
October 20, 2017
Items arrived quick and in tack. Then, believe it or not, even as a 57-year-old woman, I watched one of your videos and installed them myself probably saving around $75 in labor costs. They fit perfectly in my Chevy Avalanche. Thanks, 1A!
HEADLIGHT SET FOR 04 CHEV AVALANCHE
Highline
November 3, 2017
Amazingly quick delivery !!! Perfect Fit and great clarity and brightness the slight tint and the mirrored back make for an amazing look
Exactly what I needed, when I needed it.
A
February 24, 2018
I messed up the front end of my 2005 Chevrolet Avalanche w/ cladding and needed to replace everything. This headlight assembly set was the best value, with the best quality, from a great company. The lights look fantastic, they included the halogen bulb, but not the incandescent. Easy installation. Couldn't be happier.
Excell
J
March 10, 2018
Received earlier than posted, Exact fit, easy to install, but 1 bulb did not work. Luckily one from the old set matched.
AWESOME!!
B
July 23, 2018
Part was EXCELLENT fit.
Instructions for installation was SPOT ON!
Shipping was FAST and EASY!
Will buy from A1 Auto again, and again, and again in the future!
WOW! I can see at night!
Gus
October 15, 2018
Been dealing with fogged over lights on my Avalanche for longer then I care to admit! Also had one of my running light zip-tied in! Finally broke down and ordered a full set, the price really sold me!
One minor glitch, 1A Auto only sent one of the headlights! Couple of minutes on the phone, problem fixed.
Watched the video, very simple replacement. Took me about 30 minutes, most of which I spent cleaning before I put things back together.
All in All, very satisfied!
Great OEM replacement
Kenneth
October 17, 2018
I have ordered from 1A Auto in the past and will continue to order from them again. Purchased a complete set of replacement headlights and fog lights. I had been using the restore kits for a few years now and was just tired. I know that eventually, these will need restoring since it is only plastic, but that will be years from now. Great look and OEM fit. Bulbs sent with these are a bonus but not part of the order. As always, fast shipping and excellent customer service.
Excellent
B
October 20, 2018
Parts dropped right in. I the website pictures helped avoid purchaseing the wrong item. Great site
Head lights !!
A
October 25, 2018
Im very happy with the quality of my headlights,no fog build up or condensation,so to me that means that they are made of quality and are sealed tight ,very happy with your products,and shipping was on the money,thanks again ??????
Excellent product
G
August 3, 2019
Perfect fit, quality product.
Installation and associated video could be updated. It took considerably longer to install then I anticipated.
After installing and removing several times I finally caught on how to make it work. This was specific for the driving/fog lamps.
GREAT customer service
T
January 10, 2021
I ordered the wrong parts for my truck. Called 1A AUTO to return it. I expected a hassle....NOPE!!! They worked with me for an easy return. Now, I have the right parts that fit my truck. I will ALWAYS be a 1A AUTO customer. THANK YOU. Raymond, Bronx, NY.
Great lights!
Richard
April 30, 2022
Very easy install an 04 Avalanche. Truck looks great and lights are like new again. I took the advice of other posts and added silicone to most of the seams, leaving the bottom open to drain any water that may deep in. It did have a little moisture the next day, but burned off later. Very happy with purchase!
Oscar
June 10, 2023
I'm am very satisfied with this product
1A Auto? Home run!
JONATHAN
February 29, 2024
Flawless installation and quality!!!
Customer Q&A
Are bulbs included?January 4, 2016
Michael D
10
Hello, Test bulbs may be installed. We recommend replacing them and confirm bulb sealing when installed.
January 6, 2016
Brian F
W/cladding or without. What's the difference?July 14, 2021
Greg F
10
The shape and fit of the lights, if u don't get the correct body style the lights won't fit
July 14, 2022
Kevin P
Customer service
877-844-3393
Monday - Friday 8:00am - 9:30pm ET Saturday - Sunday 8:00am - 4:30pm ET
Enter Vehicle Year Make Model
Specify your vehicle's year, make and model to guarantee fit.
Year
Make
Model
Options
Drivetrain
This part doesn’t fit a . Select from parts that fit.