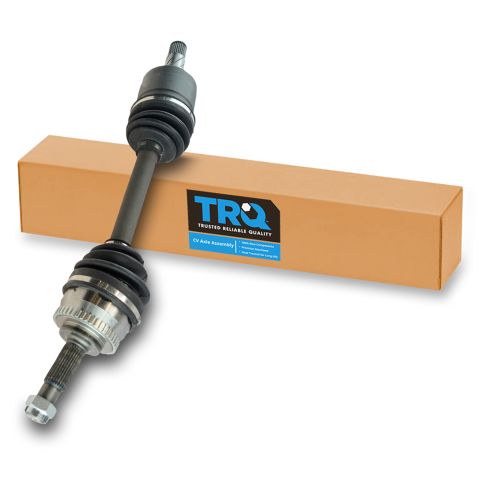
TRQ CV (constant velocity) drive axles are manufactured using premium raw materials designed to restore original performance. TRQ CV drive axles are new, so there is no core charge with your TRQ purchase. TRQ-designed drive axles utilize neoprene boots, moly grease, stainless steel clamps, and heat-treated ball tracks to ensure extended service life. Each TRQ axle is application-specific so each spline and thread will mate properly for a seamless fit. All products are fit and road-tested in our Massachusetts R&D facility to ensure we deliver on our promise of Trusted Reliable Quality.
Product Features
100% New: Manufactured to tighter tolerances for extended service life
Neoprene Boots: Improved durability compared to stock material
Moly Greased: Specifically-designed grease shield to reduce premature wear
Application Specific Design: No modification
CV axles are designed to transmit the power from your vehicle's drivetrain to the wheels while being able to flex and pivot to the demands of the steering and suspension systems. If your vehicle is making clicking noises at lower speeds or when making turns, it may be time to replace your CV axles with our 100% brand new assemblies.
Note: This is correct for models with or without ABS brakes. The tone ring can be removed if the original CV axle did not have one and the vehicle did not originally come equipped with ABS brakes.
Item Condition:New
Attention California Customers:
WARNING: This product can expose you to chemicals including Lead and Lead Compounds, which are known to the State of California to cause cancer, and birth defects or other reproductive harm. For more information, go to www.P65Warnings.ca.gov.
Lifetime Warranty
This item is backed by our limited lifetime warranty. In the event that this item should fail due to manufacturing defects during intended use, we will replace the part free of charge. This warranty covers the cost of the part only.
FREE Shipping is standard on orders shipped to the lower 48 States (Contiguous United States). Standard shipping charges apply to Hawaii and Alaska.
Shipping is not available to a P.O. Box, APO/FPO/DPO addresses, US Territories, or Canada for this item.
Expedited is available on checkout to the United States, excluding Alaska, Hawaii.
Final shipping costs are available at checkout.
How to Replace Front Drivers Side CV Axle 2002-06 Nissan Altima
Created on:
Tools used
Socket Extensions
Torque Wrench
Ball Joint Press
Rust Penetrant
Pry Bar
Jack Stands
21mm Socket
32mm Socket
Side Cutters
Rubber Mallet
Dead Blow Hammer
Paper Towels
22mm Wrench
Drain Pan
Ratchet
Floor Jack
Cloth Rags
Needle nose pliers
1/2 Inch Breaker Bar
22mm Socket
1. Removing the Wheel
Loosen the lug nuts with the vehicle on the ground
Raise and support the vehicle
Remove the lug nuts
Pull the wheel off the hub
Remove the center cap from the wheel with a flat blade screwdriver
2. Removing the Axle
Remove the cotter pin from the axle nut with needle nose pliers
Apply rust penetrant to the axle nut
Lift the wheel onto the hub
Tighten the lug nuts onto the wheel by hand
Lower the vehicle to the ground
Loosen the axle nut with a breaker bar and a 32mm nut
Raise and support the vehicle
Remove the lug nuts
Pull the wheel off the hub
Turn the hub by hand to access the ball joint cotter pin
Cut the cotter pin with side cutters if necessary
Remove the cotter pin with pliers
Loosen the ball joint nut with a 22mm wrench and a dead blow mallet if necessary
Remove the nut from the ball joint
Attach a ball joint separator to the ball joint
Turn the ball joint separator with a socket and ratchet
Once the ball joint is separated from the steering knuckle, remove the ball joint separator
Remove the axle nut from the axle
Apply rust penetrant to the axle splines
Thread the axle nut onto the axle
Strike the axle nut with a dead blow hammer to loosen the axle from the hub
Push the axle out of the hub
Have a drain pan ready
Pry the axle out of the transmission with a pry bar
Pull the axle off the transmission
3. Installing the Axle
Clean the hub splines with a rag
Check the condition of the axle seal on the transmission
Clean the seal with a rag
Push the axle into the transmission
Thread the axle nut onto the hub end of the axle
Tap the axle into the transmission with a dead blow hammer
Remove the axle nut from the axle
Apply rust penetrant or white grease to the axle splines
Feed the axle into the hub
Start the axle nut onto the axle by hand
Tighten the axle nut preliminarily with a 32mm socket and ratchet
Feed the ball joint stud into the wheel knuckle
Tighten the ball joint nut with a 22mm wrench
Insert the cotter pin into the 22mm nut
Bend the cotter pin into place with pliers
4. Installing the Wheel
Lift the wheel onto the hub
Start the lug nuts by hand
Lower the vehicle to the ground
Torque the axle nut to 173 - 230 foot-pounds
Torque the lug nuts to 73 - 86 foot pounds in a star pattern
Raise and support the vehicle
Remove the lug nuts
Pull the wheel off the hub
Fit the cotter pin through the axle nut
Bend the cotter pin into place with pliers
Clip the center cap onto the wheel
Lift the wheel onto the hub
Start the lug nuts by hand
Lower the vehicle to the ground
Torque the lug nuts to 73 - 86 foot pounds in a star pattern
Before you lift and support the vehicle, loosen the lug nuts with the wheel on the ground. Use a 21-millimeter socket and breaker bar. Lift and support the vehicle. With the lug nuts loose, you can use the 21-millimeter socket or just your hand. Finish removing the lug nuts. Remove the wheel. Place it aside.
You need to remove the center cap from the wheel. I'm going to take the end of a screwdriver, put the hand on this side and just give it a good whack. Your center cap will pop right out, it's spring-loaded. We'll put that aside.
Remove the cotter pin from the axle using some needle nose pliers. Spray this axle nut with rust penetrant.
Now we're going to put the wheel back on, put the vehicle on the ground. We have to loosen this axle nut with the weight of the vehicle on it so the wheel doesn't turn. I'm just putting these on snug by hand. The vehicle's not going to roll anywhere. We're just going to put it back on the ground. Simply don't want this thing spinning as we're trying to remove it with a breaker bar. Use a breaker bar and a 32 millimeter socket on the axle nut. Break it free. With the axle nut loosened and the vehicle lifted and supported, again, we can remove the wheel to continue working on removing the axle.
To remove the cotter pin, I've got some needle nose pliers. I'm going to try to bend it straight. Sometimes you've just got to grab it and wiggle the cotter pin back and forth and you'll start to see the looped end move and it's freed up. Kind of work the needle nose into it. So pry against it. When these cotter pins get rusty it can be a bit of a pain to get them out. The other trick is to use some side-cutting pliers. Sometimes you get a better grip on them on the cotter pin with the side-cutters and just work it out. Or like that. It actually cut the end off of it. Sometimes you can just cut the looped end right off. Then go back to your needle nose pliers and it's easier because you should replace these cotter pins every time you take this off, and try to slide. Grab one part of the cotter pin. This one's just going to break on me. There we go. I've got it out.
With the cotter pin removed, I can take a 22-millimeter wrench and loosen the nut. This one's on here really tight, so I'm going to take my dead blow mallet or you can use a rubber mallet on the end of the wrench. Just going to hit it, break it free. This is almost off. You really can't get a socket and a ratchet in here. If you've got a ratcheting 22-millimeter wrench, you could use that. I just have a regular box wrench, so just turn by turn, get the nut loose and off.
This control arm is made out of aluminum. It's very soft. You can try to hit the knuckle with a heavy hammer to break this out of the taper, but you could hit the control arm and damage the aluminum, so you really should use a ball joint separator tool. With the ball joint separator tool in place, I'm going to use the appropriate size ratchet and socket. Just going to gently push it out. It will snap when it comes free. Now we can pull this down and out of the way. It should come right out of the taper.
With the lower ball joint separated from the knuckle and the strut and hub assembly, we're going to remove the axle nut that we already loosened on the ground. It's a little tight. I can use the socket. It's loose. It just has some rust on the threads. I'm just going to use this to take it off. I spray some rust penetrant in here, where the splines go into the hub. With any luck this will push out.
It's kind of seized in there. I'm going to take the axle nut, put it on, take a dead blow hammer, and try to pop it out. Spray a little more rust penetrant from the backside. I've got the nut on here so that I don't mushroom the end of the axle shaft as I try to knock it out. That's as far as it'll go with the nut on there. Pull out on the hub and axle assembly like this. Push it out.
Hold the axle. I’ve got a drain pan underneath in case any transmission fluid comes out when I disconnect the axle from the transmission. I've got a small pry bar. I try to go between the subframe here and get this pry bar up and just sort of pry it out of the – there's a circlip inside that locks it in and you just snap it out of that. I'm going to use the pry bar. It's a bit tight, the clearances. There it is.
We did have some force holding them in. What's happening is there is a clip here. This clips inside of the transmission. You basically just need to pop it off of this circlip and then it slides straight out.
This is our old CV axle, pulled from our vehicle. This is our new one from 1AAuto.com. Our car originally did not have ABS. The new CV axle works for cars both with and without ABS. It already comes with the tone ring. See they're the same. They are the same length, with the same style splines and circlip, same spines here, same threaded ends, and it comes with a new axle nut. This should go right in and get you on the road.
Before we try to install our new axle I'm just going to take a rag and just clean out the splines that are in here, just any loose debris. We are losing some fluid here so when we're all done you want to check and fill the transmission with the appropriate fluids the correct level, but for now I'm just going to check the condition of the seal. It looks good. I'll wipe out any dirt that's in here.
Take our CV axle, then guide it in, careful not to nick the seal on the transmission. Seems to be lined up on the splines. I'm just going to try to push it in to lock it. Try pushing it in. It's pretty stiff because it has to get over that circlip. I'm going to put our nut in the end here so I don't damage the end of the axle shaft. Use a dead blow or rubber mallet. I'm just going to tap it in. There it is. Now it's seated. It just need to be tapped a little bit.
I'm going to take this axle nut off. Take a little bit of rust penetrant or if you got some white grease or something. Now we're going to take our axle, bend it over as best we can, and push out the hub. This would come together. There it is. Push it back.
Capture our axle nut. Take that big 32 millimeter socket and I'm just going to thread it down by hand to pull it in. Switch to a ratchet to go a little faster. Okay, so right there it stopped. That's fine because I will torque this after the wheel's on the car and the vehicle is on the ground. I just wanted it tight so I can put this back together for now.
Put the ball joint back into the knuckle. If you need to you can – there you go. We'll put our nut on here. Tighten our ball joint nut down with a 22-millimeter wrench. See, it's pulling these together. It's going to pull the ball joint up into the taper of the hub. That helps to lock it in place. I'll get this nice and tight and then put a cotter pin in. Put our cotter pin in. Take some needle nose pliers. Bend it over. The ball joint is now tight.
Reinstall the wheel on the vehicle. Start the lug nuts by hand. You need to torque the center axle nut The torque as 173 to 230. I’m going to torque it to 180.
Try to reinstall the cotter pin through the wheel opening. It doesn't really fit so unfortunately you have to take the wheel back off, but is the best way to do it, is to torque it with the wheel on the ground on the car. Reinstall our cotter pin. Bend it over. Now we can clip our center cap back into place. We'll reinstall our wheel and we'll torque the lug nuts. Torque on the lug nuts is 73 to 86. Let's torque these to 80 in a cross pattern. The job is complete
Thanks for watching. Visit us at 1AAuto.com for quality auto parts, fast and free shipping, and the best customer service in the industry.
CSA82207
In Stock
Product Reviews
Loading reviews
5.00/ 5.01
1review
5 Stars
4 Stars
3 Stars
2 Stars
1 Star
1
0
0
0
0
Cv axle
G
August 9, 2017
Works great! Love it and now I know where to buy parts for cheap that actually work great!
Customer Q&A
No questions have been asked about this item.
Customer service
877-844-3393
Monday - Friday 8:00am - 9:30pm ET Saturday - Sunday 8:00am - 4:30pm ET
Nissan is a registered trademark of Nissan Motor Co., Ltd. 1A Auto is not affiliated with or sponsored by Nissan or Nissan Motor Co., Ltd.See all trademarks.
Enter Vehicle Year Make Model
Specify your vehicle's year, make and model to guarantee fit.
Year
Make
Model
Options
Drivetrain
This part doesn’t fit a . Select from parts that fit.