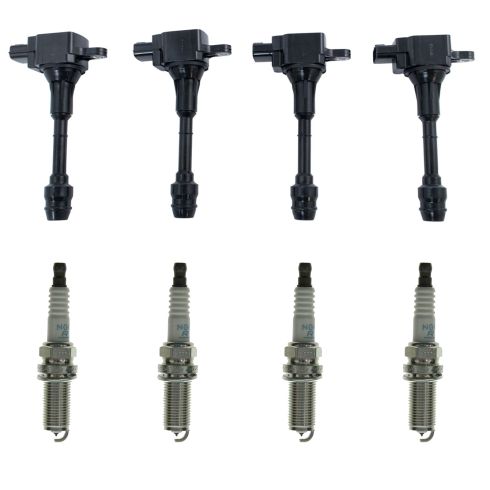
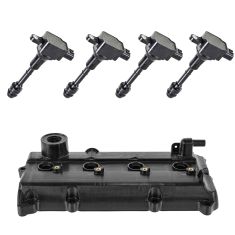
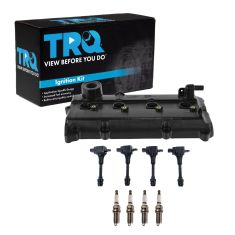
This Ignition Kit comes with NGK Laser Platinum Spark Plugs and TRQ Ignition Coils.
Complete Repair in One Purchase - Stop searching for parts individually and complete your repair with a customized kit or set from DIY Solutions.
High-Quality Parts from Trusted Brands - DIY Solutions' kits and sets are selected from the best automotive brands and include hard-to-find and even obsolete parts you may need for your vehicle.
Guaranteed Fit - DIY Solutions ensures its selected parts are quality-tested to guarantee fit and function.
Item Condition:New
Attention California Customers:
WARNING: This product can expose you to chemicals including Lead and Lead Compounds, which are known to the State of California to cause cancer, and birth defects or other reproductive harm. For more information, go to www.P65Warnings.ca.gov.
Lifetime Warranty
This item is backed by our limited lifetime warranty. In the event that this item should fail due to manufacturing defects during intended use, we will replace the part free of charge. This warranty covers the cost of the part only.
Returns: Parts with electrical components cannot be returned once installed.
FREE Shipping is standard on Orders shipped to the lower 48 States (Contiguous United States). Standard shipping charges apply to Hawaii, Alaska and US Territories. Shipping is not available to Canada.
Expedited is available on checkout to the United States, excluding Alaska, Hawaii and US Territories as well as P.O. Boxes and APO/FPO/DPO addresses. Final shipping costs are available at checkout.
How to Replace Ignition Coils 2002-06 2-5L Nissan Altima
How to Replace Spark Plug 2000-06 Nissan Sentra
How to Replace Spark Plugs 2002-06 Nissan Altima 2-5L
How to Replace Spark Plug 2002-06 Nissan Altima
How To install Replace Ignition Coils 2-5L 2002-06 Nissan Altima
Created on:
Tools used
5mm Hex Wrench
10mm Socket
Ratchet
1. Removing the Engine Cover
Remove the four 5mm Allen bolts from the engine cover
Lift the cover off
2. Removing the Ignition Coils
Push in the clip and disconnect the connector
Remove the 10mm bolt from the ignition coil
Lift the ignition coil up and out
3. Installing the Ignition Coils
Insert the coil into the engine
Tighten the 10mm bolt to the coil
Connect the connector
4. Reinstalling the Engine Cover
Place the cover over the engine
Tighten the four 5mm Allen bolts
Use a 5mm Allen key to remove the plastic engine cover. There are one, two, three, four bolts holding it on. Lift that off and put it aside.
These are your four ignition coils. I'm going to show you how to remove this one, procedure will be exactly the same for the other three. Start by pushing this clip in and wiggle the connector out. Use a 10mm socket and ratchet and use a retaining bolt. Put that bolt aside. Grab it on both sides, and kind of wiggle it, because there is a boot that goes down over the spark plug. It's got a little suction to it. Pull it out and that's how you remove the coil.
Here's our old coil from our vehicle, and our new coil from 1aauto.com. See, they're an exact match. Got the bolt holes on either side, same style connectors, and the same style connector at the spark plug end. This will fit perfectly, and get the car running great again.
Install our new coil packs. Now this bolt hole here is just a metal insert into this plastic valve cover, so we're not going to over-tighten those, just going to tighten them very carefully. So slide the coil down. Push it over the spark plug. It will sit in there. Get the bolt started. I'm just using my wrist to tighten it, and right when I feel it get tight, I'm going to stop, 'cause I don't want to pull this threaded insert out of the plastic valve cover.
Reinstall the connector, and repeat this procedure for the rest of the coils. Reinstall the engine cover, and reinstall your four bolts. These bolts are just going into aluminum, just holding on the plastic cover. Not a lot of torque on these. The job is complete.
Thanks for watching. Visit us at 1AAuto.com for quality auto parts, fast and free shipping, and the best customer service in the industry.
Tools used
Socket Extensions
Torque Wrench
Spark Plug Gapping Tool
10mm Wrench
5/8 Inch Spark Plug Socket
10mm Socket
Ratchet
1. Removing the Spark Plug
Remove the 10mm bolt from the ignition coil
Disconnect the wiring harness from the ignition coil
Pull out the ignition coil
Use a 5/8 inch spark plug socket to remove the spark plug
2. Gapping the Spark Plug
Use a gapping tool to measure the gap
For this model the gap sould be .044 inch
The gapping tool should go in and out with slight resistance
3. Installing the New Spark Plug
Insert the new spark plug with the 5/8inch spark plug socket
Making sure your socket extension stays straight, tighten the new spark plug
Tighten the spark plug to between 25-30 foot-pounds of torque
Push the new ignition coil in, making sure it is centered
Insert and tighten the 10mm bolt into the ignition coil
Reconnect the ignition coil wiring harness
Repeat this procedure for the other spark plugs
Brought to you by 1AAuto.com, your source for quality replacement parts and the best service on the Internet.
Hi, I'm Mike from 1A Auto. I hope this how-to video helps you out, and next time you need parts for your vehicle, think of 1AAuto.com. Thanks.
In this video, we're going to show you how to replace the spark plugs on this 2006 Nissan Sentra. This vehicle has the four-cylinder engine. The only tools you'll need are a 10 millimeter wrench or a socket with ratchet, and then you'll also need a 5/8ths spark plug socket with a ratchet and extension.
Pretty easy, they're right straight forward. A 10 millimeter bolt holds the coil in. Remove that. Pull on here, and disconnect. The coil comes up and out. You want at 5/8ths plug socket. This is actually designed to kind of go on, it's got a soft center. It kind of grabs on to the coil. Mine is really old, so I'm going to stuff a piece of paper towel up in there, which, will help it to grab onto the socket. So, you just put it right down in until it's on the spark plug. Get it nice and firm and unscrew the plug. Try lifting up on it slowly, and it should come right up and out.
When you put new plugs in, the new plugs should come already gapped. These platinum tipped plugs, you have to be very careful with them when you gap them. These should be at .044 or 44 thousandths. Like I said, they should come gapped, but if you want to check them, just take your gage and carefully and slowly insert it. It should insert. Then, come back out with just a little bit of resistance. Once you've made sure you're all set with your gap, then put the plug back down in. Carefully, make sure when you're turning, that you have your extension right in the center of the hole so that your plug's going in straight. Then, tighten and these should be tightened to about 25 to 30 foot-pounds, which is, just kind of firmly tightened with a smaller handle like this. You don't want to over tighten them. They'll get stuck in the head very easily. Okay, here's a new coil from 1A Auto; it's going to go in just like the original one. Making sure that you put it right down in the center there. You can feel it kind of go down to the spark plug. I'm going to put it down on. Put your bolt back in, and tighten it right down, nice and firm. Reconnect, and then repeat for the other three.
We hope this helps you out. Brought to you by www.1AAuto.com, your source for quality replacement parts and the best service on the Internet. Please feel free to call us toll-free, 888-844-3393. We're the company that's here for you on the Internet and in person.
Tools used
5mm Hex Wrench
Socket Extensions
Torque Wrench
5/8 Inch Spark Plug Socket
10mm Socket
Ratchet
1. Removing the Engine Cover
Remove the four 5mm Allen bolts from the engine cover
Lift the cover off
2. Removing the Ignition Coils
Push in the clip and disconnect the connector
Remove the 10mm bolt from the ignition coil
Lift the ignition coil up and out
3. Removing the Spark Plug
Loosen the spark plug with a 5/8" socket and extension
4. Installing the Spark Plug
Insert the spark plug into the socket
Tighten the spark plug into the engine by hand
Torque the spark plug to 15-21 foot-pounds
5. Installing the Ignition Coils
Insert the coil into the engine
Tighten the 10mm bolt to the coil
Connect the connector
6. Reinstalling the Engine Cover
Place the cover over the engine
Tighten the four 5mm Allen bolts
Use a 5mm Allen key to remove the plastic engine cover. There are one, two, three, four bolts holding it on. Lift that off and put it aside.
These are your four ignition coils. I'm going to show you how to remove this one, procedure will be exactly the same for the other three. Start by pushing this clip in and wiggle the connector out. Use a 10mm socket and ratchet and use a retaining bolt. Put that bolt aside. Grab it on both sides, and kind of wiggle it, because there is a boot that goes down over the spark plug. It's got a little suction to it. Pull it out and that's how you remove the coil.
Your spark plugs are located down in the head through these access holes. Before you remove the spark plugs from the holes, to make sure there's no debris in there, if you've got access to compressed air with a blow gun, you should blow the holes and blow out any debris so you don't have any fall into the cylinder with the spark plug pulled out of there. These ones are actually pretty clean, so we're in good shape.
We can use a 5/8 spark plug socket. It has the little rubber holder in here that's going to grab onto the electrode end. It'll allow me to pull the spark plug out of the cylinder head once it's loose. We can just do these one at a time. Pull one out, replace it with the new one, move on down the line. Your old spark plug we pulled out, it's pretty dirty and sooty and it's got a bit of a fuel odor. The car actually had a check engine light for a random misfire. So it seems like it's time for a tune-up.
This is our new spark plug from 1AAuto.com. It is an exact match for the one that came out of the vehicle. It's ready to go and be installed. The electrode is nice and fresh and it's not worn out. This will really help the car out and basically be like driving a new car again.
Take our new spark plug, place it into the spark plug socket. That's why it has the little rubber holder in there so it doesn't fall out while you're trying to install it. Just going to install it by hand so it doesn't get cross threaded. Once I've swapped out all of them, I'll come back and torque these. Thread it down until it stops. Move to the next one. With the plugs threaded in just hand-tight until they stopped, I'll now torque them. The torque is 15 to 21 foot-pounds. I'm going to set my torque wrench at 17. We'll torque them down.
This bolt hole is just a metal insert into this plastic valve cover, so we're not going to over-tighten those. We'll tighten them very carefully so slide the coil down, push it over the spark plug, and let it sit in there. Get the bolt started. Just using my wrist to tighten it. Right when I feel it get tight, I'm going to stop because I don't want to pull the serrated insert out of the plastic valve cover.
Reinstall the connector, and repeat this procedure for the rest of the coils. Reinstall the engine cover, reinstall your four bolts. These bolts are just going into aluminum, just holding on a plastic cover. Not a lot of torque on these. Job is complete.
Thanks for watching. Visit us at 1AAuto.com for quality auto parts, fast and free shipping, and the best customer service in the industry.
Tools used
5mm Hex Wrench
Socket Extensions
Spark Plug Gapping Tool
5/8 Inch Spark Plug Socket
10mm Socket
Ratchet
Magnet - Extendable
Needle nose pliers
1. Removing the Spark Plug
Remove the four 5mm Allen bolts from the engine cover
Pull off the engine cover
Disconnect the wiring harness from the ignition coil
Remove the 10mm bolt from the ignition coil
Pull the ignition coil off
Remove the spark plug with a 5/8 inch spark plug socket
If the spark plug doesn’t pull out with the socket, retrieve it with pliers or a magnet
2. Preparing the New Spark Plug
Determine the correct gap for your vehicle
Set the gap on the spark plug to .044 using a spark plug gapping tool
The correct setting should slide in and out of the gap with some resistance
3. Installing the New Spark Plug
Insert the new spark plug
Thread the spark plug by hand
Tighten the spark plug to between 18 and 20 foot-pounds
Put the ignition coil into place
Insert the 10mm bolt into the ignition coil
Repeat these steps for the remaining spark plugs
Put the engine cover into place
Install the four 5mm Allen bolts into the engine cover
Brought to you by 1AAuto.com, your source for quality replacement parts and the best service on the Internet.
Hi, I'm Don from 1A Auto. I hope this how-to video helps you out, and next time you need parts for your vehicle, think of 1AAuto.com. Thanks.
In this video, we're going to show you how to replace the spark plug on this 2003 Nissan Altima with the 2.5 liter, 4-cylinder engine. The items you'll need for this are new spark plugs from 1AAuto.com, 10mm socket and ratchet, 5mm Allen bit, and a 5/8 inch spark plug socket, as well as a gap tool.
To access the ignition coils, you first have to remove this engine cover. It's held in by these four 5mm Allen bolts. We'll just fast forward as Don removes these. Now, the cover just lifts right off. Here are your four ignition coils. It's held in with one 10mm bolt and the harness right here. Just push the tab and pull that harness off, and then remove that 10mm bolt. The ignition coil just lifts right up and out. With the ignition coil removed, you can see the spark plug right down in there. Using an extension and your 5/8 inch socket, you want to just remove that spark plug. If the plug doesn't come right out, then you can use a magnet or pliers to reach down and grab it.
You'll want to set the gap between the center electrode and the ground electrode. On this, it should be .044. Set it by sliding the spark plug tool in between there and make sure there's a little resistance when you pull it in and out.
Carefully, put the spark plug back down in and thread it in by hand to make sure you don't cross-thread it. Once it's seated, you want to tighten it between 18 and 20 foot pounds. Now, put your coil back down in and replace the 10mm bolt. You'll want to reconnect it and repeat these steps for the rest of the spark plugs.
We hope this video helps you out. Brought to you by www.1AAuto.com, your source for quality replacement parts and the best service on the Internet. Please feel free to call us toll-free, 888-844-3393. We're the company that's here for you on the Internet and in person.
Tools used
5mm Hex Wrench
10mm Socket
Ratchet
1. Removing the Ignition Coil
Remove the four 5mm Allen bolts from the engine cover
Lift the cover up and off
Remove the ignition coil wiring harness
Remove the 10mm bolt from the ignition coil
Lift the ignition coil up and out
2. Installing the New Ignition Coil
Place the ignition coil into the cylinder head
Replace the 10mm bolt on the ignition coil
Reconnect the ignition coil wiring harness
Replace the engine cover and tighten the four 5mm Allen bolts
Brought to you by 1AAuto.com, your source for quality replacement parts and the best service on the Internet.
Hi, I'm Don from 1A Auto. I hope this how-to video helps you out, and the next time you need a part for your vehicle, think of 1AAuto.com. Thanks.
In this video, we're going to show you how to replace the ignition coil on this 2003 Nissan Altima with the 2.5L four-cylinder engine. It's the same process on the Altimas and Sentras with this engine from 2002 to 2006. You'll need a new ignition coil from 1AAuto.com, a 10mm socket, a ratchet, and a 5mm Allen bit.
To access the ignition coils, you first have to remove this engine cover. It's held in by these four 5mm Allen bolts. We'll just fast-forward as Don removes these. He's using a ratchet with a 5mm Allen bit. You could also just use a 5mm Allen wrench, as well.
Now, the cover just lifts right off. Here are your four ignition coils. It's held in with one 10mm bolt in the harness right here. Just push the tab and pull that harness off. Then remove that 10mm bolt. Now the ignition coil just lifts right up and out.
The old ignition coil is on the left; the new one from 1A Auto is on the right. You can see they're identical, and will fit exactly the same. Take the new ignition coil and just push it down into place. Then replace that 10mm bolt and reconnect your harness. Repeat this process for however many coils you want to replace. Now, all that's left is replacing that engine cover and those four 5mm Allen bolts.
We hope this video helps you out. Brought to you by www.1AAuto.com, your source for quality replacement parts and the best service on the Internet. Please feel free to call us toll-free, 888-844-3393. We're the company that's here for you on the Internet and in person.
IGN01083
In Stock
Product Reviews
Loading reviews
5.00/ 5.08
8 reviews
5 Stars
4 Stars
3 Stars
2 Stars
1 Star
8
0
0
0
0
Perfect match
Justin
August 8, 2020
These were a perfect match and easy to replace. Tutorial video made the process extremely easy.
Perfect parts
N
September 8, 2020
The plugs were gaped perfect, the parts fits great runs better than it did 10 years ago.
2006 atlima
A
December 22, 2020
Delivered promptly.. Parts worked great and fixed a misfire. 2006 Altima.. Good product and fair price.
Awesome Great fit and quality
Erin
July 5, 2021
What can you say really ! I buy from 1A Auto because Matter what product I order it immediately ships, Fits perfectly and I have everything I need in one package plus a video if need be awesome ! Thank you. Oh ya all my purchases have been great quality including these coils and plug !
Garry
September 15, 2021
Great!!!
????????
Harry
September 27, 2021
Works great
Great!
Jason
October 16, 2021
Good deal, works great!
On time delivery & easy install instructions.
Vraj
December 14, 2022
I installed these along with ignition coils and valve cover & gasket. Car is running real smooth now, thanks 1A Auto!!
Customer Q&A
Does this part work for 2.5 s ?October 5, 2022
John D
10
This is listed to fit:
2002-2006 Nissan Altima L4 2.5L
2002-2006 Nissan Sentra L4 2.5L
October 5, 2022
Kelly S
Customer service
877-844-3393
Monday - Friday 8:00am - 9:30pm ET Saturday - Sunday 8:00am - 4:30pm ET
Nissan is a registered trademark of Nissan Motor Co., Ltd. 1A Auto is not affiliated with or sponsored by Nissan or Nissan Motor Co., Ltd.See all trademarks.
Enter Vehicle Year Make Model
Specify your vehicle's year, make and model to guarantee fit.
Year
Make
Model
Options
Drivetrain
This part doesn’t fit a . Select from parts that fit.