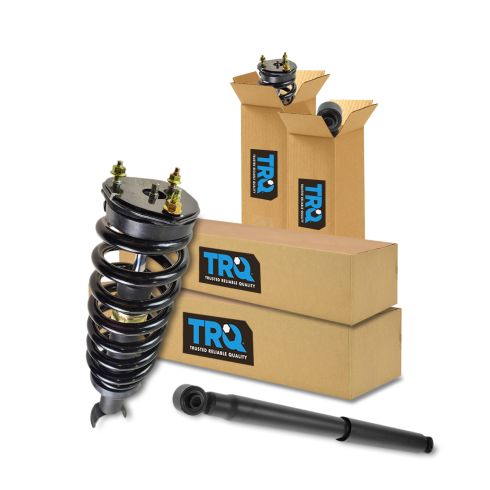
1ASSP00999-2006-08 Dodge Ram 1500 Front & Rear 4 Piece Complete Shock Assembly & Shock Absorber Kit TRQ SBA60403

Replaces
2007 Dodge Ram 1500 Truck Crew Cab 4 Wheel Drive Front & Rear 4 Piece Complete Shock Assembly & Shock Absorber Kit TRQ SBA60403

Product Reviews
Loading reviews
4.82/ 5.0
17
17 reviews
Shock absorber
June 28, 2017
The helpfulness and speed of 1A was great and getting all the suspension together in one kit. The only thing I would say that could be better would be a heavier duty struts for the front they seam to be a little light for my truck. But still happy with them.
October 25, 2017
I am very happy with my order and especially the customer service representative. There was a part left out of my order and I called them. They were very nice and helpful, my part came a couple days later. I would recommend them to anyone. Thanks again.
Awesome shocks at a great price
July 25, 2019
This is my first purchase from 1A Auto and I expect to become a long time customer. The shocks are great and my truck now handles MUCH better. The fact that the coil overs are preinstalled makes the job much easier. Also, you install videos are a very well done and very helpful.
From a customer service standpoint, there was a shipping problem and 1A Auto took care of it immediately...even though it really wasn't their fault.
Getting the old shocks out was more difficult than expected, but that was because the old units were old and rusted in. Soak with penetrating oil a couple of times, well in advance of pulling it apart. I ended up having to cut out the bottom linkage on the old ones and replace the lower bushings....But, the new ones went in great!
Great service and parts
November 21, 2019
Parts were affordable and arrived quickly. Videos were great when I got stuck. Great Complete package.
Struts and shocks
December 8, 2019
Would differently recommend them there great.ptice is Ruth.
Truck parts
September 18, 2020
It's the same price as rock auto but you get lifetime warranty and instructional videos on parts of you need them. Very detailed. They even have part numbers of what they would replace it with, which was also on rock auto!
OEM Quality at a cheaper price
December 21, 2020
Struts fit as should, my ride improved majorly and feels like a completely different pickup. Highly recommend this product. Just a tip to anyone doing this job is to be prepared for lower control arm bushings as the bolts like to rust themselves to it.
07 ram 1500 laramie
April 1, 2021
This kit wouldnt work on a 2wd? Would differently buy if it fits
May 25, 2021
I ordered struts for my 08 ram 1500 and had no issues. I believe it took about 4 days to get them. They have been on the truck about 3 weeks now with no problems.
September 11, 2021
Don't forget to order "Control Arm Bushing Set." If you have an older truck the bolts will be nearly impossible to heat or hammer out. Dodge did not use anti-seize and they were essentially welded on. If this is true for your vehicle, you will need to grind or cut out the strut. (I used a hole saw, without the pilot bit, and drilled out the rubber gasket in the bushing. After I hammered the inside of the bushing out, the sleeve remained. I used a saws-all to cut two lines, with out hitting the control arm, to release the outside of the bushing. After this step, I used a Dremel tool to clean out the control arm. It was a bear, but it can be done.
Good
February 17, 2022
Fast shipping. Fit great
June 2, 2022
Couldnt be happier everything worked out great . The ride is so much smoother now thanks for a great product .
New Shocks/Struts for my Ram 1500
June 21, 2022
I love the new struts that I got my truck drives a lot better.
On point
December 29, 2022
Perfect fit great price quick delivery can't complain
February 5, 2023
Sweet once again
May 4, 2023
They fit! I had to order the lower bushings because mine were in rough shape but the ride quality is way better.
The right parts
December 13, 2023
The right parts, the first time. Thanks!
Customer Q&A
Will it fit a 2006 Dodge Ram trx4?
June 13, 2016
10
Fits:
2006-2008 Dodge Ram 1500 Truck Front & Rear Shock Absorber Set of 4 for 4 Wheel Drive (excluding Mega Cab)
June 13, 2016
Brian F
will it fit a 2007 laramie?
May 28, 2017
10
Yes, as long as you have the Regular Cab or Quad Cab and 4 Wheel Drive.
May 30, 2017
Alex P
Will this part fit 3.7L 2WD model?
July 11, 2019
10
This part is specific to vehicles with a particular set of options. We will need more information about your vehicle to confirm the fit.
July 11, 2019
Emma F
Need for 06 ram quad 2wd left side has speed sensor no abs in front only in the back?
June 26, 2021
10
This is not the correct part for your vehicle, but we do carry a selection of shock kits for the RWD models here: https://www.1aauto.com/2006-dodge-ram-1500-truck-shocks-and-struts/y-mo-c/2006-1463-64?2006-1463_Drivetrain_fitQualifierFld=Rear+Wheel+Drive
June 28, 2021
Cristina P
Will this fit a 2wd 2007 ram?
November 12, 2021
10
This part will not fit your vehicle, but we may have a part that is listed to fit.
Please enter your vehicle's year make and model in the search bar at the top of the page. This will display parts guaranteed to fit your vehicle. Just be sure to verify all of the information shown in the Vehicle Fit tab before ordering.
November 12, 2021
Ricale A
Will this fit an 06 ram 1500 slt mega cab?
November 17, 2022
10
No, this kit is not listed to fit mega cab models.
November 17, 2022
Jessica D
Will this kit fit 2008 dodge truck2wd 3.7 l v6 and does it have abs?
August 5, 2023
10
Yes, this part will fit your vehicle as long as you have a regular or crew cab. This will not include ABS sensors.
August 7, 2023
Emma F
Dodge is a registered trademark of FCA US LLC. 1A Auto is not affiliated with or sponsored by Dodge or FCA US LLC.
See all trademarks.


