Hi, I’m Mike from 1A Auto. We’ve been selling auto parts for over 30 years!
Open the hood. Reach down, and pull the release. Located far down here by your left foot, where it rests. Pull it open. Release the secondhand latch. Just push up on it. Lift it up. Put those down for a second.
The hood has two positions. Normal position, and then if you open it further, there is a second service position here. I'll put it there for now. Remove the eight push clips from the upper grille cover. Just start on one side. Pry it up with a small plastic screwdriver. Pry it up with a small, flat bladed screwdriver. Prying open the middle unlocks the clip when you pry open the outside to unlock it. You may need to get a trim clip tool that can help to unlock it. Pull it right out. Just repeat that for all of them. Last one here. Pull this cover off. It slides behind the grille, just lift it up. Slide it out from the chrome grille.
From underneath the fenders, slide off of the safety lock and put it aside. We're going to lift the vehicle up to get to the clips under the bumper. You could do this with the vehicle on the ground. But in order to show you, we're going to put it up in the lift so it's easier to see. On both sides of the car, there is a Phillips head screw up in this recessed opening. You're going to remove that. I'll repeat that for the other side.
There are ten push clips on the front edge of the bumper. These are removed just like the ones up top using a small flat bladed screwdriver. Push out the middle, and then pry them out of the bumper. They get filled up with dirt. Sometimes they're hard to unlock. Just pry them open with a small flat bladed screwdriver, and then get the trim clip tool in there. Kind of work them open. Work along the edge, find all the clips, and pull them out. They might break. You might have to replace them. They get brittle with age. Front bumper is setting on two pins on either side. Just kind of pop it up like that, and over here. That's the front.
Now we'll come to one side and pull it straight out. It's going to sound like it's breaking, but you're just pulling it off of the clips. Just work it down around the headlight. Make sure it's off of that pin that we'll pop back on. Do the same for the other side. Give it a bit of a swift tug. And now, I'm going to get off those pins, support it, and pull it straight off the vehicle.
The headlights are bolted in. This is part of the bumper bracket, it's going to come out with the headlight. A 10MM bolt here, a 10MM bolt here, and a 10MM bolt here. There's also a 10MM bolt that's under the bracket, bolting this bracket to the headlight, which is why we're gonna remove the headlight and the bracket all as one piece. I'm gonna spray some rust penetrant on these. Start with this one on the top. Just slide the plastic out of the way. That one came right out. Remove this one. The bolt that came out here does have a shoulder to it, so I'm gonna make sure that we're gonna reuse this bolt in the same spot. Remove this bolt here. Also has a shoulder, we're gonna reuse that in the same spot. Headlight assembly is now free. It's gonna slide straight out of the fender. So it came off of these pins that were in the top, slide the bracket up and over like this, and then just kind of maneuver it out. Once we have it out, I'll just support it. Push this tab in both sides to unlock it. Unplug all the lights. Push down the locks, pull them off. Same for this one. Same for this one. Sometimes you have to push in, because they can fill with dirt. Push down this tab here. I'm gonna use a small flat bladed screwdriver, push in on the lock. Pull the connector out. Pull the headlight right out of the vehicle.
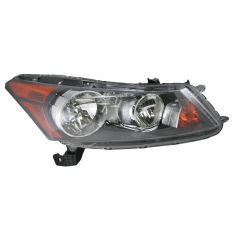
Here's our original headlight that we've pulled from our vehicle. It's got UV damage, it's yellow, it's crazing, it's got internal damage. It's time to be replaced. It has the bracket still attached to it. This is our brand new headlight from 1AAuto.com. I can actually pull the protective plastic wrap off of it. It's perfect and new. We'll need to reattach the bracket to reuse it. You need to adjust the aim of your headlight. You can turn this bolt here to adjust it up or down. But this will work right and fit great in your vehicle. To reuse this bracket there are two bolts, 10MM bolts on the underside of it. Bolts the headlight housing. Use a 10MM socket, ratchet extension. Loosen these up. Take the bolt out. Do the same for this one. Take the bracket off, don't need this headlight anymore. We install the bracket onto the new headlight. Bolts back in. Tighten these down. Don't need to over tighten them, they're just going in the little inserts in the plastic. Just like that. This is ready to be installed in the vehicle. This procedure will be the same for the drivers side. Before you put the headlight back in, make sure you plug all the lights back in. So clip that into place. Put it in the bulb over here. Put in the low beam bulb. Click and locks into place. And then the high beam bulb is like that, and the turn signal bulb over here. Slide the headlight back into the fender. It has two pins here that need to slide into two openings in the fender. At the same time we need to also maneuver it down this way. Just kinda gently get it in there, see if I can fit this up just like that. Trying to get these pins up into place without breaking them. Slide them in like that. So now the headlight's in place, push it into those little pins that are in there. Make sure we get it up like that. Put the shoulder bolt back into this one here, it came out of. Wind up. Tighten it down into place. A non shouldered bolt went on top. Have to move the plastic out of the way. Just tighten that down. It's perfect there. Put the other shouldered bolt back in here. Just repeat this procedure for the other side.
Reinstall the bumper. Go straight on with it. It does have some pins right here that it's going to sit on, on both sides. It helps keep it from falling off. Get the bumper lined up in the brackets. Push it right in, and snap it in place. And the same for both sides.
We're going to push the fender liner up in behind the bumper. Just like that. Install this Phillips head screw, so the bumper doesn't fall off, while I put the push clips back in. Make it tight. I'll just stop. Do the same for this side. I'm going to go along the bumper now and reinstall all the push clips I removed. Push them back into place. If you have broken ones, you'll replace them. Put the last one in. Now reinstall this upper cover. Put it over the little rubber bumpers, then this part goes behind the grille. Just kind of have to bend it and flex it. It slides in like that. Do the same for both sides. And place all the push clips. Put push clips in. Hood down.
This is a basic tutorial on how to aim the headlights on your vehicle. Find the access of your headlights. This is usually indicated with a small dot or the headlight bulb size on the lens. If not, it's the actual center point of your headlight bulb. Transfer this mark to a vertical wall with a preferably dark color that'll allow you to back up 25 feet. Pull up and find the center line of your vehicle, as well as the center line of your headlight access. Mark the wall with the height of the headlights, and a straight line going across at that access height. Back your vehicle up 25 feet from the wall to the front edge of your vehicles headlights. Turn your headlights on, and locate the adjusting screw, usually on the back side of your headlights. You'll want to rotate this until the passenger hotspot or focus of the beam is approximately two inches below the line and the driver's side is four inches below the line. We change the heights on each side so you can still get a good beam to the offside of the road on the passenger side, and have the driver’s side low enough to not blind oncoming traffic
Thanks for watching. Visit us at 1AAuto.com for quality auto parts, fast and free shipping, and the best customer service in the industry.