Replaces


Complete Repair in One Purchase - Stop searching for parts individually and complete your repair with a customized kit or set from DIY Solutions.
High-Quality Parts from Trusted Brands - DIY Solutions' kits and sets are selected from the best automotive brands and include hard-to-find and even obsolete parts you may need for your vehicle.
Guaranteed Fit - DIY Solutions ensures its selected parts are quality-tested to guarantee fit and function.
Assemblies may include halogen or incandescent test bulbs that should be replaced before installation.
Attention California Customers:
 WARNING: This product can expose you to chemicals including Chromium (Hexavalent Compounds), which is known to the State of California to cause cancer, and birth defects or other reproductive harm. For more information, go to www.P65Warnings.ca.gov
Lifetime Warranty
This item is backed by our limited lifetime warranty. In the event that this item should fail due to manufacturing defects during intended use, we will replace the part free of charge. This warranty covers the cost of the part only.
FREE Shipping is standard on orders shipped to the lower 48 States (Contiguous United States). Standard shipping charges apply to Hawaii and Alaska.
Shipping is not available to a P.O. Box, APO/FPO/DPO addresses, US Territories, or Canada for this item.
Expedited is available on checkout to the United States, excluding Alaska, Hawaii.
Final shipping costs are available at checkout.

How to Replace Headlights 2010-15 Chevy Camaro
Created on: 2017-03-24
Tools used
Hi, I'm Mike from 1AAuto. We've been selling auto parts for over 30 years! We're dedicated to delivering quality auto parts, expert customer service, and fast and free shipping, all backed by our 100% satisfaction guarantee. So visit us at 1AAuto.com, your trusted source for quality auto parts.
Using a plastic trim tool, remove all of the plastic clips along the top edge of the bumper. We'll then remove the 10 millimeter screw at the top corner of the bumper bracket on each side. We are bringing our vehicle up on the lift to make it easier to show you what's going on, but you should be able to do this either with the vehicle on the ground or the front end raised slightly.
Clearly we're removing our bumper because the vehicle was in a collision, but if your bumper is intact, you would have two 10 millimeter bolts right about here. Ours ripped out of the bumper, so we'll just remove those so we have them out when our new one goes on. We removed the wheel to make it easier to show you what we're doing, but you should be able to access this with the wheel on. We're going to use a T20 Torx driver. You can do this either as a screw driver or with a ratchet. Remove the three T20 Torx bolts in each wheel well.
Peel back the wheel well liner and remove the 10 millimeter bolt with the 10 millimeter socket ratchet. You'll also need a seven millimeter socket ratchet to remove this bolt. You'll need to get up a little higher to remove the three 10 millimeter bolts up on the front edge of the fender. We'll do that with a 10 millimeter socket ratchet. We're missing our wheel well liner over here from the collision. Other than that, we'll repeat these steps on the opposite side. Carefully pull the bumper back. Once you've got a little slack on there, disconnect the bumper harness and remove it from the vehicle.
Remove the top two 7mm bolts. We'll then remove the two 7mm bolts on the front at the bottom. Remove the headlight. Lift up on the red safety tab, disconnect the headlight as well as the turn signal, and remove the headlight from your vehicle. We'll then repeat these steps on the opposite side.
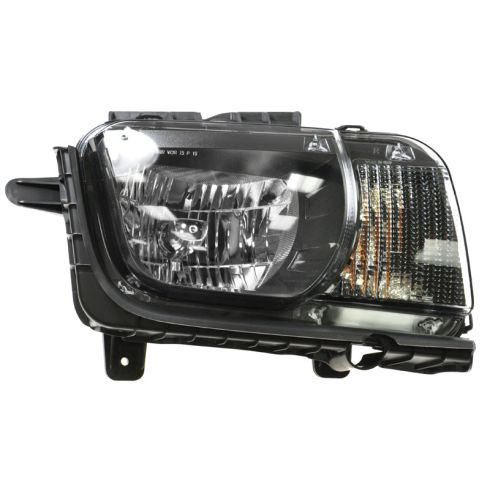
Here we have our old pair of headlights that we removed from our vehicle and our new headlights from 1AAuto.com. As you can see, these headlights are exactly the same. We have the same black housing, new lens with the same turn signal, same headlight reflective material, as well as the same four bolt mounting locations. On the back side, you can see everything is just the same with a new headlight and a new turn signal, as well as the sockets.
Now our vehicle was in a little bit of a fender bender. The front end got broken up some. It's very common for the headlights to get broken, as well as the lenses, the brackets. All this stuff is very, very prone to damage. Rocks can kick up from the road and break your headlight housings, let moisture in there, and ruin your headlights from the inside out. Fortunately, this new pair of headlights from 1AAuto is going to go in direct fit, just like our original equipment. Gets your visibility back so your vehicle looks good and drives safe, and fix you up right.
Reconnect your turn signal into your headlight. Don't forget to lock the safety tab back into place. Reinstall your headlight into the vehicle. Reinstall the bottom two 7mm screws. We'll then reinstall the two 7mm bolts on the top. We'll then repeat these steps on the opposite side.
Reinstall the main electrical connector to the front bumper. Then line up the tabs on the fender and slide each side of the bumper into place. Reinstall the 10 millimeter bolt into the bumper bracket. Reinstall the seven millimeter screw at the bottom of the bumper bracket. Repeat these steps on the opposite side.
Resecure your wheel well liner with your three T20 Torx screws. Line up and reinstall the two 10 millimeter screws at the bottom of the bumper as well. Reinstall your plastic clips by popping them into the hole and then pushing the top down. There are three on each side of the hood latch. Reinstall the 10 millimeter bolt in the top corner on each side of the bumper.
Thanks for watching. Visit us at 1AAuto.com for quality auto parts, fast and free shipping, and the best customer service in the industry.

