Replaces
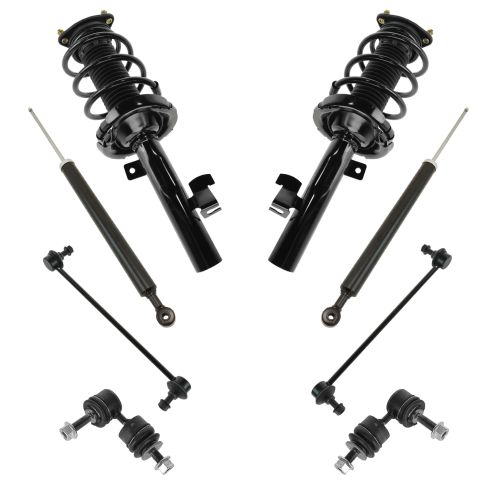
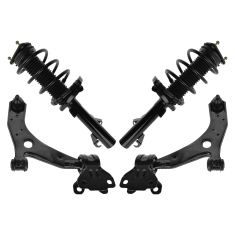
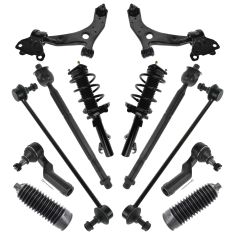
Part Details
TRQ suspension kits are manufactured using premium raw materials and coatings for extended service life. Each TRQ suspension component is designed to be a direct, maintenance-free replacement to the stock unit. To extend the life of your steering and suspension components, TRQ recommends replacing components in pairs, sets, or kits. All products are fit and road-tested in our Massachusetts R&D facility to ensure we deliver on our promise of Trusted Reliable Quality.
Product Features
Our direct fit gas-charged shock absorbers help restore your vehicle's handling and ride quality to just like new.
Replacing struts used to require specialized tools to compress, remove, and transfer the old spring and mount. Our Pre-assembled, complete strut & spring assemblies come with all new parts and make the job much quicker and easier for the do-it-yourself mechanic.
Strut & spring assembly contains:
Our steering and suspension components are pre-greased and sealed for long life and do not require the extra maintenance typically required by greaseable versions.
Item Condition:
New
Attention California Customers:
 WARNING: This product can expose you to chemicals including Chromium (Hexavalent Compounds), which is known to the State of California to cause cancer, and birth defects or other reproductive harm. For more information, go to www.P65Warnings.ca.gov
Lifetime Warranty
This item is backed by our limited lifetime warranty. In the event that this item should fail due to manufacturing defects during intended use, we will replace the part free of charge. This warranty covers the cost of the part only.
FREE Shipping is standard on orders shipped to the lower 48 States (Contiguous United States). Standard shipping charges apply to Hawaii and Alaska.
Shipping is not available to a P.O. Box, APO/FPO/DPO addresses, US Territories, or Canada for this item.
Expedited is available on checkout to the United States, excluding Alaska, Hawaii.
Final shipping costs are available at checkout.
Created on:
Tools used
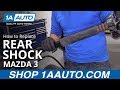
Hey friends, it's Len here at 1A Auto. Today we're working on our 2011 Mazda 3, and I'm going to be doing a rear shock. It's going to be very simple. I want to show you how to do it. If you need any parts, you can always check us out at 1AAuto.com. Thanks.
Okay, friends. Here we are. We've got the vehicle partially supported off the ground, but the wheels still touching, so it can't spin. We're going to use our 21-millimeter socket, and we're going to loosen up all these lug nuts. Just give them a crank or two. This is just to break them free in case you're not using an air gun to do this job. If you are, you don't really have to worry about doing this part. Now that all five of these are loosened, we can go head up with the vehicle. We'll make sure that it's secured safely, so it can't shake around, or fall off, or anything like that. We'll move ahead to the next step.
All right, so now we're going to go ahead and fully remove these lug nuts. I'm going to take off three of them. The fourth one I'm going to take all the way off, put it back on a few threads, and then I'll remove the last one. There we are. I'm just going to put this one on a few threads, like I said. That's just going to help keep this wheel from falling off and potentially hurting me while I put all this stuff away. Hold the wheel. My lug nuts. We'll slide this out of the way. On to the next step.
Up here, you have 12-millimeter nuts that go onto these studs right here. I'm just going to use a ratchet, and extension, and a socket, of course, 12-millimeter. If you had access to an air gun, you can do that. There we are, 12-millimeter nut. You can do the same to the other one. Number two, set this aside. All right. Okay, so right down here we have a 17-millimeter. I'm just going to use my air gun here. Grab this, pull that out. Now we can bring our shock right down. There's our rear shock. Easy peasy.
All right, so we've got our rear shock. We're ready to install it. I'm just going ot come up through the bottom here. Right up. Bring it to my holes. We've got our two brand new 1A Auto nuts. There we are. I'm just going to go ahead and bottom these out. Once they're bottomed out, we'll torque them down. These are close now. Bottomed out. Let's torque these down to 20 foot pounds. One. There we are. Just checking one more time. Let's move on to the next step.
To get the lower part of the shock on there, as you can tell, when it's fully expanded, it hangs down lower than where the bolt hole is. Lifting this thing up by hand, trying to lift it like that, somebody could probably do it. I'm not trying to say that I'm the strongest person in the world. It's just not the easiest thing. I'm just going to use a pole jack. You can use a floor jack if you're working a little lower to the ground. I'm just going to kind of bring the holes up so they line up. There. Okay. I'm just going to blast this in a little bit. There we are. We're going to torque this down with our 17-millimeter to 77 foot pounds. There we are. Let's hit it one more time real quick. Tight.
Now it's time to get the wheel up onto the vehicle. Instead of going in front of it and trying to lift, and potentially hurting our back, you just come around the side of it, roll it right up your leg and use your ab muscles to lift it up. There we are. Hold your wheel. Make sure it can't go anywhere. There we are. Okay. Our next step is going to be to bottom these out, and then we'll bring it down completely, and torque them down.
Now that we have all the lug nuts started on here, what I'm going to do is I'm just going to bottom them out. When I go to bottom them out, what I'm going to do is I'm going to go in a star pattern boom, boom, boom, boom, boom. Basically, crisscross pattern. That's to ensure I'm not going to go around in a circle this way. The wheel is not going to get kinked on just like this, and I think everything's nice and tight. You drive it down the road, the wheel is going like this. Next thing you know you're breaking studs. Your wheel comes off. God knows what could happen. Let's avoid that. Let's go crisscross star pattern.
I'm not making them very tight. I just wanted to bottom them out. Now I'm going to go ahead and torque them down. Okay, so here we go. We're going to go ahead and torque these down. We're going to make the same star pattern in a crisscross manner. Okay. 21 millimeter, 85 foot pounds. I could have probably brought it down another inch. Just to be sure we torqued them all, let's just hit them again. Cool. Easy peasy.
Thanks for watching. Visit 1AAuto.com, your place for DIY auto repairs, for great parts, great service, and more content.