WARNING: This product can expose you to chemicals including Lead and Lead Compounds, which are known to the State of California to cause cancer, and birth defects or other reproductive harm. For more information, go to www.P65Warnings.ca.gov.
Lifetime Warranty
This item is backed by our limited lifetime warranty. In the event that this item should fail due to manufacturing defects during intended use, we will replace the part free of charge. This warranty covers the cost of the part only.
FREE Shipping is standard on orders shipped to the lower 48 States (Contiguous United States). Standard shipping charges apply to Hawaii and Alaska.
Shipping is not available to a P.O. Box, APO/FPO/DPO addresses, US Territories, or Canada for this item.
Expedited is available on checkout to the United States, excluding Alaska, Hawaii.
Final shipping costs are available at checkout.
How to Replace Front Power Window Motor 1994-99 Cadillac Deville
How To Replace Rear Power Window Motor 1993-99 Buick Lesabre
Created on:
Tools used
Flat Blade Screwdriver
Phillips Head Screwdriver
8mm Wrench
10mm Socket
Ratchet
1. Disconnect the battery
Use your 8 mm wrench to disconnect the negative battery terminal.
2. Remove the door panel
Pry up the window switch panel.
Disconnect the wiring harness.
Pry out and disconnect the courtesy light.
Remove the door handle bezel panel.
Take care not to let the tabs tear the leather while you remove this piece.
Disconnect the door lock wiring connectors.
Remove the two exposed Phillips screws.
Lift the door panel up and off.
Disconnect the speaker lead and set the door panel aside.
3. Remove the power window motor
Carefully peel back the water shield
Remove the three 10 mm nuts securing the motor.
Disconnect the wiring harness.
4. Install the new motor
Mount the motor into the door.
Bolt it in with your 10 mm socket and ratchet.
Connect the wiring harness.
Plug in your power window switch and connect the battery to test the motor before reassembly.
Once you confirm that everything is working as it should, disconnect the battery again.
5. Install the door panel
Replace the water shield
Reconnect the speaker lead
Thread the wiring connections through their respective spots in the door panel.
Mount the door panel onto the door.
Install the two Phillips screws
Plug in the power window switch panel and clip it down into the door pull
Connect the door lock switch harness and the courtesy light
Clip both into the door panel.
Use your 8 mm wrench to reconnect the negative battery terminal.
Brought to you by 1AAuto.com, your source for quality replacement parts and the best service on the internet. Hi, I'm Mike Green. I'm one of the owners of 1AAuto. I want to help you save time and money repairing and maintaining your vehicle. I'm going to use my 20+ years experience restoring and repairing cars and trucks like this to show you the correct way to install parts from 1AAuto.com. The right parts installed correctly. That's going to save you time and money. Thank you and enjoy the video.
In this video, we're going to show you how to replace the driver's front window motor on this 1997 Cadillac De Ville, same as any '94-'99. Taking the door panel is a little different. This will cover '97 to '99 as far as that door panel goes. The tools you'll need are a flat blade screwdriver, Phillips screwdriver, and a 10 millimeter socket and ratchet. Start by carefully disconnecting the negative battery cable and this should, on most vehicles, will be a 8 millimeter wrench. First, take a flat blade screwdriver, insert in the middle and there's a little tab. When you push on it this comes up, forward and out. And then this back one, there's a little tab here. Just work your screwdriver in there lightly. Pull that out. And this one here, push on the tab. Pry up and off. Same thing here. Push on that tab. Pry up and out. Same thing here. Little tab. Pry it out. Then pull that connector out. Okay now here on this courtesy light, carefully pry the front of it out. There, it comes out. There's a little tab right here. Pull up on it like that.
Now you want to remove this panel here. You basically want to go in and find... you can pull it easy to make sure that the metal tabs don't get caught in your door panel in the leather and rip the leather. You can see this one's caught. Going to use the screwdriver, pry the leather right up over and out. Two connectors. Push a little tab. Disconnect that. And then on this little tab and underneath here, push it down. Disconnect that. Now there are two screws, Phillips. One right there and one right in here. When you got for this one you want to have your screwdriver slightly angled. It's not straight in; it is at somewhat of an angle.
I'm just going to fast forward as I'm just removing those two Phillips screws. Once you remove those screws, lift your panel up and off and reach in behind and disconnect the speaker. Now you want to carefully pull down your water shield. Notice I carefully pull the back to front. I really only need to pull the front part back and expose the window motor. Here's your car window motor. It's held in by three 10 millimeter nuts and there's a lead. Just press the tab back here, pull the lead out. We'll fast forward here as I just remove those three 10 millimeter nuts that hold the power window motor. Then you need a screwdriver and pry the motor right off. There's nothing wrong with our original motor and I'm not one to waste a good part. Re-installation is very straightforward. Just push the motor on. Insert the three nuts.
Just a quick note here. When I put this motor on, the motor pushed all the way nice and flush to the door panel. If your motor goes on but still has a quarter of an inch before it will go against the door panel, that means that the gear is not meshing. All's you want to do is put the three 10 millimeter nuts on, tighten them down very lightly, then reconnect your battery, reconnect your motor and your switch and just run the motor and push that motor in until it meshes with the gears for the window. And then go ahead and tighten it up. We'll just fast forward here as we put on those three 10 nuts and then tighten them up. You want to tighten them up nice and firm. They don't have to be extremely tight, though. You can test it. Plug that in. Make sure you plug in your ... now you can plug in your switch before you put the door panel back together to test it. Now connect the battery. Okay, so the window seems to work correctly so we can take that switch back apart and then put our water shield back up into place.
To reinstall the panel, what you want to do is get your bottom three hooks in first. You just kind of place them close to where they go. Reconnect our tweeter. Make sure all our harnesses come in through here. Okay, our courtesy light back here. Then as we rotate up these two harnesses. Lift up on the panel. Push it in. Make sure it goes on in front and rear. Then push down. Make sure all our harnesses are out. I'm going to fast forward here again as we install those screws. Plug in our courtesy light. Back in place first. Hook these connectors in. Put this in. Hook the bottom in first. Just remember to reconnect your battery and you're all set.
We hope this helps you out. Brought to you by www.1AAuto.com, your source for quality replacement parts and the best service on the internet. Please feel free to call us toll free 888-844-3393. We're the company that is here for you on the internet and in person.
Tools used
Socket Extensions
Flat Blade Screwdriver
10mm Wrench
10mm Socket
Ratchet
T25 Torx Driver
1. Removing the Door Panel
Pry up the switch panel
Disconnect the window switch wiring harness
Remove the Torx 25 screw from the door handle
Pry off the door handle bezel
Pry off the reflector on the edge of the door panel
Remove the 10mm bolts inside the edge of the door panel
Remove the 10mm bolts in the door pull
Pry out the door panel
Lift the door panel up and off
Disconnect the wiring harnesses
Carefully peel off the water shield
2. Removing the Window Motor
Disconnect the window motor wiring harness
Remove the three 10mm nuts from the window motor
Pull off the window motor
3. Installing the Window Motor
Put the window motor into place
Fasten the three 10mm nuts onto the window motor
Connect the window motor wiring harness
4. Inserting the Door Panel
Put the water shield into place
Connect the wiring harnesses
Lift the door panel into place
Push in the door panel clips
Insert the 10mm bolts in the door pull
Insert the 10mm bolts inside the edge of the door panel
Push on the reflector on the edge of the door panel
Push on the door handle bezel
Insert the Torx 25 screw from the door handle
Connect the window switch wiring harness
Push on the switch panel
Brought to you by 1AAuto.com, your source for quality replacement parts and the best service on the Internet.
Hi, I'm Don from 1A Auto. I hope this how-to video helps you out, and next time you need parts for your vehicle, think of 1AAuto.com. Thanks.
In this video we're going to show you how to replace a rear window lift motor in a '97 Buick LeSabre. It's going to be the same to do from the left door to the right rear door and it's going to work and apply to the '97-'99 model year.
Use a flat blade screwdriver and pry off the back, remove my switch by prying off the two plastic connectors, and be careful not to break them, or the two plastic tabs. Pulls this up and out of the way. The Torx 25 screw right behind the door handle. Get that out, and pull the plastic out. You may have to pull on the door handle a little bit to help get that plastic out from behind. Use a small pocket screwdriver to remove this reflector. Pressing in and down with the screwdriver helps get those clips that are on the top and bottom of that out. Now, we're going to take out four bolts one is right in here, one is straight in, and then you have two under where your switch pad was. I'm going to fast-forward this as I remove those four 10mm bolts. Now, I'm just going to get the rest of those clips off by prying between the door panel and the door itself. The clips I'm talking about are on the inner edge of the door panel. Just pop them, pull it out. Disconnect your harness by pulling the tab on the side. Go ahead and plug back in the connector there, place this one up through the back.
Use a flathead screwdriver to pry out this green clip, and then you can press in and disconnect the window motor. I'm using a 10 millimeter wrench to remove the three nuts that hold the window motor to the regulator. I'm going to speed it up as I remove those three nuts.
Re-installing the window motor, I'm going to fast-forward as I re-tighten those three nuts that hold the window motor to the window regulator. Go ahead and plug back in and then your green clip.
Just fast forward here as we put the water shield back on. Just make sure you pull the harnesses through and everything, get it back on there as best you can and we did miss filming taking that off earlier in the video, so obviously, if you have that, you'll pull it off and then put it back on before you put your door panel on. I'm going to go ahead and plug back in the connector there and fish this one up through the back.
Here, I'm just hanging the door panel on the sill of the door and then pressing in those yellow clips that I used my fingers on the inside of the door panel to pull apart and just making sure that the bolt holes are lined up. Then install a 10mm screw here. Here, I'm just installing the switch back into the switch plate, and pushing it down into the door panel. With the door handle cover, you're going to want to make sure that the notch where your lock and unlock fits up on the lock and unlock yellow rod there, and you have to pull handle out, play with that, and make sure that's centered. I'm reinstalling the Torx 25 screw.
We hope this video helps you out. Brought to you by www.1AAuto.com, your source for quality replacement parts and the best service on the Internet. Please feel free to call us toll-free, 888-844-3393. We're the company that's here for you on the Internet and in person.
WMA07940
In Stock
Product Reviews
Loading reviews
4.67/ 5.03
3 reviews
5 Stars
4 Stars
3 Stars
2 Stars
1 Star
2
1
0
0
0
Quick service
Irene
April 3, 2018
Although the service was quick I don't think this product included the belts for these motors? Apparently there's a belt (s) (according to the mechanic) that's supposed to go along with this. Overall the service was quick with no errors and or delays
Good price for all 4
frank
September 22, 2018
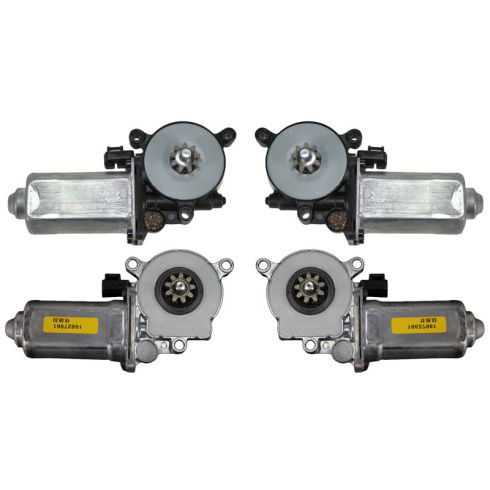
I ordered these 4 window motors for a Oldsmobile 88. Came in pretty fast and I had no issues, fast install, cant beat it really. It's better than going to local parts store and spending $87 for one motor. Thanks 1A Auto.....
dwight
February 16, 2022
very happy pappy as always. [i will be back .as always ZACK.
Customer Q&A
No questions have been asked about this item.
Customer service
877-844-3393
Monday - Friday 8:00am - 9:30pm ET Saturday - Sunday 8:00am - 4:30pm ET
Pontiac is a registered trademark of General Motors Company. 1A Auto is not affiliated with or sponsored by Pontiac or General Motors Company.See all trademarks.
Enter Vehicle Year Make Model
Specify your vehicle's year, make and model to guarantee fit.
Year
Make
Model
Options
Drivetrain
This part doesn’t fit a . Select from parts that fit.