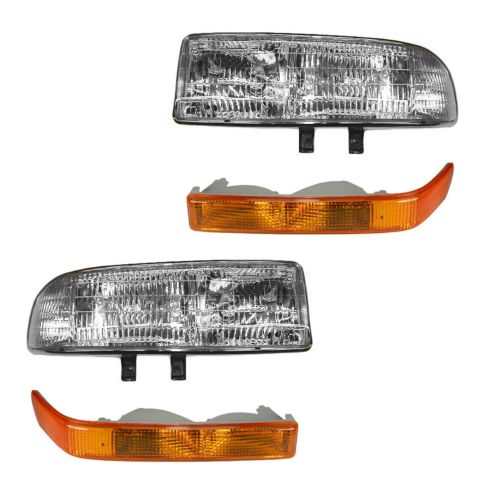
Complete Repair in One Purchase - Stop searching for parts individually and complete your repair with a customized kit or set from DIY Solutions.
High-Quality Parts from Trusted Brands - DIY Solutions' kits and sets are selected from the best automotive brands and include hard-to-find and even obsolete parts you may need for your vehicle.
Guaranteed Fit - DIY Solutions ensures its selected parts are quality-tested to guarantee fit and function.
Assemblies may include halogen or incandescent test bulbs that should be replaced before installation.
Features and Benefits
Direct Fit - No vehicle or wiring modification necessary
DOT, SAE, and FMVSS Compliant - Meets on-road use regulations
Matching set for a restored look
Item Condition:New
Attention California Customers:
WARNING: This product can expose you to chemicals including Chromium (Hexavalent Compounds), which is known to the State of California to cause cancer, and birth defects or other reproductive harm. For more information, go to www.P65Warnings.ca.gov
Lifetime Warranty
This item is backed by our limited lifetime warranty. In the event that this item should fail due to manufacturing defects during intended use, we will replace the part free of charge. This warranty covers the cost of the part only.
FREE Shipping is standard on orders shipped to the lower 48 States (Contiguous United States). Standard shipping charges apply to Hawaii and Alaska.
Shipping is not available to a P.O. Box, APO/FPO/DPO addresses, US Territories, or Canada for this item.
Expedited is available on checkout to the United States, excluding Alaska, Hawaii.
Final shipping costs are available at checkout.
How to Replace Parking Light 1998-2004 Chevy S10 Pickup
How to Replace Headlight 1998-2004 Chevy S10 Pickup
Created on:
Tools used
Flat Blade Screwdriver
Rust Penetrant
1. Removing the Headlight
Undo the tabs that hold the headlight
Rotate the headlight forward and out
Disconnect the headlight wiring harnesses
Twist out the side marker light bulb
2. Removing the Parking Light
Undo the parking light tabs with a flat blade screwdriver
Pull out on the light by hand
Twist out the parking light bulb
3. Installing the New Parking Light
Twist the bulb into the parking light
Put the parking light into place
Push the parking light tabs in
4. Reinstalling the Headlight
Apply penetrating oil to the headlight tab slots
Attach the headlight wiring harnesses
Twist the side marker light bulb into the headlight
Make sure not to pinch the wires while inserting the bulb
Put the headlight into place
Push the headlight tabs in
Brought to you by 1AAuto.com, your source for quality replacement parts and the best service on the Internet.
Hi, I'm Mike Green. I'm one of the owners of 1A Auto. I want to help you save time and money repairing or maintaining your vehicle. I'm going to use my 20-plus years experience restoring and repairing cars and trucks like this to show you the correct way to install parts from 1AAuto.com. The right parts installed correctly: that's going to save you time and money. Thank you and enjoy the video.
In this video, we'll be replacing the parking lights on a 2001 Chevy S10 pickup, basically the same as most '98 to '04 S10s. This one does not have fog lights, the parking lights are different for ones that have fog lights and do not have fog lights. It's pretty easy. No tools are necessary.
We start by removing the headlights, which is pretty simple. There are two tabs that pull up, that lock the headlight into place and then you rotate the light forward and pull it out and then just use thumb and unlock the headlight harnesses. Then the side marker light bulb twists out and your headlight is free. Now we're going to remove the parking light and it's locked in by a double tab here. You use your other hand to press out on the light a little bit while you pushing on the tabs with a screwdriver and it will come unlocked pretty quick. Then there is a third tab that holds it in, on this one it kind of came right out but on the side and I'll show it to you later, there's another tab that locks it in. Then, once the parking light is out, it's a twist tab, it's a thumb tab and then twist and your parking light is out.
Here with the light out you can see the mounting tabs better. There's two alignment tabs there and there's the big square clip. This is the one that can be a problem when you're removing the parking light and it's actually easy enough to reach in from the side and hit that with your finger and pull it and have it unlock. I'll just continue to show you where those tabs go.
Insert the bulb and twist. It can be a little bit of a pain and then twist and put it in. Then push it back into place. Change the angle, here, so you can see from the top. Make sure that goes in correctly. Then push the other side. Then I also grab the inside of the grill just to make sure everything's in.
Now there are tabs in the headlights that go down in those slots, I'm going to spray them with a little oil just to make things easier. Those are the tabs, they go into the slots when you're putting the headlight in. Now we're going to get ready, we're going to plug in the harness here and what I'm going to show you next after we plug in the harness is you want to make sure that harness doesn't get pinched in. There's actually on those tabs that I showed you, there's a little ledge built on and you wrap the harness up and around that ledge. I'll show you here. I'm grabbing the harness and I'm bringing it up on top of the tabs that are on the tabs, if you have one of these lights in your hand you'll see what I mean. Then you put the light in and it's kind of a little ballet of pushing the bottom down, making sure those tabs go into those slots and then getting the upper tabs back into the radiator support.
You can actually look down into the holes and see everything pretty clearly. You can get it. Then once you got that, you put the locking tabs back in, which unfortunately I didn't get a great shot of here, but lock the tabs back in and you are all set. That's it. A grille replacement takes probably about 30, 35 minutes and if you do your headlights and parking lights at the same time you can really freshen up the front end of you S10.
We hope this helps you out. Brought to you by www.1AAuto.com, your source for quality replacement parts and the best service on the Internet. Please feel free to call us toll-free, 888-844-3393. We're the company that's here for you on the Internet and in person.
Tools used
No Tools Needed
1. Removing the Headlight
Remove the two locking tabs from the back of the headlight.
Pull the light forward.
Disconnect the harnesses to free the headlight assembly.
Twist the sockets and pull out to change the bulbs.
2. Reinstalling the Headlight
Spray lubricant on the holes that the headlight tabs fit into to make reinstallation easier.
Reconnect the harnesses.
Put the harnesses on top of the tabs on the back of the headlight.
Line the headlight up and push it into place (making sure you don’t pinch the wiring harnesses).
Put the two locking tabs back into place.
Brought to you by 1AAuto.com, your source for quality replacement parts and the best service on the internet.
Hi, I'm Mike Green. I'm one of the owners from 1A Auto. I want to help you save time and money repairing and maintaining your vehicle. I'm going to use my 20 plus years of experience restoring and repairing cars and trucks like these to show you the correct way to install parts from 1AAuto.com. The right parts installed correctly, that's going to save you time and money. Thank you and enjoy the video.
In this video, we'll be replacing the headlight in this 2001 Chevy S10 Pickup. Basically the same as any '98 to 2004 S10 pickup with the Style lights, very easy procedure, you don't even need any tools and we'll get right to it.
You're going to open up the hood and then there's two locking tabs that you see on the top of the screen there, I'm pulling up on them. Place those locking tabs there where they're safe and they don't fall in and you don't have to fish them out, like I did a couple of times. Then, you pull the headlight forward and it's out. Then, you can unplug your lights and service the bulbs, if you need to do that or if a rock jumped up and hit the light or whatever, you can replace your entire headlight, too.
Then, there's two slots that I'm going to spray some lubricant on just to make it easy to get everything together. Right there, that slot and that slot. Then, I'll show you the tabs. These tabs go into those slots, okay? The other thing is you don't want to pinch your wires. I'm going plug in the harnesses here and I'm going to show you how to make sure you don't pinch the wires. Those tabs I showed you a few seconds ago, they also have tabs that come forward. Once you have one of these lights in your hands, you'll understand what I mean. What you do is you take the harnesses and you put them up on top of the protruding tabs. That keeps them from getting in behind the other tabs and getting caught between the metal and the plastic of the headlight, okay?
Put your headlight back in there. This is a little ballet of pushing on the backside of the headlight, pushing in and down at the same time and then getting everything to line up. You can see down, there's a couple of holes that you can see down into to see how things are lined up. Once you get it, it goes in and then you put your locking tabs, which I didn't do a very good job videoing there, I apologize. You put your locking tabs back on and you're all set.
We hope this helps you out. This video was brought to you by www.1AAuto.com, your source for quality replacement parts and the best service on the internet. Call us toll-free, 888-844-3393. We're the company that's here for you on the internet and in person. Thank you very much.
LHT04128
In Stock
Product Reviews
Loading reviews
4.22/ 5.09
9 reviews
5 Stars
4 Stars
3 Stars
2 Stars
1 Star
6
1
1
0
1
Great headlights!
Troy
January 30, 2017
I bought taillights and they looked so good so I decided to buy the headlights and with the insgructional video everything looks clean, bright thanks 1A. Fast shipping.
Poor quality control
Michael
May 15, 2018
When the low beams are adjusted properly the passenger side high beam is way too high.
Perfect replacement part!
C
July 9, 2018
Being my 2003 Chevy S-10 Pick-up sits in a full sun driveway all day, the headlights and tail lights became cloudy over it's 15 year life. I had them buffed out, but it happened again within a year. These replacements fit perfectly and look Fantastic! If I ever need them again, I know where to go, Here at1A Auto.com. Fast shipping and a terrific price for late model vehicles. I will shop here from now on for my parts for my truck. In fact I recently bought another part I needed and again couldn't be happier!
Chevy Blazer head lights
T
August 12, 2018
This totally change the look of the Blazer. My husband is a mechanic he said they were easy to install and adjust. When the first order arrived, the driver side headlight would not adjust. I called and they had a replacement out the same week. Based on the quality and service we will be replacing front and back lights in all of our cars. The next time we need car parts I will begin my search with this company. Extremely impressed!
S-10 headlights
david
February 23, 2019
Swapped out headlights. Easy drop in except for trying to get tab to go into support slot in truck. Easy to adjust once installed.
Didnt install bottom yellow ones because the retaining tab broke even though I was being very careful. It didnt even flex. It just snapped. Didnt feel like calling af returning and all that so I just left the original yellow lights on the truck.
The headlights are a huge improvement and we can now see at night. Before it was light driving by Braille.
Thanks!!
D
July 6, 2019
It was my first purchase with 1A and they have earned ALL of my business from now on!!!
Lighting for my 99'Blazer
George
September 7, 2023
I purchased a 4 Piece lighting kit for my 99' Chevy Blazer and i was surprised how everything fit so easily and looks nice and the best thing was the price,you can't get a better deal then here at 1A Auto,the prices are cheaper then anywhere else i looked and all sales people are very courteous and very helpful,I would recommend 1A Auto to all my friends.
Decent
Collin
December 12, 2023
They don't fit that great. Somewhat of a struggle. Two of the light socket holes were machined wrong. They look good, just a little tough to install.
easy to install
frank
May 30, 2024
looks great
Customer Q&A
Dose warranty cover hazzing of lens?February 17, 2022