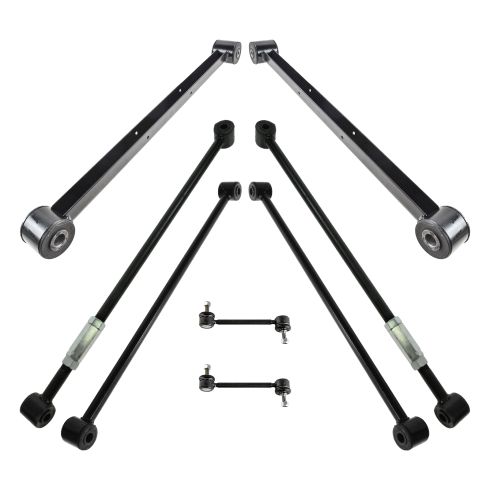
TRQ suspension kits are manufactured using premium raw materials and coatings for extended service life. Each TRQ suspension component is designed to be a direct, maintenance-free replacement to the stock unit. To extend the life of your steering and suspension components, TRQ recommends replacing components in pairs, sets, or kits. All products are fit and road-tested in our Massachusetts R&D facility to ensure we deliver on our promise of Trusted Reliable Quality.
Product Features
Application Specific Design: No modifications necessary
Anti-Corrosion Coated: Enhanced surface life
Pre-greased: No additional maintenance required
Kitted for Restored Performance: Improved road-feel and handling
Our steering and suspension components are pre-greased and sealed for long life and do not require the extra maintenance typically required by greaseable versions.
Item Condition:New
Attention California Customers:
WARNING: This product can expose you to chemicals including Lead and Lead Compounds, which are known to the State of California to cause cancer, and birth defects or other reproductive harm. For more information, go to www.P65Warnings.ca.gov.
Lifetime Warranty
This item is backed by our limited lifetime warranty. In the event that this item should fail due to manufacturing defects during intended use, we will replace the part free of charge. This warranty covers the cost of the part only.
FREE Shipping is standard on orders shipped to the lower 48 States (Contiguous United States). Standard shipping charges apply to Hawaii and Alaska.
Shipping is not available to a P.O. Box, APO/FPO/DPO addresses, US Territories, or Canada for this item.
Expedited is available on checkout to the United States, excluding Alaska, Hawaii.
Final shipping costs are available at checkout.
How to Replace Trailing Arm 1995-2007 Chevy Monte Carlo
Created on:
Tools used
24mm Socket
Adjustable Wrench
A Piece of Pipe (for leverage)
Torque Wrench
Hammer
15mm Socket
Rust Penetrant
18mm Wrench
Jack Stands
18mm Socket
19mm Socket
24mm Wrench
Ratchet
Floor Jack
1. Removing the Wheel
Loosen the lug nut covers with a 19mm socket
Pry off the center cap with a flat blade screwdriver
Loosen the lug nuts with the vehicle on the ground
Raise the vehicle with a floor jack
Secure the vehicle on jack stands
Remove the lug nuts
Pull off the wheel
2. Removing the Rear Lower Trailing Control Arm
Spray penetrating oil on the 18mm bolt at the top of the trailing control arm
Spray penetrating oil on the 24mm bolt at the bottom of the trailing control arm
Remove the lower nut with a 24mm wrench
Loosen the bolt free with a 24mm wrench and a piece of pipe for leverage
Hammer the bolt free
Loosen the top bolts with an 18mm wrench till the arm lowers
Remove the 15mm bolts from the trailing arm bracket
Remove the trailing arm
Hammer the 18mm bolt out of the arm
3. Installing the New Rear Lower Trailing Control Arm
Push the 18mm bolt through the trailing arm and bracket
Push the bracket into place
Insert and tighten the 15mm bolts to the bracket as tight as possible
Place the lower end of the trailing arm into place
Insert the 24mm bolt on the lower end and tighten it preliminarily
Tighten the 18mm bolt preliminarily
Lower the vehicle onto jack stands placing pressure on the suspension
Tighten the 18mm and 24mm bolts
4. Reattaching the Wheel
Slide the wheel into place
Start the lug nuts by hand
Tighten the lug nuts preliminarily
Lower the vehicle to the ground
Tighten the lug nuts to 100 foot-pounds in a crossing or star pattern
Reattach the center cap
Tighten the lug nut covers with a 19mm socket
Brought to you by 1AAuto.com, your source for quality replacement parts and the best service on the Internet.
Hi, I'm Mike from 1A Auto. I hope this how-to video helps you out, and next time you need parts for your vehicle, think of 1AAuto.com. Thanks.
In this video, we're going to show you how to replace a trailing arm on this 2003 Chevy Monte Carlo. It's the same part and similar process on these Monte Carlos from 2000 to 2007. We show you on the passenger side, but the driver side is the same procedure. The items you'll need for this include a new training arm from 1AAuto.com, 15mm, 18mm, 19mm, and 24mm socket and ratchet, a piece of pipe for leverage, 18mm and 24mm wrench, an adjustable wrench, a torque wrench, jack and jack stands, and a hammer.
Start off by loosening these 19mm lug nut caps, and then pull your hubcap free. Remove these 19mm lug nuts. You want to loosen these while the vehicle is on the ground, raise it, and remove them the rest of the way. If you have air-powered tools, you can remove them entirely when the vehicle is entirely in the air. Once the lug nuts are removed, pull your wheel free.
Spray penetrating oil on this bolt and the bolt up here at the top of your controller. Then just remove this lower bolt. The easiest way to do that is using a 24mm wrench. Once the nut is removed, just break that bolt free. We use air-powered tools to do this, but you could also just use hand tools with a piece of pipe for leverage. Just keep twisting the bolt until it loosens up.
Once it's loosened up, you can just hammer it out the rest of the way and then just pull that down. Using an 18mm wrench, just loosen up this top bolt. When you get it loose enough and the trailing arm lowers, you can then access these two bolts and this bolt right here. All three of those are 15mm. We'll just fast-forward as Mike removes them.
You want to put this somewhere where there's a gap. You can put the bolt down in, and then, just using a hammer, hit the bolt out. You may have better luck and it may just pull out. If yours looks like ours, this is probably how you'll have to do it. You'll need the bolt out of the other one as well.
On the bottom is the old trailing arm and bracket; above it is the new one from 1A Auto. You can see they're identical, and they'll fit exactly the same. Take the new trailing arm and bracket and push the bolt through. Replace the nut on the other side. Push the bracket up into place and replace those three 15mm bolts. Just tighten those up. If you used air-powered tools, go around again with just a ratchet and socket and make sure those are tightened up as tight as you can get them.
Put the lower end of the trailing arm back into place, push the bolt through, and then replace the nut on the other side. Just tighten that up, and for right now you are just tightening this preliminarily. Do the same thing with the top bolt. Now you want to lower the vehicle down onto jack stands, putting all the pressure on the suspension and then tighten up these two control arm bolts the rest of the way.
Replace your wheel, replace the lug nuts, and tighten them up. You want to tighten those while the vehicle is on the ground, and then you want to torque each of them to 100 foot-pounds in a crossing pattern. Replace your hubcap and tighten up those lug nut caps. Then you're all set.
We hope this video helps you out. Brought to you by www.1AAuto.com, your source for quality replacement parts and the best service on the Internet. Please feel free to call us toll-free, 888-844-3393. We're the company that's here for you on the Internet and in person.
PSA72558
In Stock
Product Reviews
Loading reviews
5.00/ 5.01
1review
5 Stars
4 Stars
3 Stars
2 Stars
1 Star
1
0
0
0
0
Mark
April 15, 2023
happy with the product. Do you sell hardware too?
Customer Q&A
No questions have been asked about this item.
Customer service
877-844-3393
Monday - Friday 8:00am - 9:30pm ET Saturday - Sunday 8:00am - 4:30pm ET
Oldsmobile is a registered trademark of General Motors Company. 1A Auto is not affiliated with or sponsored by Oldsmobile or General Motors Company.See all trademarks.
Enter Vehicle Year Make Model
Specify your vehicle's year, make and model to guarantee fit.
Year
Make
Model
Options
Drivetrain
This part doesn’t fit a . Select from parts that fit.