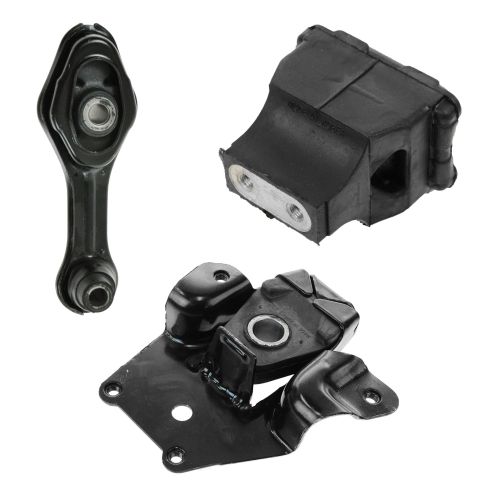
1AEEK00561-Chevrolet Cavalier Pontiac Sunfire 3 Piece Engine & Transmission Mount Kit TRQ MTA32812

Replaces
2000 Pontiac Sunfire L4 2.4L Automatic Transmission 3 Piece Engine & Transmission Mount Kit TRQ MTA32812

Product Reviews
Loading reviews
4.78/ 5.0
9
9 reviews
top motor mount
September 23, 2017
Everything went good disassembling (video was very helpful ) the reassembling was disappointment when the 2 original bolts were a 1/2" to long for the new rubber piece so then i had to go to town an find bolts that would work. the lower mount went together fine an was the real problem. haven't got to the third piece yet.
very pleased
May 5, 2018
they work great .. all three came together... smooth now shifting from park on the road also not to bad install very happy with my order great experance each time I have ordered every part and great prices I will be using 1A Auto again ..
Great bundle prices
June 11, 2018
1A, in my opinion the best place for quality low priced auto parts with fast shipping. I've bought all of my parts needed for my build with out any problems. The website makes it easy to locate parts with preloaded Make & Model menu. I will be making more purchases that's for sure. Check out donskystarsky on YouTube to see the Zombie Chevy Build using A1's parts and knowledge .
June 23, 2019
Great quality parts
Fast service
February 26, 2020
Parts worked great and delivery of parts was fast. Very satisfied, Thank You.
April 10, 2020
Parts came fast and on time. Got just right. Would definitely suggest 1AAuto
Works well
May 2, 2022
I've only installed the dog bone mount but that was 30k miles ago and it's still intact. I don't know about the quality of the other two mounts but I've always had good results from 1aauto.
Cavalier
January 25, 2023
On time in perfect condition!
who could ask for more?
October 20, 2023
Quality parts, great prices, installation videos-who could ask for more?
Customer Q&A
We need motor mounts?
November 24, 2017
10
You may need engine mounts to be replaced if they are cracked, or there is too much room compared to the OE specifications. It must be diagnosed as faulty.
November 24, 2017
Alex P
10
Yes. You will know when your motor mounts are bad when there is a shaking feeling when you accelerate. You can also tell if you can actually shake the engine forward and back.
December 9, 2017
Steve M
10
You have engine/motor mounts on your engine. You will know if you need mounts if you are looking at your engine and snap the throttle and the engine rocks back and forth significantly towards the front and rear of the vehicle on a front wheel drive application.
January 23, 2018
Steve M
Pontiac is a registered trademark of General Motors Company. 1A Auto is not affiliated with or sponsored by Pontiac or General Motors Company.
See all trademarks.


