Replaces

This part doesn’t fit a . Select from parts that fit.
Frequently bought together
Part Details
Item Condition:
New
Attention California Customers:
 WARNING: This product can expose you to chemicals including Lead and Lead Compounds, which are known to the State of California to cause cancer, and birth defects or other reproductive harm. For more information, go to www.P65Warnings.ca.gov.
Lifetime Warranty
This item is backed by our limited lifetime warranty. In the event that this item should fail due to manufacturing defects during intended use, we will replace the part free of charge. This warranty covers the cost of the part only.
FREE Shipping is standard on Orders shipped to the lower 48 States (Contiguous United States). Standard shipping charges apply to Hawaii, Alaska and US Territories. Shipping is not available to Canada.
Expedited is available on checkout to the United States, excluding Alaska, Hawaii and US Territories as well as P.O. Boxes and APO/FPO/DPO addresses. Final shipping costs are available at checkout.


Created on:
Tools used
Brought to you by 1AAuto.com, your source for quality replacement parts and the best service on the Internet.
Hi, I'm Mike Green. I'm one of the owners of 1A Auto. I want to help you save time and money repairing or maintaining your vehicle. I'm going to use my 20-plus years experience restoring and repairing cars and trucks like this to show you the correct way to install parts from 1AAuto.com. The right parts installed correctly: that's going to save you time and money. Thank you and enjoy the video.
In this video, we'll be installing a tailgate cable on a 2004 GMC Sierra. It's basically the same as any GMC Sierra or Silverado from 1999 to 2006. The only tool you'll need is a 1/2 inch wrench.
Open up the tailgate. You got a bolt here. It's a ½ inch bolt. Remove that. If it's frayed, you can replace it. Not a difficult thing to replace at all. Most people can do it. If you're wondering how, that's how. A couple of keys, make sure if you're replacing one, the other one's in good shape. You don't want the tail gate to fall because if it falls, it will hit the bumper and it will get dented. Don't take them off both at the same time.
Just one little thing: When you're tightening it, you see the tailgate cable's made to go around the flint in this bolt. You need to lift up and make sure the tailgate cable goes on the bolt, and then tighten it. This allows that to keep moving. If you're tightening it up with getting it in that right spot, basically what will happen is your tailgate will just going to stay like this. This would end up pinching into there and probably damaging and scratching things. That's about it.
We hope this video helps you out. Brought to you by www.1AAuto.com, your source for quality replacement parts and the best service on the Internet. Please feel free to call us toll-free, 888-844-3393. We're the company that's here for you on the Internet and in person.
Tools used
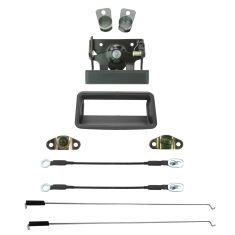
So, now that we have the tailgate down, we have a clear view of all of our mounting bolts. We have two here, 13-millimeter. And then, if you were to go around, more than likely you have some Phillips heads. We're gonna remove them all. Here we go. Bring up the tailgate. Now, we can see what's going on in there. Let's see about popping this off of here. Here we are.
Now, this one right here has been broken for a while so it has a little wire tie. I'm just gonna get that right out of there using some cutters. Awesome. Now, you got these little white clips. They should kinda pry off of the bar there. And then, once you have it flipped up you can take the rod right off. This one obviously flips down. Here we are. Slide that out of right there. Here it is.
It's time to get this in here, just get it kinda lined up. You can grab your little rods. We're gonna put it through the hole just like that, and we're gonna spin this around so the lock comes around and clips right onto the rod. Give it a wiggle. That feels great. Do the same to the other one. Bright that one up and around. Lock it in. Perfect.
Get that started in there. We're just gonna turn it and try to make sure these bolt holes are lined up and they're not like that. Line them up nice. You see, when I tightened it, it kinda turned a little bit. Here we are. Let's get this back up on here. Line our bolt holes. Here we are. Now, I'm gonna go around the sides, start all those in as well. All right, let's start snugging them all up.
Let's get this puppy installed. I'm just gonna line it up. Make sure you wanna press right in. A couple of loving bonks. Put those clips in there. Beautiful.
Tools used
All right. So to do this job, you're gonna need one simple tool. A plastic trim tool. Something that I want to show you, if you look at the backside of the little bezel, you're gonna see these little ears. That's where we're gonna be looking for with our plastic trim tool. We're gonna come right down right where that is, and then we'll pop it off. So, I'm gonna come like this. Give it a little twist. There we are. Do the same on the bottom. Okay. There we are. Let's get this puppy installed. Just gonna line it up. It should wanna press right in. Couple loving bonks. Get those clips in there. Beautiful.
Tools used
Hi, I'm Mike from 1A Auto. We've been selling auto parts for over 30 years. We're dedicated to delivering quality auto parts, expert customer service, fast and free shipping, all backed by our 100% satisfaction guarantee. Visit us at 1AAuto.com, your trusted source for quality auto parts.
In this video, we're going to be working with our 1996 GMC Sierra K1500. We're going to show you how to remove and replace the tailgate cables, which often rot out or break, making the tailgates hang too low and not support what they're supposed to. If you like this video, please click Subscribe. We have a ton more information on this truck, as well as many other makes and models. If you need these parts for your vehicle, you can follow the link down in the description over to 1AAuto.com. The only items you'll need for this repair are a T40 Torx socket ratchet and extension and maybe a flat head screwdriver.
Open your tailgate. Lift up on your tailgate slightly. Lift up on the little metal safety here so you can slide the cable forward into the larger opening and pop it out. Remove the T40 Torx for the cable.
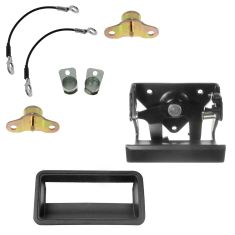
Here we have our old tailgate cable that we removed from our truck and our new part from 1AAuto.com. As you can see these parts are exactly the same. We have the same length and the same cable ends. Our new one actually comes with this nice little plastic insulator to help keep the rust and corrosion off of there. These tailgate cables tend to fray and get rusted and eventually break. Or these little safeties break and fall off, meaning that sometimes you'll go to open your tailgate, it will come up, fall loose, your tailgate will open too far, or even worse, drop on you. Fortunately, it only takes one bolt and a few minutes to replace these. You can get a nice new pair of tailgate cables from 1AAuto.com that are going to go in direct fit, just like the original equipment, get your tailgate opening safely and securely, and fix you up right.
Install the T40 Torx bolt at the bottom of the cable. Make sure the hook at the top is facing the correct direction so the tab faces in toward the middle of the truck and will lock back over the stud. This bolt is shouldered so it's going to bottom out before it's completely clamped, so this still has room to move around. Lift up on your tailgate, slide the larger part of the cable over the tab and then lock it into place. If you're replacing these parts as a pair repeat these steps on the opposite side.
Thanks for watching. Visit us at 1AAuto.com for quality auto parts, fast and free shipping, and the best customer service in the industry.