Hi, I'm Mike from 1AAuto. We've been selling auto parts for over 30 years! We're dedicated to delivering quality auto parts, expert customer service, and fast and free shipping, all backed by our 100% satisfaction guarantee. We've created thousands of videos to help you install our parts with confidence. That saves you time and money, so visit us at 1AAuto.com, your trusted source for quality auto parts.
In this video, we're going to be working with our 1996 GMC Sierra K1500. We're going to show you how to remove and replace your vehicle's passenger side exhaust manifold on a V8 engine.
If you like this video, please click subscribe. We have a ton more information on this and many other vehicles, and if you need this part for your truck. You can follow the link down in the description over to 1AAuto.com.
Here are the items you'll need for this repair: 14 to 15mm socket, ratchet, socket extensions, 14 to 15mm wrenches, pliers, gloves, safety glasses, rust penetrant, sawzall
Start your vehicle and allow it to run up to operating temperature. While your engine is still hot, you'll want to crack loose these six bolts on your exhaust manifold. Again, the motor is hot, so you want to keep your hands away. You may even want to use a thicker pair of work gloves or cutting gloves to do this just in case. As long as you get it nice and hot, you should be able to loosen this hardware and not have anything get stuck or broken on you. Now, normally there would be three 13 millimeter bolts here around the flange where the exhaust reaches the exhaust manifold. You can tell that ours are pretty badly rotted. I'm not going to be able to get these off because there's nothing to turn, and the flange is so corroded that there's nothing to cut.
Hopefully, yours are still present and you can remove them. Then wiggle this flange, and it'll come down. You can just lift your manifold up and out of the truck nice and easy like it's supposed to go. But for us, I'm going to unplug my O2 sensor. You can remove yours if it looks like it's going to come out. Ours doesn't, so I'm not going to touch it. Then all the way back here just behind the rear edge of the transmission pan, I'm going to cut the pipe, and try to pull it out and up with our exhaust manifold. This is a pretty good way of doing it if yours is as badly corroded and damaged as ours is, because you could put either a sleeve here with a pair of clamps, or if you have the ability to weld. You could weld this pipe around again either to itself or with a sleeve to seal it back up and still get your job done here.
Disconnect the connector for your O2 sensor. Once you've got everything else disconnected, you can finish removing your exhaust manifold bolts. Everything's unbolted, so you can remove your exhaust manifold from the vehicle.
We're now going to cut the flange off of the bottom of the exhaust manifold. Now, on the other side, we cut the nut here to try to save the flange. This flange is pretty much gone, so we're going to cut it here to save ourselves the hassle and replace the flange for this pipe. Be sure to use proper safety equipment anytime you're cutting.
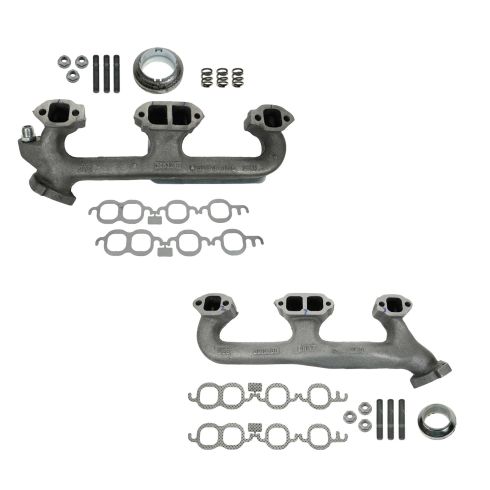
Here we have our new manifold and our old part that we removed from the truck. As you can see they're exactly the same, with the same body of the manifold, same flange and mounting locations. Same three bolt flange on the bottom, and it comes with a nice new gasket that just clicks in.
We have the flange gasket here which you'll have to cut into the three individual pieces, you can see they're all the same, the center section, and then each end is on there as well. It comes with a new set of studs since you likely had to cut your old ones off. We'll show you an example of how to install these on the other manifold that we've already done, and a new set of nuts for it. So if your old exhaust manifold is rusted out, cracked or broken or is leaking, this new part from 1AAuto is going to go in direct fit, just like your original equipment, and fix you up right.
Your new manifold comes with studs and the rest of the hardware you need to install and secure it. However, if you don't have a stud installer tool, this can easily be done with the parts just included in the kit. For starters, you want to make sure you've put some of the appropriate high-temperature thread locker on the short side of the stud so it remains in the manifold. Start the threads in as far as you can by hand. And then install one of the nuts included with the kit backwards so the flange faces out. This particular one is a 15 millimeter, but yours may be different. Actually, this seems to be sticking on there and installing the thread pretty well. Not the method I had intended to use, so once it gets in, we'll show you another way to do it if this doesn't work.
There we go. Now what we were after is normally the nut would spin down onto the threads, and once you had it down about the length of the nut, or two times the length of the nut, you would install another one and use your 15 millimeter ratchet, bring that down, get them to touch, and then back this nut off while tightening the top one to lock in together, and then turning the nut to install your stud. Make sure that bottom's out in there. Hold the ratchet the other way, support the nut toward you, and remove your nuts. You'll then repeat this process on the remaining studs.
Make sure your studs are installed with thread locker and the new gasket is in place. Set the bottom of your manifold back into the exhaust pipe below. Of course you want to make sure that all the old gasket is removed from the head, and for these new style gaskets, we'll going to want to install all of our bolts just a few threads so it's enough to support the weight of the manifold, but not pull it up against the side of the head yet.
You'll see that the new gaskets have these little hooks on them. The only reason they're like that is so you can line them up in that gap on the manifold, drop them in and let them hang on the bolts. Now you can go ahead and tighten down all of your 14 millimeter manifold bolts. Torque the two center manifold bolts to 26 foot-pounds.
Now if your exhaust manifolds came off and the flange and ball socket on the exhaust pipe are still intact, you'll want to set that ball socket up to your new exhaust gasket. Line the flange up to the three studs, and tighten down your new 15 millimeter nuts.
Thanks for watching. Visit us at 1AAuto.com for quality auto parts, fast and free shipping, and the best customer service in the industry.