Replaces
This part doesn’t fit a . Select from parts that fit.
Frequently bought together
Part Details
Product Features
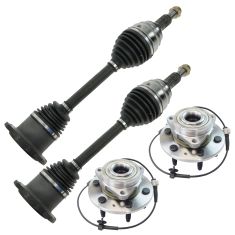
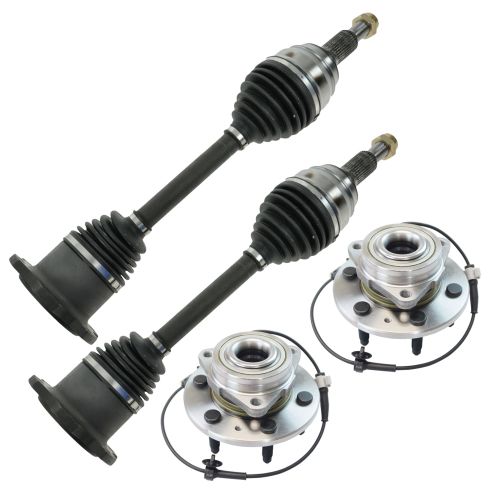
TRQ drivetrain kits are manufactured using premium raw materials to restore original performance. Each TRQ drivetrain component is designed to be a direct, maintenance-free replacement to the stock unit. To extend the service life of your drivetrain, TRQ recommends replacing wheel hubs, bearings, and constant velocity (CV) drive axles at the same time to ensure even wear of components and improved ride comfort. All products are fit and road-tested in our Massachusetts R&D facility to ensure we deliver on our promise of Trusted Reliable Quality.
Our steering and suspension components are pre-greased and sealed for long life and do not require the extra maintenance typically required by greaseable versions.
Item Condition:
New
Attention California Customers:
 WARNING: This product can expose you to chemicals including Lead and Lead Compounds, which are known to the State of California to cause cancer, and birth defects or other reproductive harm. For more information, go to www.P65Warnings.ca.gov.
Lifetime Warranty
This item is backed by our limited lifetime warranty. In the event that this item should fail due to manufacturing defects during intended use, we will replace the part free of charge. This warranty covers the cost of the part only.


Created on:
Tools used
Okay, friends, one of the first things we're going to talk about in this video is safety, hands and eyes. With that said, let's go ahead and safely raise and support the vehicle. And now, we're going to remove all six of our lug nuts and take the wheel off.
Now that we have the wheel off, we have a clear view of our ABS wire right here. I always like to disconnect it. We'll go ahead and pull it off of the frame right there where it's on and if you look at it, you're going to see a red tab. Push that red tab so it's away from the little indicator here. Now we're going to squeeze on this tab and separate the two. Let's continue on by removing it from the rest right along here. There's another one down here. Perfect. Set it aside. Now, looking from the backside, you're going to see two caliper bracket mounting bolts. Go ahead and remove the pair of them, and then we're going to set the whole caliper up on top of the control arm so it's safe.
Looking at the front of your rotor, you're going to see this little Torx head screw right there. Go ahead and remove that and then remove the rotor. Use your 36-millimeter socket, remove your axle nut. There we are. Give your axle a nice push. If it doesn't move inside the bearing, you need to continue on with a little punch in the center with a hammer bonk, bonk, bonk until it's free. Let's remove our outer tie rod end nut. Now, looking at the backside of the knuckle right along where the axle is, you're going to see three mounting bolts that hold the bearing to the knuckle. Go ahead and remove all three.
There it is. Go ahead and wiggle that bearing. All right, ours feels like it's ready to come off. If it doesn't for you, you can go ahead and give a bonk right along the top here, maybe along the bottom, just try to break it free. There we are. Let's go ahead and grab that backing plate off of there. There's our bearing, friends. Now, let's continue on with a nice collection bucket on the floor. We're going to spray down this area, get out any of the debris that's in there.
Okay, this looks great. You also want to make sure that this area along here is nice and clean as well, that's where the backing plate's going to ride. And then, of course, double-check that backing plate itself and make sure that that's in good condition as well. If you have any rot build-up in areas that it's supposed to make contact points, obviously you're going to have an issue. Now, let's use a little bit of copper never-seize, we're going to go along the inner portion of the knuckle right there and then, of course, this area where the mounting area is. There we are. All up along there. Beautiful. I like to put a little bit along the splines of the axle itself as well, but you definitely don't need to go on the threaded area. Now it's going to be time to clean up the threads on all of your bolts. You want to make sure there's no rust or any remaining thread locker. Once you have them cleaned, let's put on a tiny bit of thread locker ourselves.
All right, so I cleaned up my bolts, I've got some thread locker on them, I've got my backing plate, and I've got my brand new bearing. Go ahead and put the wire through your backing plate and then line up the slot right along there. You're going to notice the cutout area on one side of your backing plate, that's going to be where the caliper is supposed to be. Let's go ahead and put this bearing on there. Now, of course, we'll start all three of our bolts from the backside, we'll snug them up, and then we'll torque them to manufacturer specifications.
Now let's torque all these bolts to 133 foot-pounds. Now if you have an existing rotor that looks a lot like this, you want to make sure that you clean up this surface where the hub's going to ride. If you have some copper never-seize, go ahead and coat the area where the rotor's going to ride and, of course, make sure you get inside that bolt hole where the security bolt is. Now it's going to be time to get our rotor up on here. Make sure you line up your mounting hole and, of course, start that bolt in there and snug it up. Now, let's go ahead and get our caliper on there. I've got my two bolts with a little bit of thread locker on it. Start them both in, snug them up, and we'll torque them to manufacturer specifications. Let's torque these 170 foot-pounds. Connect in your ABS wire, click it in, give it a tug, make sure it's locked. Perfect. Go ahead and start it into the frame. Make sure everything's secure.
Let's get the tie rod nut back on here. Let's torque this to 26 foot-pounds. Tiny bit of thread locker on your axle stud there, washer, start the nut on, we're going to bottom it out carefully, and then we'll torque it to manufacturer specs as well. To torque this, the easiest way to do it would be to grab your wheel, come from the backside and you're going to bonk out this center cover right here. Now we're going to put the wheel on there and then we'll, of course, torque everything down at the same time. Now that we have the wheel touching the ground, we can torque our axle nut to 188 foot-pounds. Torque your lug nuts to 140 foot-pounds. Let's go ahead and get our cover on there. Torqued.
Okay, friends, so that was easy. Next thing you need to do is go ahead and pump up the brake and then take it for a road test. Listen for any noises and, of course, pay attention to make sure you don't have any ABS light.
Tools used
What's up, guys? I'M Andy from 1A Auto. In this video I'm going to show you how to replace the front hub bearing on this 2015 Chevy Silverado. If you need this part or other parts for your vehicle, click the link in the description and head over to 1Aauto.com.
Take a 22-millimeter socket and a breaker bar. I'm just going to loosen up these lug nuts. Now I'm going to raise and support the vehicle. Then I can take the lug nuts off. Take the tire off.
So I'm going to loosen up this axle nut. There's a couple of different ways you can do this. You can take a screwdriver and slide it in between the break fins right there, and then the brake rotor up against the caliper bracket will stop that from spinning, loosening it up here. And then also you could take a pry bar, slide it in between the lugs and hold that while you loosen it up, or even have the tire on the ground with the center cap off, loosen it that way.
I'm using a 35-millimeter socket and breaker bar, and I'm going to use a pipe to give me a little more leverage. This is on there pretty tight. Loosen it up.
Now I'm going to take these caliper bolts out. I'm going to use a 19-millimeter socket and a ratchet. Loosen that up. Take that out. I'm just going to leave that in a little bit before so I can take the top one out, otherwise the caliper is just going to slide up. There we go.
If when you're taking that bolt out, if the pin starts spinning, you can use a 19-millimeter wrench and hold the pin from spinning. Ours came right out. Now I'll just grab the caliper. I'm just going to rock it back and forth a little bit to compress the piston. You can always take a screwdriver and slide it in between the caliper and the rotor, pry it out a little bit, make it easier to pull it off.
Then I'm going to take this caliper hanger. We sell these at 1Aauto.com. Slide it in the caliper and then hook it onto something. I'm going to hook it onto the spring right here. Keep the caliper from hanging just on the hose. You never want to let the caliber hang from the hose.
Now I'm going to take these pads off. I'm just going to use a little pry bar. You can use a screwdriver. These pads are on there pretty tight. They're rusted on there really good. Slide those out. As you can see, there's no pad life left on these brake pads. That's metal on metal, so these brakes are definitely due to be changed.
Now we want to take this caliper bracket off. I'm going to use a 18-millimeter socket and a breaker bar. Take these two bolts out. These are on there really tight, so I'm actually gonna use a pipe to get a little more leverage. Loosen these up. And I'll take a 18-millimeter socket and a ratchet, take the bracket off. When we have those caliper bolts out, we can grab the bracket and just slide it up.
To take this rotor off, I have to take that screw out. I'm going to use a pry bar to keep the rotor from spinning. I'm going to use a T30 socket and a ratchet, loosen this up.
So this screw isn't coming out very easily, so I'm just going to take a punch and a hammer, give it a couple taps, hopefully to break some rust free. Let's see if I can loosen this up now. All right, so this is giving me a little bit of trouble. What I'm going to do is take that same T30 socket and put it on an impact driver. We actually sell these at 1Aauto.com. We're just going to twist it to the left and hit it with a hammer. And there it goes, it's loose. Got it.
I can grab the rotor. Now if this was stuck on there, rusted worse, you can take a hammer and tap in these locations, and then slide the rotor right off.
Now I gotta take this nut off. I'm just gonna use the socket, a 35-millimeter socket and a ratchet, and I'm gonna use a pry bar to prevent this from spinning. Take that off, take the washer off. You can take some needle nose pliers to grab this washer, or you could take a magnet or even a screwdriver or a pick and just pull this washer off.
Now these bolts that hold the wheel hub on that go through the knuckle, I'm just going to spray some rust penetrant and let them soak for a little bit. It'll make it easier to remove the bolts.
Disconnect this connector. I'll just move this lock tab with a pick. So this lock actually broke a little bit, so what you would do is push this lock back and then push down on that little tab and that will release the connector. I just had to get under there with a pick to release it.
So we're going to get underneath here and just use a straight blade screwdriver or a trim tool. Pry that up. And then over here is a little tab that holds this in. Push down on the tab on one side with a straight blade screwdriver, and then on the other side. Or you can use some needle nose pliers or something. There we go. Pull that out. That wiring harness is disconnected.
Now we want to remove these three bolts that are on the back side of this knuckle. I'm going to use a 15-millimeter socket and a breaker bar to break them free. And then I can use a ratchet. Now they're all loose, now I can switch to a 15-millimeter socket extension and a ratchet. Now I can take these bolts out.
So there's a couple ways that we can pull this hub off. You can try to grab it and see if it comes off. This one's rusted, it's been on there a while. You could use a slide hammer and put an adapter, slide hammer it out. A lot of times it'll break the hub, will separate in the middle, and then you're still stuck with that inner piece attached to the knuckle.
So what we're gonna do is we're going to actually take a hammer and we're just going to hit it from the backside. And that's how we can remove the hub from the knuckle. And luckily this one's not in there too hard. You can see the backing shields starting to separate. A lot of times these will freeze in there and it's really difficult to get out. We'll just go back and forth with the hammer. A couple of hits on this side, couple of hits on this side. Give it a couple of taps on the axle. Not too hard, because we don't want to mess up the threads.
You want to make sure you watch out for your toes too because this hub could just fall all of a sudden. If you're not wearing steel-toed boots, it might get you in the feet. Here we go. Separate it, push the axle, slide this out and slide the dust shield off. Leave that right there, and there's the hub.
Here's the old hub bearing. Here's the new one from 1Aauto.com. It's got the same machine surfaces, same bolt holes, same threads on the inside for the axle. This comes with the wheel speed sensor, same connector. And on the front, it's got the same studs. Get yours at 1Aauto.com and you can do it yourself.
It's a good idea to replace the bolts whenever you're doing the hub bearing on this vehicle. We sell these bolts at 1Aauto.com. As you can see, the bolts look identical to the ones that came out, they're the same threads, same size hex.
Before I put the hub bearing on, I'm just going to take this shield off. Remember the direction that it goes. You could even leave it right there. I'm just going to take a wire brush and clean up some of the rust that's here. If it's really bad, you can take a die grinder and grind some of the rust off. This isn't too bad. All right, that's cleaned up.
If you want, you can put a little bit of grease on there. I'm not going to use any grease. I'm just going to take this shield, slide the ABS harness through there, just like that. Position this back over. Just make sure the wiring harness doesn't get pinched. Let it slide on there, slides on there pretty good.
Now I'm going to take the bolts. You want to get them all started before you start tightening them down. I'm going to use a torque wrench with a 15-millimeter socket, and I'm going to tighten these bolts to 133 ft-lbs.
I'll take the Washer, stick the washer on, then the nut. Then I'll take a pry bar, prevent the hub from spinning. Use a 35-millimeter socket and ratchet, tighten this down, and then I'll torque it. With the torque wrench, I'm gonna torque it to 177 ft-lbs.
Take the wiring harness, re-secure that in the same position that it came out of. Push that clip in there, and this one over here. Just like that. Connect the connector right here, lock it in place and push that down right there.
Now we're going to clean up the caliper bracket. Just take a wire brush. If you're reusing the clips, clean up the clips. Take the clips off. Just use a straight blade screwdriver, a pocket screwdriver, clean the back side of the clips. And then also clean this area right here. If you have a lot of rust, you're going to want to take a file or something a little more abrasive and clean any of the rust out that is raised up. Just be careful. Don't file too much down.
We'll take a little bit of caliper grease, put it on here before we put the clips down. That's going to keep some of the moisture out of there, prevent it from rusting up as bad. And then put the clips on, and we'll do the same with the other side.
Now we want to clean the slide pins. Just pull the slide pin out. Take some brake parts cleaner and a rag, wipe it off. You can also take some brake parts cleaner, spray it in the hole, clean the hole out. Make sure it drains out. We'll take a little bit of brake caliper grease, apply that to the pin. Then re-insert the pin and do the same procedure for the other side.
Before I put the rotor on, I'm just going to use a little bit of this anti-seize. Just go around this area. A lot of times this area gets corroded pretty good, so we'll just do this for future so it's easier to remove.
First I'm gonna slide this rotor on backwards. I'm gonna take some brake parts cleaner, clean it down. There is a coating on the brakes, so you want to take that coating off. Just wipe it down with a rag. Flip it around, take some more brake parts cleaner, clean this side, wipe it down with a rag. Make sure that the bolt hole lines up with that hole right there. Then take the screw, get this one started.
I'll just take the T30 socket extension and ratchet, just snug this down, not tight, that's good enough. Take the brake caliper bracket, line that back up. Take the caliper bolts, you can put some thread locker on there. Same with the top one. Get that lined up.
Now we'll take an 18-millimeter socket and a ratchet and I'll tighten these up. Now I'm going to use a 18-millimeter socket and a torque wrench. I'm going to torque these bolts to 170 ft-lbs. We'll take a little bit of brake grease, put it on the ends of the pads. Take a pad, slide it into the caliper bracket. Do the same on the inside.
Now the inside pad, the bottom of the pad is flat on this one. The outside of the pad has a curve to it. Then I'll take this caliper hanger off, flip the caliper over. Now I'm going to take this break caliper compressor that we sell at 1Aauto.com, slide it in there and it ratchets. I'm just going to go slow, compress the pistons. When that's compressing the pistons, the fluid is going through the caliper, through the hoses, through the lines, back to the master cylinder into the reservoir. It's a good idea to check the reservoir after you're done the job just to make sure the fluid is not too full or not full enough.
Alright, so that's compressed, both of those pistons. Take the caliper, make sure the hose is not twisted, push the pins in a little bit. That lines up. Take the bolt, caliper bolts. Then I'll take a 19-millimeter socket and a ratchet, just snug these up, and then we're going to torque them. Use a 19-millimeter socket and a torque wrench and torque these to 74 ft-lbs.
Take your tire, reinstall the tire. Take the lug nuts, get those started. Before you lower the vehicle all the way down, just let it down enough so the tire is touching. Then I'm going to torque the lug nuts with a 22-millimeter socket and torque wrench, and I'm torquing them to 140 ft-lbs, and I'm going to torque them in a star pattern or a cross pattern so that the wheel gets tightened down evenly. I'll just go around again. We're good to go.
Afterwards, we want to make sure we pump the brake pedal. There's going to be an air gap between the caliper piston and the brake pads. We want to eliminate that air gap by pushing down on the brake pedal. After that, we want to check the fluid level in the reservoir for the master cylinder. Make sure the fluid level is at the proper location and adjust accordingly, and then you'll be good to go.
Thanks for watching. Visit 1Aauto.com for quality auto parts shipped to your door, the place for DIY auto repair. And if you enjoyed this video, please click the subscribe button.
Tools used
One of the first things you want to do is safely raise and support your vehicle by the frame so your suspension can hang. Once you've done that, take a small pry bar, and we're going to take off this center cap. If you were to spin it, you're going to see a little notch in the cap. Carefully slide this off of here. That exposes our 22-millimeter lug nuts. Remove all six. Remove your wheel. Now, let's remove our 21-millimeter nut. Let's just put that nut on just a couple threads. Now, we're going to take a hammer and we're going to hit right here on the knuckle. You want to be very careful for your brake rotor.
Now that the wheel's off, we have a clear view of where we're going to start working. We're going to disconnect the electrical. This is the ABS right here, and it's very delicate. I'm just going to come right up along here and you're going to see where it's supposed to be mounted to the frame. Should be pretty secure. This is missing about half of its clip, so I'll make sure I secure it in afterward. This purple right here is a little lock. It's holding it from coming separated. I like to just come right in between here, pop that up. Now, we'll separate this. Just take a peek. Make sure you don't see any funny colors. If you were to come right down along here, we're going to get this clip off of here as well. Just give it a little twist, lift it up, grab that ABS wire, carefully set it aside. The next thing we're going to do is remove this 10-millimeter headed bolt. The next thing we're going to do is remove the nut that holds the upper ball joint to the knuckle. Okay. That comes right off. I'm just going to go ahead and put it on there just a couple threads for now. Now, let's use a 36-millimeter socket to remove our axle nut. Behind there, there's a washer. Go ahead and remove that as well. Let's go ahead and blast this with some penetrant. The next thing we need to do is separate the axle from the bearing. I'm going to use this punch right here and go right in the center. You definitely don't want to use a hammer and potentially damage the threads.
The next thing we need to do is remove our mounting bolts that hold the caliper to the knuckle. Use an 18-millimeter. Carefully hang your caliper so it's putting no pressure on your flex hoses. So, now, let's just double-check to make sure this upper ball joint nut is still on there a few good threads. It hasn't loosened up on us. And then we'll move down here to the lower ball joint nut. Remove that as well. Take that and just put it on a couple threads. Okay. So, now, it's going to be time to separate the upper ball joint from the knuckle right here. Pay special attention to anything that's delicate that you don't want ruined, such as an ABS wire. Make sure that that's secure and safely out of the way. Go ahead and take your nice little hammer, and we're going to bonk right here on the knuckle itself. As you can tell, it's separated. We can move along. So, now, let's pushed down on this. Remove that nut. And carefully draw this down. Now, if you're worried the knuckle with the rotor is going to be too heavy, you can go ahead and use a Torx bit right here, remove that bolt, and take the rotor right off. The problem with removing it like that is you're going to have to clean up the mating surface between the wheel bearing and the rotor itself. So, now, I'm going to take my hammer again and I'm going to come right down here and we're going to hit right on the knuckle itself until this comes down. There we are. Carefully lift up. Remove the ball joint nut. Carefully lower this down. Remove your knuckle.
The next thing we're going to do is remove the bolts that hold the axle to the front differential. That's what the bolts look like. Remove them all. The next thing that we're going to have to do is remove the sway bar link. And you're going to have to do that on both sides of the vehicle. The reason for that is because we want to take the sway bar and swing it down.
There we are, friends. Now, it's going to be time for the install. Take your axle, slide it right in here. Gonna take one of my bolts. I like to use some red threadlocker. We'll call it your prerogative. Go ahead and start in the bolts. Don't tighten any of them down completely until you've started them all in. Okay. Let's snug them up. Like to go criss-cross. All right. Just double-check them all.
Now, it's gonna be time to install your sway bar link. To do that, you want to make sure you have the shaft facing up like this with one of your washers, a bushing with a little piton facing up towards the control arm. I'm going to put it through the lower control arm. Put another bushing with the piton facing down towards the control arm. Nice metal washer. Gonna put my spacer, another metal washer, another rubber bushing with the piton facing up towards the sway bar, just like this. Go ahead and pull this down. Rubber bushing with the piton facing the control arm or the sway bar, washer, and then the nut. Start in the other side the same way. So, now, we're just going to tighten this up. It's important to remember that you don't need to flatten out your bushings. You just kind of want to make them so they're completely touching up against the sway bar and completely touching the control arm itself. I can see it's touching. This can't move around. And I have approximately the width of my pinky. Do the same to the other side of the vehicle.
Let's just take some copper never-seize and go right along this splined area. You don't necessarily need to go down the threaded area though. Go ahead and take your knuckle. I'm going to start it on the axle a little bit and slide it over the lower ball joint stud. Lift it up, kink it to the side, and start on that lower ball joint nut. Wiggle the axle around. Should slide right in. Now, we're gonna use a bar. We're gonna pull this upper ball joint down into here. Get the nut, go ahead and start it on there. Just gonna take my bar and try to hold pressure on the lower ball joint to the knuckle. And then we're going to go ahead and try to tighten it up. So, now, you'd want to torque this to 37 foot-pounds. If for some reason you can't get your torque wrench in there like I can't, I would just continue with my wrench and make sure it's nice and tight. Beep. Perfect. Now, it's time to torque up that lower ball joint nut as well, torque it to 37 foot-pounds. Now what we want to do is make sure that our slot is lined up with the hole that goes through the ball joint stud so we can make sure we install our cotter pin. Go ahead and slide that through. If for some reason yours is not lined up when you torqued it, you need to continue tightening, not loosening, until it's lined up with the next available slot. Go ahead and peen that over and lock it in.
All right. So, now, it's gonna be time to get the caliper on here. Just go ahead and slide it right over the rotor. Now, we're going to line up those bolt holes. I like to use some red threadlocker on these bolts. Start them in there. Okay. Let's bottom them out. Now, let's go ahead and torque these to 148 foot-pounds. Now, we'll just go ahead and take that tie rod end, put it right through the knuckle. Take your nut, start it on there. We're going to bottom it out. Now, you're going to torque this to 44 foot-pounds. That's torqued. The next thing we're going to do is look to see if we can find the hole in the stud of the tie rod and match it with the next corresponding slot on the tie rod stud nut. This doesn't line up. So, what I need to do now is I need to continue tightening until it does. I can see right through. I'm going to grab that locking cotter pin and install it. Slide that right on through and just peen it over. There's no way that this nut can come loose. Now, it's going to be time to get the washer with the axle nut on there. Go ahead and slide the pair on. Go ahead and use your 36-millimeter socket, bottom it out, and then we'll torque it. Just going to put a little splash of never-seize in here. I've got my mounting bolt. Let's use our 10-millimeter and snug it up. Make sure it's fully secured. Make sure there's nothing binding your flex hose for your brakes are not twisted in any way.
Now, it's time to get our ABS wire resecured. Let's go ahead and put it in right here. Make sure it cannot come loose. If this can hang around and move around, it could potentially get damaged. We'll go ahead and connect this in now. Listen for a click. Give it a tug. Go ahead and slide in your lock. Now, we're going to take our mounting hardware here and just slide it right down and in. It's just a little push clip. Give it a nice tug. Make sure it's definitely secured.
So, of course, next, you'd want to go ahead and torque down this nut right here. And that's going to be torqued to 177 foot-pounds. You can do that several ways. If you were to just do it like this, what you're going to notice is it just keeps spinning. If that was the case, what you would do is you can use a pry bar coming straight through these lug studs like this down to the ground and so it holds it from spinning on you and then you would torque it. If you didn't want to go through the process doing that, you can go ahead and throw the wheel up on there and then go through the center hole, which is the way that I'm going to do it. We'll grab those lug nuts. Start them all on there. Let's bottom these out.
Now, we'll bring it down to the ground and we'll make it so the wheel is just barely touching enough so the wheel can't spin. It's time to torque down this axle nut, 177 foot-pounds like I said. Torqued. Now, let's do the lug nuts, 140 foot-pounds. Go criss-cross. Torqued. Now, it's going to be time to get the center cover on. Before you go ahead and pound it on there, just take a look at the back. You're going to see something that looks a lot like a valve stem, line it up. This can go pretty much just like this. Light bonk. And then, of course, clean up your wheel, make it look nice and pretty, and take it for a road test.
Tools used
Brought to you by 1AAuto.com, your source for quality replacement parts and the best service on the Internet.
Hi, I'm Mike from 1A Auto. I hope this how-to video helps you out, and next time you need parts for your vehicle, think of 1AAuto.com. Thanks.
In this video, we're going to show you how to replace the right hand, or passenger side, front axle on this 2011 Chevy Silverado. This is a 1500. The procedure for the left axle is pretty much the same, and it's also the same for these trucks for model years 2007-2013 for both this Chevy Silverado 1500, as well as the GMC Sierra. In this repair we use new axle or axles from 1AAuto.com, jack and jack stands, 15 to 22mm sockets with a ratchet extension. You'll need a breaker bar and a pipe for some extra leverage, a 36mm socket, and I separate that one out because it's not one that's usually in your regular socket set. You'll need to buy that one special, some penetrating oil, and a torque wrench. You can replace these axles one at a time, or in pairs.
From the top, there are three 18mm nuts that hold the top of the strut in place. You see one there, one has a wire lube on it there that I'm going to reach down and grab and just pull off. Apologies for the camera shot, but you just grab the wire clip and pull it up off the stud. Okay, so you have your other one there and your third one there. Now use an 18mm socket with a long extension and remove those three nuts. Remove the center cap just by prying with a screw driver. If you don't have the benefit of air tools, loosen the lug nuts with the vehicle on the ground then raise and secure the vehicle and then remove the lug nuts the rest of the way. Remove the wheel and tire they are 22mm lug nuts.
Turn the wheel using hands or the steering wheel. Then you need to remove the stabilizer link. Make sure you put some penetrating oil on the top end of it there. Then use a wrench on the top side and a socket wrench on the bottom side. Remove it all the way. We're going to kind of speed up a little bit, "cheat" a little bit while using an impact wrench to take that off to speed things up for us. Here's the shock and strut in place. We're just using that 15mm socket ratchet. You might want a breaker bar to break them loose, but they come apart pretty easy on this truck. We'll fast-forward as we just take those out.
Get those bolts out. Press down on the suspension some, and bring the strut down and then up and out. Using your hammer and a cold chisel, you could also use a large pair of pliers to pull off that center cap. We just kind of get it started, and then pry it off with a screwdriver. Okay, the nut is a 36mm nut if you have the benefit of an air impact wrench. You can also just pull the brakes, use a breaker bar and a large pipe or something for extra leverage to loosen it up. We'll put the wheel back on, set the emergency brake, and take it off. Loosen it up that way, and then raise the vehicle back up and take it off the rest of the way.
We're going to put a screwdriver into the brake rotor, that's going to hold things in place. You could do that also when you're removing that 36mm nut for the end of the axle. Then there are six 15mm bolts that hold the axle to the differential, and we're just going to remove those. And once those bolts are out, pull the axle from the differential and pull it right out.
The new axle goes right up into place. Put it into the hub first, you have to twist it a little bit to get the splines to line up. Then push on the other end of the axle and put it up into place. Line it up with the differential. Now I'll just fast-forward here as we put the bolts in, start all the bolts in, and then tighten them up preliminarily. And then you want to tighten all the bolts to between 55 and 60 foot-pounds. We'll fast-forward as we make sure we torque all those bolts correctly. And we're using the screwdriver to hold the rotor in place so we can torque it.
Now we'll go back to putting the strut in, and the strut does line up. There is a, you can see where the spring goes into the mount. The end of the spring should face out. Put the strut up in place and start the bolts on. You'll notice we're putting in a new strut in here. You'll also probably notice that there's an old axle in the footage, that's because when we filmed putting the strut and everything back together, we had not replaced the axle yet.
Now put the bottom down in place and take your bolt run up through, and then those clips that you took off of the original strut, put them into place. We just kind of hold them with our fingers, get the bolts started in, and then you can press them down into place and tighten up the bolts the rest of the way. Okay, and you can see here we use a screwdriver to put through the clip to hold it in place until it gets down far enough that it holds itself in place. And repeat it for the other side as well. Okay, and you can tighten these up between 70-75 foot-pounds.
Okay, speed up as we put the stabilizer link back in place. Use a pry bar to lift up on the sway bar a little bit, put the link back in place, put the bolt up through and then tighten the nut down on top. Put the tire back on, thread the lug nuts on, and then tighten them up preliminarily. Put that center bolt back on and tighten it to 156 foot-pounds. Torque your lug nuts to 110 foot-pounds using a crossing pattern. And then put that center cap back on. And then back up top, tighten up the three nuts that hold the top of the strut in place, tighten them to 70 foot-pounds. And put that wire retainer back in place and you're all set.
We hope this video helps you out. Brought to you by www.1AAuto.com, your source for quality replacement parts and the best service on the Internet. Please feel free to call us toll-free, 888-844-3393. We're the company that's here for you on the Internet and in person.