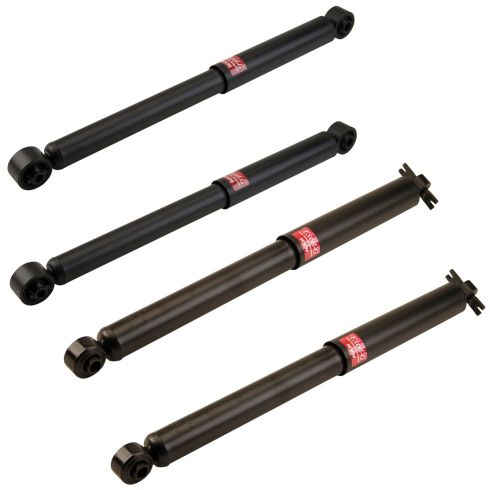
Kit Includes: (2) Rear Shock Absorbers (2) Front Shock Absorbers
Specification
Location
Front & Rear
Why Buy KYB Excel-G?
KYB Excel-G shocks and struts will match your vehicle’s Original Equipment (OE). These shocks and struts are perfect for restoring or surpassing your original suspension performance. Some of their perks include:
Equal or greater OE performance
Calibrated to OE specifications
Nitrogen gas-charged, twin-tube design made of quality materials
Restore original ride comfort, handling, and suspension capability
Item Condition:New
Lifetime Warranty
This item is backed by our limited lifetime warranty. In the event this item should fail due to manufacturing defects during intended use, we will replace the part free of charge. This warranty covers the cost of the part only.
FREE Shipping is standard on orders shipped to the lower 48 States (Contiguous United States). Standard shipping charges apply to Hawaii and Alaska.
Shipping is not available to a P.O. Box, APO/FPO/DPO addresses, US Territories, or Canada for this item.
Expedited is available on checkout to the United States, excluding Alaska, Hawaii.
Final shipping costs are available at checkout.
How to Replace Rear Shocks 1995-2000 Chevy Tahoe
How to Replace Rear Shocks 2000-06 Chevy Tahoe
How to Replace Front Shocks 1988-2002 GMC Sierra 1500
How To Replace Rear Shock 1992-99 GMC K1500
How to Replace Front Shocks 1992-2000 Chevy Tahoe
Created on:
Tools used
21mm Socket
Socket Extensions
Torque Wrench
14mm Socket
Jack Stands
Ratchet
Floor Jack
1. Removing the Rear Shock
Raise the Vehicle with a Floor Jack
Secure the Vehicle on Jack Stands
Use a 21mm wrench to hold the lower shock bolt
Remove the lower shock nut with a 21mm socket and ratchet
Remove one of the two 14mm bolts from the top of the shock
Hold the shock as you remove the other 14mm bolt
Pull down the shock
2. Installing the New Strut
Thread one 14mm bolt through the top of the new shock
Put the shock into place
Tighten the first 14mm bolt preliminarily
Start the second 14mm bolt and tighten it preliminarily
Tighten the two 14mm bolts
Push the lower end of the shock into place
Push the 21mm bolt through the lower end of the shock
Start the 21mm nut by hand
Use a 21mm wrench to hold the lower shock bolt
Tighten the 21mm nut to between 75-80 foot-pounds of torque
Lower the vehicle to the ground
Repeat this procedure on the other side
Brought to you by 1AAuto.com, your source for quality replacement parts and the best service on the Internet.
Hi, I'm Don from 1A Auto. I hope this how-to video helps you out, and next time you need parts for your vehicle, think of 1AAuto.com. Thanks.
In this video, we're going to show you how to replace the rear shocks on this 1996 Chevy Tahoe. If you replace one of them, we do recommend that you replace both of them. We show you on the passenger side, but the driver's side shock is the same procedure. It's the same part and process for the Tahoes from '95 to 2000. The items you need for this are new rear shocks from 1AAuto.com, 14mm and 21mm socket and ratchet with extension, 21mm wrench, a torque wrench, and jack and jack stands.
You want to start off by removing this 21mm bolt and then you're going to remove these two 14mm bolts. Using a 21mm socket and ratchet and a 21mm wrench, you just want to remove that nut. Once the nut's removed, use the socket and ratchet on the other side and just start twisting out the bolt. Now, use a 14mm socket and ratchet with an extension to remove those two upper bolts and we'll just fast forward as Don does this. Once those are removed, the shock will pull down.
Up front is the old shock, in the back is the new shock from 1A Auto. You can see they're identical and they will fit the same. You will have to just apply some pressure to shrink the new shock. Feed your new shock up into place with a bolt and a 14mm socket and then just tighten it into place. Really, you only need to tighten it preliminarily and then you should start the other bolt. Once you have both bolts started, just got back and forth tightening them up until it's nice and firm. Now, push the shock in and then forward and then line it up and push the bolt through. Then, just replace the nut and washer on the other end and tighten that up with your socket and ratchet and the 21mm wrench. Torque this lower bolt to 75-80 foot pounds and you're all set.
We hope this helps you out. Brought to you by www.1AAuto.com, your source for quality replacement parts and the best service on the Internet. Please feel free to call us toll-free, 888-844-3393. We're the company that's here for you on the Internet and in person.
Tools used
21mm Socket
21mm wrench
Torque Wrench
Socket Extensions
Hammer
Pry Bar
Center Punch
Air Compressor
Floor Jack
1/2 Inch Breaker Bar
1/2 Inch Impact Gun
22mm Socket
Now, I'm going to take a 22 millimeter socket. Take these lug nuts off. I'm going to take this wheel off. Now, I need to support the rear axle, and I'm just going to use a screw jack. Just take some of the load off of the shock. That should be good right there. Now, I'm going to use a 21-millimeter wrench, and hold the bolt on the lower shock. And then use a 21-millimeter socket, loosen the nut up, and take that nut off. And take that nut off. Then I'll take a punch and a hammer, and just punch the bolt out.
If you have to adjust the tension on the screw jack, pull that out. Make sure that's loose. Now, I want to get this top bolt out and the nut, and I'm going to use a 21-millimeter socket, an extension, and from the backside, I'm going to hold the bolt. And on this side, use a 21-millimeter socket. Take th\ nut off. Slide the bolt out, and grab it from the inside. And you should be able to slide the shock out. If you have to, you can use a pry bar. Just pry this out, and there we go. Slide the shock in position, and get the bolts in from the backside. And just slide the nut on.
Before I tighten the upper bolt, install the lower bolt. You have to adjust the screw jack and get that nut started. Now, I'm going to torque this to 70-foot pounds. And torque this one to 70 as well. Now, I can lower the screw jack and set it aside. We'll take the wheel. Put the wheel back on. Put the lug nuts back on. I'm going to tighten these lug nuts to 140-foot pounds in a cross pattern or star pattern so that it tightens the wheel down evenly. All right, and I'll just go around again. Double-check. Good.
Tools used
Torque Wrench
Hammer
Socket Extensions
Rust Penetrant
18mm Wrench
Pry Bar
Jack Stands
18mm Socket
Trim Tool Set
Flat Blade Screwdriver
Socket Driver
Copper Anti-Seize
Wheel Chocks
Center Punch
Ratchet
Floor Jack
Swivel
22mm Socket
Safely raise and support your vehicle on the frame so your suspension can hang. Now that we've safely raised the vehicle, let's remove this by using a small pry bar right in this little slot. Now you can see your 22-millimeter lug nuts, remove those. And now we'll just do the same thing to the other side. Now that we have the wheel off, we have a clear view of what we need to do. To get to the upper part of the shock, we're gonna remove this portion right here using a little forkey tool that looks like this. Grab these little push clips, let's pop right out, do the same to them all. There we are.
Now it's time to remove both bolts. You can start wherever you want. I'm gonna start at the top using an 18-millimeter on one side and an 18 on the other. Okay, looks good. I'm just gonna leave that on there a couple of threads. We'll do the same on the bottom. Start that nut on there a couple of threads, hit with some more penetrant. Now let's start driving the bolts out. It's important to make sure you have the nut started on, and if you want to put it flush, that would be better. The reason for that is because you don't want to damage the threads on your bolt when you go ahead and bonk on it with your hammer.
The next thing to do is to apply a little bit of upward pressure on the lower control arm. You can use a floor jack or a post jack, whatever you've got, but just kind of lift it up so you can get a little bit more movement with that bolt. There we are. Grab that washer. Let's grab the shock, see if we can move it around. Up and out. Let's coat this shanked area with some copper never-seize or grease, a little bit like that. Now you have the threaded area, I'm gonna say it's your prerogative to use some thread locker, but I would recommend it. Awesome.
We're gonna take the long bolt, that'll be the one that goes through the top of the new shock. Let's go ahead and compress our shock three to five times. It's time to get the new shock in here. Go right up in between the control arm and go right up in the past and try to get the lower portion in to where it belongs first. You might need to compress the shock a little bit. All right. So now it's sitting down where it needs to go, I'll get that upper portion started in. Don't forget your washer and then, of course, the nut. Do the same thing to the lower.
So to line up the holes, it can be a little bit difficult. You might need to go up a little bit or down a little bit with your control arm to line it up. Let's snug these up. Now let's torque them to manufacturer specifications. Torque both these bolts to 66-foot pounds. Let's get this out of here. Let's get this back on here. Let's start at the center. There we are. Let's get the wheel on and torque it to manufacturer specifications. Start on one of those lug nuts. Now we're just gonna start on all the lug nuts, we'll bottom them out and then we'll torque them to 120-foot pounds. Torque these to 120-foot pounds. It's torqued. We'll get our cover on here. Awesome. And now we'll just do the same thing to the other side.
Tools used
21mm wrench
13mm Socket
Torque Wrench
Hammer
18mm Socket
1/2 Inch Impact Gun
13mm Wrench
Okay, so we have removed the wheel just so we have a little bit more room to work. You don't necessarily have to.
One of the first things we're going to do is remove these 13-milimeter headed nuts. If you were to feel on the backside, you're also going to feel a 13-millimeter headed bolt end on the other side. So, we'll first get our socket on there. You might need to bonk it on there a couple times. Obviously, I have a lot of rust on mine. I've got my 13-millimeter wrench, put it up there. Let's see about removing this. Now we'll just do the same to the other one. Get that bolt out of there.
Now we're going to remove the lower bolt right here, using an 18 on this side and a 21-millimeter on the nut side. There we are. Take this right out of here.
Now it's going to be time to compress the rear shock. You want to compress it at least three to five times to activate the gases inside. We'll get this strap right off of here, let it completely decompress, and then recompress it, like I said, three to five times.
Time to get the shock in here. I'm just going to go ahead and line it up, kind of where it's going to go, and put my bolt through. The bolt is going come through from the center. Slide it right through like that. Then, you have your emergency brake cable. Make sure you get that on there the way it's supposed to go. Next is going to be the washer, and then the nut. Perfect.
So, the next thing we need to do is jack up the rear differential so we can bring the shock up to where it's going to mount into the mounting frame. All right, that's pretty close. I'm going to leave that just like that and grab my new bolts. Okay, let's snug them up.
Let's snug up this lower bolt. Make sure your emergency brake bracket is where it's supposed to be. This looks good.
Get our wrench up there. Let's torque this to 13 foot-pounds. That feels good. And do the same to the other one. Let's torque this bottom bolt to 74 foot-pounds. Torqued.
Let's get this out of here. If you did happen to remove the wheel, just go ahead and replace it, and then torque it to 120 foot-pounds.
Tools used
Torque Wrench
Hammer
Socket Driver
Pry Bar
Jack Stands
Wheel Chocks
18mm Socket
Ratchet
Floor Jack
Swivel
Trim Tool Set
1/2 Inch Impact Gun
KYSSP00090
In Stock
Product Reviews
Loading reviews
4.82/ 5.017
17 reviews
5 Stars
4 Stars
3 Stars
2 Stars
1 Star
14
3
0
0
0
Shock's
Parrish
November 6, 2017
Its early on yet but so far I can say what an improvement.
Set of four shocks
Pete
April 4, 2018
The parts were exactly like original parts. Easy to install. Required about an hour to install. I would recommend buying.
Totally worth it.
Quinton
July 29, 2018
I was skeptical at first but these shocks are great for the small price tag. I highly recommend these for all stock applications.
Service and parts
Merle
September 20, 2018
The parts are top quality and the staff are most helpfull. Would recommend to anyone!
My first KYB product
Will
November 14, 2018
I just installed these shocks on my 98 GMC. Love the way it rides now. The price was right, and the service was excellent. I will be buying more parts from you in the future. Keep up the great work. I will be shopping for more real soon.
Best deal in shock absorbers
S
December 5, 2018
These are very high quality shock absorbers for the price. Awesome ride quality. Plus very fast shipping and customer service.
Russell
January 2, 2019
The shocks were an exact fit as described, were delivered quickly and were a good price. Plus, 1A Auto has great installation videos.
Donald
June 29, 2019
Installed and fit perfect
Ryan
July 7, 2019
Good quality for the money little stiff but good for towing no more bouncing an easy on turns.
Great Company!!
Colton
September 7, 2019
One stop shop for all your auto needs!
Shock for a gmc truck
don
September 9, 2019
I would hightly recommon these was a perfect and a great ride.
Ronald
September 24, 2019
Great everything perfect
J
November 12, 2019
great shock but never recived rebate
1997 Chevy K2500
DONAVEN
December 18, 2021
Fit perfectly, improved my ride quality drastically.
Happy customer
Michael
December 27, 2021
I no problem with them work just fine
Worth the money I spent.
Gerardo
June 9, 2022
Good ??
Alexander
June 9, 2022
Arrived in timely manner and fits application perfectly. Time will tell of their quality.
Customer Q&A
My truck came with Bilstein shocks how do these compare to that brand ?September 25, 2018
R M
10
1A Auto's house brand parts are manufactured by various aftermarket companies specifically for us and built to your vehicle's exact OEM specifications.
September 25, 2018
Christa R
Will these fit a 1997 k1500 z71 off road package?March 27, 2019
Tyler F
10
Yes, according to the information you provided, this part will fit your vehicle.
March 27, 2019
Emma F
Will these shocks work if the truck has a 6 inch lift?November 28, 2019
Gary P
10
Thank you for your inquiry. Our parts are designed to fit and function vehicles that are still at OE specifications. If the vehicle is modified in any way we cannot guarantee the fitment or functionality, nor provide the warranty for the parts. Please let us know if you have any further questions.
November 29, 2019
A C
Do these shock come with mounting bolts?August 16, 2020
A E
10
Nope
August 16, 2020
Charles H
10
It was about two years ago since I did the shocks on my truck (these ones) and theyve held up great however I dont recall them coming with mounting hardware I used the old ones.
Good luck!
August 17, 2020
D A
10
New hardware is not included with this item. You may be able to reuse your original hardware if it is in good condition. Please let us know if you have any other questions.
August 17, 2020
Emma F
How come these fit a k1500 z71 but it says it also fits my k2500 suburban ? The suburban is 2,000 lbs heavier? Are you sure they will work?October 14, 2021
Patrick H
10
These are guaranteed to be a direct replacement of the vehicles listed in the "Vehicle Fit" tab on the listing.
October 14, 2021
Andra M
Will these fit a 1994 k1500 z71?April 7, 2022
John D
10
Yes, this part will fit your vehicle.
April 7, 2022
Ricale A
10
They sure fit a 88 k 1500 perfectly.
April 7, 2022
Reggie W
10
They fit my 95 k1500 no problems.
April 7, 2022
JAKE N
10
Possibly but I they were shorter than what I needed on a 3500 4x4 stock suspension
April 7, 2022
S O
Customer service
877-844-3393
Monday - Friday 8:00am - 9:30pm ET Saturday - Sunday 8:00am - 4:30pm ET
Chevrolet is a registered trademark of General Motors Company. 1A Auto is not affiliated with or sponsored by Chevrolet or General Motors Company.See all trademarks.
Enter Vehicle Year Make Model
Specify your vehicle's year, make and model to guarantee fit.
Year
Make
Model
Options
Drivetrain
This part doesn’t fit a . Select from parts that fit.