One of the first things we want to do when we start this job is, of course, to make sure the steering wheel will not be able to spin around and around and around. So, you can do that with something as simple as a bungee cord, just secure it to anything you can, whatever it reaches. For me personally, I'm just going to go right here because it's nice and close. Put it around there. Perfect. That's not going to be able to go around. We don't have to worry about the airbag anymore. Once you've safely raised and supported your vehicle so you can see underneath, you want to remove this plate. If you take out these two bolts, this should swing down, far enough to see right there. Let's use our 15-millimeter socket to remove this plate as well. The next thing we're gonna do is remove this cotter pin here so we can get the nut off. Now, it's time to remove the nut that holds the Pitman arm to the center link here. Use your 22-millimeter. The next thing we're going to use is a pickle fork, and we're going to try to separate this joint right here. If you want to spray down the area with some penetrant, it's probably a great idea. That's separated nice and easy. We can move along. So, now, we got to get this cover off of the steering shaft here. There's a little tab that you'd want to push to try to get around this. Then you should be able to slide it up. If you can't, you can try using a screwdriver. That looks decent. We can see where our little pinch bolt is right here. We're going to remove that, and then we'll get the steering shaft up and away from here.
Now, let's use an 11-millimeter to remove this bolt. Let's go ahead and spray down this area pretty good. Use your pry bar, go in between the shaft and the power steering box, and you should be able to move it. Once you're sure it's moving around pretty easily, we're going to continue on by removing the shaft from the box itself. There we are. That's completely released. Let's move along. Now, we're going to use an 18-millimeter crow's foot to get right down here on this line so we can remove the pair of them. If you want to spray them down with some penetrant, it's probably a great idea. Okay. So, I can see that the line is spinning with the actual fitting. So, I'm just going to try to work that back and forth a little bit. I'm going to spray it again real quick and see if I can get it to break free. I'm just going to take my bar along the top and just try to cause some vibration to see if I can get that penetrant to work its way in between the line and the fitting. Obviously, I don't want to damage the line in any way. If you poke a hole in the line, well, go ahead and buy yourself a new one. There we are. We've got those two separated now a little bit, so it's at least spinning. Let's make sure we put a nice recycling bucket underneath the vehicle to catch the power steering fluid that's bound to come out. Here we are. Got the fluid coming out. We're going to make sure that goes right into the collection bucket so we can recycle it properly. We'll set this aside and we're going to do the same thing to this line right here. There we go. Now, inside the driver's side wheel well, you're going to see three bolts sticking through the frame. Just remove all 3 of these bolts right here using your 21-millimeter socket. If you can't get this one, you could just try to bend this metal a little bit and then, of course, we'll form it back to the way it needs to go.
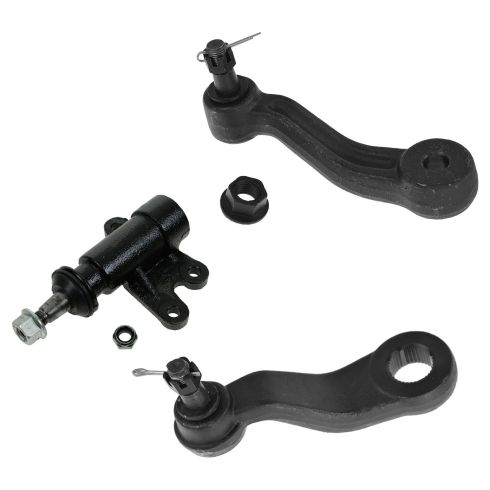
Let's see if we can finagle the box out of here now. There it is. Next thing we're gonna do is remove this nut that holds the Pitman arm on. Let's just make sure that we've got the right Pitman arm. Looks good. You'll notice if you look inside here, it actually has these little keyways in it. So, just kind of make sure that you're facing in the general direction when you take this off and it should pretty much line up because you really can't mess it up. Here we go, 34-millimeter. Get that lock washer off of there. We'll set these aside. Usually, this is on there pretty good and it feels like it is. At this point, we're going to use a Pitman arm puller, and we're going to separate these two pieces. So, now, we're going to use a Pitman arm puller, and that's the tool that's going to go right over the Pitman arm. It's going to have a little piton that's going to drive down in the center of the shaft and it's going to actually lift up at the same time on the Pitman arm to separate it from the sector shaft. Get that tool on here. Oh, that one came off nice and easy. It's always a good idea to spray them down. It's helpful. Awesome. Now, you just clean up this area, make sure you don't have any gunk or anything like that. Once you've done that, we're going to go ahead and take this piece and we'll get it on there. Let's get our new Pitman arm on here. Like I said, it should line right up with the keyway slots there. That feels great. We have this aiming in this direction. You don't want it aiming towards the box, okay? Make sure you get your locking washer on there. If you want to use a little bit of thread locker, we'll call it your prerogative, but we're using a locker washer. So, you don't have to. Let's get this on there. Now, we're going to torque this nut to 184 foot-pounds.
The easiest way to do that, of course, is to have the arm facing towards the right. That way there, when we tighten it, it's going to have leverage against the ground. Let's clean up the threads on our bolts. And then we'll go ahead and put on a teeny bit of thread locker. I've got the thread nice and cleaned up. I'm going to put in one of the bolts. I'm going to go for the top one. Get it right up in there. Looks good. Now, when I get my box up, I'm going to hold it, and I'm gonna try to get at least one of the bolts started before I grab the other two. Let's get our box up in here.
I'm twisting that bolt while I'm trying to wiggle this around. Okay. Start it in. I'm going to start in the other two and then we'll snug them up. Now, we're just going to use our 21-millimeter. We'll zip these down so they're bottomed out, and then we'll torque them to manufacturer specifications. Now, let's torque the bolts to 100 foot-pounds. Now, if you bent this out of the way, just make sure you bend it back. Let's get this off of here. Okay. I got the nut off. I'm going to leave this on here. It's going to help protect us. Now, we'll just pull down on the bar and slide it over that. There we are. Slides right on. Start it on there. Let's go ahead and snug this up now. Now, we're going to torque it to manufacturer specifications, which is 40 foot-pounds. That's torqued. The next thing we need to do is make sure that our castle nut winds up with the slot for the cotter pin. Once you have it lined up, go ahead and put it in, and lock it down. If it doesn't line up, you need to continue tightening until it does. All right. So, I've got that nice and lined up. I've got my cotter pin here, I'm gonna slide it right through. And then, of course, make sure that I peen it over so there's no way that the cotter pin can come out because this is what makes sure it's locked in so it can't come unsecured. Now it's going to be time to get the steering shaft onto the power steering box here. Just kind of line it up. You're going to notice that the steering box right here has a flat area. On the inside of the shaft, it's also going to have a flat area. Once you line that up, this should slide on fairly easily. If you need to give it a couple of loving bonks with a hammer, well, that's probably pretty probable as well.
All right. I don't want to go too far. I want to just take a peek inside that hole and it looks like I need to go a little bit further. Looks about right. I've got my steering shaft bolt here. As you can tell, I cleaned off the threads and I put on just a teeny bit of thread locker because it's a good idea. There it is. All right. That's snug. Now, we're going to torque it to manufacturer specifications, which is 22 foot-pounds. So, it's a good idea to replace your O-rings on here. I just put on some nice new ones. Once you've done that, you just use a teeny bit of the power steering fluid, make sure that you lubricate them, and then we're going to go ahead and install them into the vehicle here. Let's start this one in there. You might need to wiggle the line around a little bit. All right. That one's bottomed out. Now, we're going to make sure we snug it up with our crow's foot. And then once we've done that, we're going to do the same thing to the other line. Click. Once you have it nice and snug, you want to pay attention right down along here to make sure the line is resting directly against the box. If it is, stick your screwdriver in and just kind of move it away. You want to have a teeny bit of a gap, that way there, it's not directly rubbing and potentially causing a hole over time. We're going to get this line started into the box. Just give it a couple of nice turns. Make sure it flows in nice and easy. Now, we're going to use the wrench to try to tighten it up. If you feel like it's getting stuck or it's hanging up in any way, it might be cross-threaded. In which case, you'd want to back off, check those threads, and make sure they're good. Okay. That one went right in. That feels pretty good. I'm just going to check it with the crow's foot.
Make sure you don't have too much pressure on your lines or your hoses in any direction. There's no kinks or crimps. This looks really great. Make sure you put this cover back on here. It should slide right over, and then over that line. That should lock it in. Make sure it cannot move around. Now, we're going to use a nice funnel, and then we're going to go ahead and fill up the system and then we'll bleed it. Make sure you use your manufacturer-specified fluid. Now that we have this, so it's almost full to the top. Okay. So, now that we've got plenty of fluid in here, we're actually just going to make sure the front wheels are off the ground a little bit, and we're going to turn the wheel completely to one side and then very slowly all the way to the other side from point to point, maybe three to four times, and we're gonna come out here and we're gonna watch for some air bubbles. Once we notice that the air bubbles have dissipated, we're going to start up the engine. We'll let it run for a few seconds. We'll turn it off and we'll recheck the level. Make sure the level's good and there's no aeration, and then we'll continue on with the bleed. Let's go ahead and put the cover on just to make sure no contaminants get in. Now we're just going to clean up the area. Anywhere that you see power steering fluid, make sure it's nice and clean. So that way there, when we run it and if we happen to see any fluid anywhere, we can determine where the leak might possibly be.
So, now, we're just gonna check the level. Looks like it's right about at the add line, but it also is at the full cold line. So, it's important to pay attention to the fact that your engine's either cold or warm. If it's cold, you want to be at approximately the cold line. If it's warm, you want to be much higher up approximately at the hot line. This looks decent. So, I'm just going to go ahead and run it now for a little while and make sure all the air burps out of it. Turn the wheels side to side. Okay. So, this looks great. I'm looking at where all my lines are connected into everything, I want to make sure that there's no leaks. If there's any leaks, we need to make sure we fix them now. This looks wonderful. We're going to run it for a little while, let it get up to temperature, and then we're going to recheck the fluid while the vehicle is hot. Now that the vehicle's nice and hot, let's go ahead and pull this up and out of here. Just check that fluid level. As you can tell, this is still a little bit low. So, I'm going to add some more. While I've got it open, we're going to take a peek inside and just double-check to make sure there's no air bubbles. If there's air bubbles, you need to continue bleeding the system before you take it for a nice long road test. Okay. So, we've got that nice and topped off now. We'll close this up. Make sure everything's nice and connected. There's nothing hanging around. This looks great. Let's take it for a road test. All right. Let's get the plate up here. Let's go ahead and get our shield up here.