Replaces
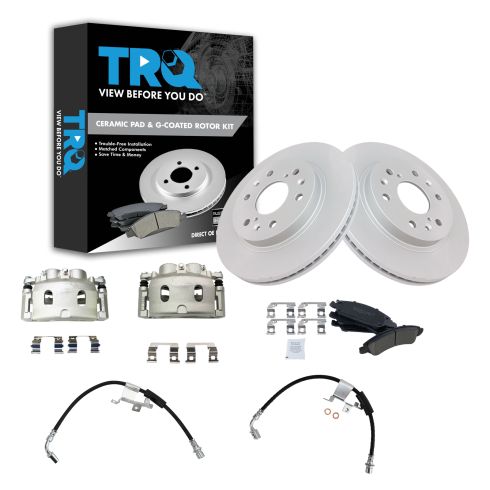
2017 Chevrolet Suburban with 6 Lug Wheels Front Driver & Passenger Side Ceramic Brake Pad & Rotor Kit with Calipers & Hoses TRQ BKA29677


BKA29677
In Stock
This part doesn’t fit a . Select from parts that fit.
Specify your vehicle's year, make and model to guarantee fit.
Orders must be placed by 2pm ET
Part Details
- Brake Pad Bonding Type: Premium Posi
- Brake Pad Friction Material: Ceramic
- Brake Rotor Coating: Premium G-Coated
-
Kit Includes:
(1) Front Ceramic Brake Pad Set with Contact Point Grease & Hardware
(2) Front Brake Calipers with Hardware
(2) Front G-Coated Brake Rotors
(2) Front Brake Hoses
Specification
- Driver & Passenger Side
- with 6 Lug Wheels
- Front
TRQ brake kits are designed to restore your brake system to like-new performance. TRQ brake pads are positive molded, thermal scorched, chamfered, and utilize a multi-layer shim for enhanced performance and service life. TRQ G-coated rotors have long-lasting rust prevention, perfect for wheels with large openings that expose the rotor and rotor hat during daily drives. All products are fit and road-tested in our Massachusetts R&D facility to ensure we deliver on our promise of Trusted Reliable Quality.
Product Features
Item Condition:
New
Attention California Customers:
![]() WARNING: This product can expose you to chemicals including Lead and Lead Compounds, which are known to the State of California to cause cancer, and birth defects or other reproductive harm. For more information, go to www.P65Warnings.ca.gov.
WARNING: This product can expose you to chemicals including Lead and Lead Compounds, which are known to the State of California to cause cancer, and birth defects or other reproductive harm. For more information, go to www.P65Warnings.ca.gov.
Lifetime Warranty
This item is backed by our limited lifetime warranty. In the event that this item should fail due to manufacturing defects during intended use, we will replace the part free of charge. This warranty covers the cost of the part only.


Created on:
Tools used
Tools used
Tools used
Tools used
Tools used
Okay, friends, one of the first things we need to talk about is safety, hands and eyes. Let's get started by removing our wheel. The next thing we wanna do is push back our caliper a little bit. You can do that by either gently pushing it back slowly or, of course, you can open your bleeder screw. There we are. The next thing we're gonna do is remove our two caliper slider bolts. Take your caliper off and set it aside so it's putting no pressure on your flex hose. Let's remove our pads. Remove your caliper bracket bolts. Leave that one in there a couple of threads. Remove your bracket. Next, let's remove our rotor to hub mounting bolt. Hold your rotor so it can't fall off and give it a couple of loving bonks from the backside to remove it.
Next, make your way over to a nice bench where you can start disassembling your caliper bracket. If you grab onto these, you can pull out your caliper sliders. I'll set them aside on the corresponding holes. We'll move along to removing these tins. Use a nice pry bar or a screwdriver. We'll set those aside as well for recycling. Now, let's put this over a nice bucket. We're gonna use some parts cleaner inside these slider holes. Nice bore brush. Make sure you clean out the holes completely. Empty it out, let it dry. While that's drying, let's go ahead and clean up this area here where the tins are gonna go. You wanna get this edge right here, along there, and right there as well. Okay. All four corners look great, let's move along to cleaning up our sliders now. Give them a nice wipe, make sure they're not damaged in any way. If you see any corrosion or build-up, you need to, of course, clean it. And, of course, make sure you get up in this edge right here, which is where the boot is gonna be. This looks great. Do the same to the other one as well. Awesome.
Now, you're gonna wanna use some nice caliper grease, something with a nice high-temperature rating on it and we're gonna lubricate our sliders right here. I like to put on plenty of grease. That looks great. And, of course, I'm gonna get all the way up into that lip up there where the boot is gonna ride. That's gonna help keep moisture out of there. Let's go ahead and put it in. Give it a nice twist as we go. Perfect. Do the same to the other side. Okay. So, now let's continue on with that caliper grease and we're gonna go right along these areas that we just cleaned up. Let's go ahead and put on our brand new caliper tins here. Slide them in, lock them in. Perfect. Back at the vehicle, the next thing that we need to do is clean up our bearing where the mating surface is where the rotor is gonna ride. Little bit of copper never-seize. Let's go ahead and clean down that brand new brake rotor surface. It's time to install our brand new rotor. Let's go ahead and line it up on here. Take our little mounting bolt, start that in and we'll snug it up. Your caliper is a dual-piston caliper. To push in these, you're gonna need to push them both at the same time. Let's go ahead and do this slow. There it is. Now, we just wanna make sure that our bolts are nice and clean. If you have any thread locker on them, go ahead and make sure you clean it off.
Now, it's time to install our cleaned and prepped caliper bracket. When you install these bolts, I like to use a little bit of red thread locker. Start them both in, snug them up, and we'll torque them to manufacturer's specifications. Torque these to 170 foot-pounds. Now, it's gonna be time to install our pads. You're gonna notice that there's two different ones and you're also gonna notice on the thicker one that it has a squealer or wear indicator. You want that wear indicator facing down when it's installed. Perfect. Let's use a little bit of that caliper grease and go right on these caliper pistons. Put the caliper over the pads. Install your caliper slider bolts with a little bit of thread locker. Bottom them out and torque them to manufacturer's specifications as well. Torque these to 74 foot-pounds. Let's get the wheel back up on here. We're gonna snug up all the lug nuts and then we'll torque them to 140 foot-pounds. Torqued. Okay. So, the process will be the same on the other side of the vehicle. Other than that, go ahead and pump up your brake pedal and check your brake fluid.
Tools used
Tools used
Tools used
Tools used
Tools used

BKA29677
In Stock
Product Reviews
877-844-3393
Monday - Friday 8:00am - 9:30pm ET
Saturday - Sunday 8:00am - 4:30pm ET
Specify your vehicle's year, make and model to guarantee fit.
This part doesn’t fit a . Select from parts that fit.


