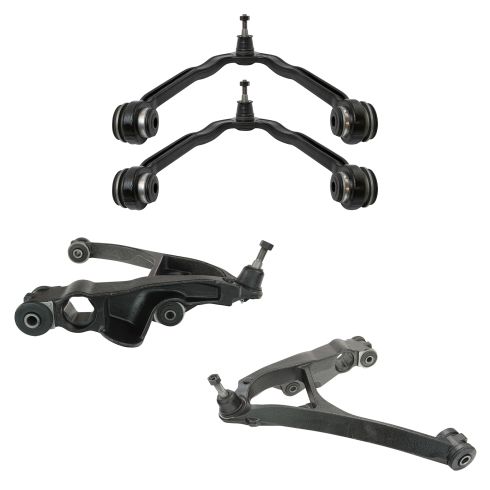
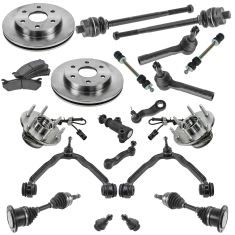
1ASFK01956-Chevrolet GMC Cadillac Front Upper & Lower 4 Piece Control Arm with Ball Joint Set TRQ PSA62471
Replaces
2003 GMC Yukon XL 1500 Front Upper & Lower 4 Piece Control Arm with Ball Joint Set TRQ PSA62471
Product Reviews
Loading reviews
4.58/ 5.0
40
40 reviews
01 Suburban control arms with bushings, and ball joints
February 10, 2017
Watched several videos on how to change these parts, and the one by A1 was best - particularly how to unload the torsion bars. Video was the final factor/reason I ordered from A1. However, really good price on these parts, too, and they bolted right in. Made the front suspension feel tight and new again. This is my second purchase from A1, and I've been very happy both times. Parts were shipped and arrived quickly. Having the ball joints and bushings already installed made this job way easier and quicker than it otherwise would have been. Thanks to A1 for those videos - that's how I knew about you, and they're very helpful!
Great product
March 6, 2017
Received items on time, they were an exact fit. I had no problem installing, just watch video of part ordered to see how to install. Great price will be ordering from them again when need something else.
March 18, 2017
I ordered control arms front struts for my 2009 Ford Escape and ordered upper and lower control arms and a bunch of other parts for my 2004 GMC savanna van. All the parts came when they said and with the how to videos all the parts were install with no problem! Thank you again for great parts and service !
Dominic B.
Great product
March 20, 2017
Made my installation of my lift a snap. So nice everything was all ready to go. Simple bolt in installation. Thanks
Great alternate
March 20, 2017
Control arms are a lot easier to replace than the ball joints and cost the same from 1aauto. The lower are more difficult but still possible for the weekend mechanic like me. Instructional videos were great and showed everything I needed to do.
Good deal
April 21, 2017
Fits perfect...no issues. ...good price. .. very happy
PERFECT FIT, EASY SWAP, HOW-TO VIDEO MADE IT A SNAP
November 24, 2017
Chaned out all 4 control arms in one day. Never done front suspension before, but with the how-to video it was a piece of cake. My truck is a 2000 Silverado 4x4 with 227K miles on it with all original parts. It rides and steers like it's brand new again.
Great price. Right part.
April 6, 2018
Great price and the video in the product description helped a ton. Perfect fit for my 04 Silverado!
April 7, 2018
A1 Auto is a wonderful store to shop at online for auto parts and much more, keep up the good work A1 Auto.
Awesome parts
June 10, 2018
I worked at autozone for a few years and the parts I bought from 1A were far cheaper and much higher quality. Very happy
Perfect Fit
December 4, 2018
Upper & lower control arm set fit my 2000 Chevy 1500 perfectly! How-to video took all the guesswork out of the job! Thanks 1A Auto!
Suspension parts
January 4, 2019
Good quality parts perfect fitment everything arrive as discrive definitely recommend
Ok for price
January 5, 2019
Parts were as described. Seemed a little on the high side since you could buy oem parts for a 100 dollars more. Fast shipping and customer service is great. Have bought many parts from them and so far no issues.
Love
April 2, 2019
Always love ordering off here. Super fast shipping !
Great product
August 9, 2019
I installed these on my 03 Silverado SS and they fit just like OEM. I've bought this kit for several trucks and they all fit as expected and I've never had any problems.
Upper & Lower Control Arms with Ball Joints complete set
October 9, 2019
I purchased the complete set years ago & they are still holding up. Thanks 1AAuto.com
WOW! Drives and Handles like new!
October 10, 2019
To say that these are perfect is an understatement. Ordered em, got em, installed em, like driving a new truck. These are a perfect fit. After installation, had the truck (2012 1500 4x4 Silverado) aligned and "ALL" parameters were perfect. This truck has over 315,000 miles, has seen side angles of close to 40 degrees, has been airborne for over 26 feet in length, and been buried pass both axles in the river sand and drives like "NEW"!!!! Perfect steering and cornering. Just awesome. I am so pleased... Saved money? YES YES YES YES!!!! Check for yourself. When I received these parts (both upper and lower front end control arms) I checked and compared them to the OEM ones installed on the truck. These new parts are even better than the originals. I could not be happier. If these are the parts that you are looking for, stop here and purchase. you WILL NOT BE DISAPPOINTED nor will you find a better price or better quality.
Awesome
February 17, 2020
Exact fit
Worked good for a bit
March 9, 2020
Ordered all 4 control arms( 1ASFK01956) and steering kit (1ASFK01596). Installed them over a weekend. Took the truck to get the alignment done. The shop told me tie rods were already too loose to properly align. Replaced with other brand instead.
On one of the upper control arms, the bushings seemed too thin and they had to shim them so they could tighten down on them.
Now most of the ball joints on the control arms are shot after only 20k miles. Contacted 1aauto for their warranty for the control arms and was denied because the truck is lifted with just raising the torsion keys.
Now I am spending the money again plus some to get all new control arms.
2002 Chevy Silverado z71 4x4
Front end suspension kit.
July 31, 2020
Great product. I needed assistance with my diy project. This would have been a whole weekend project for me. Very possible to do it yourself but 1aauto provide quality products.
Perfect
March 21, 2021
Fast delivery quality parts and the right parts. I was so damn impressed. Im tired of the AZ and ORileys getting the wrong stuff
Great quality
April 12, 2021
Same fit. Great quality
Great replacement parts at a great price!!
May 23, 2021
I needed quite a bit of front end work done on my 05 Suburban with 367,xxx miles on it and 1A had everything I needed at great prices compared to most local places. Everything arrived well packaged and ready for install, shipping was much faster than anticipated with how many items I had ordered at one time, so that was really great. I would definitely order from 1A Auto in the future for any other parts I may need. Thank 1A Auto!!!
Not worth risk.
August 7, 2021
Bought in September, 2020. Upper control arm ball joint needs to be replaced. 6k miles, daily driver.
Stolen by a Steal
November 3, 2021
Poor quality. They wore our ridiculously fast.
November 3, 2021
....
Works great on lifted 02 Silverado
December 27, 2021
Bought these a year ago and they are still working great. Truck has a 6in fabtech lift on 37 in tires. I took it straight to the local 4x4 shop after install and had a full alignment done and have had no issues since. I do wish they had fittings to repack down the road but I got what I paid for and that's a decent set of uppers and lowers for a 20yr old truck with almost 250,000 miles on it.
March 1, 2022
I like it
2000 z71 control arms
April 11, 2022
Nice deal new Ball Joints and control arm bushings made for a faster repair
Made it easy to align
Highly recommend
July 18, 2022
Not sure.
handles like new
March 15, 2023
excellent parts vehical rides much more steady now!
2001 Chevy suburban, upper/lower control arm replacement
July 17, 2023
This kit worked perfect. I had found a couple YouTube videos that were very helpful and watched them a few times, made notes of torque specs, and started with the lower control arms first as they seem to be the hardest to install. Honestly, it was very straightforward. Once you watch the videos, and this kit is quality. Would highly recommend.
The front suspension now feels solid and precise, like when it was new
[{"url": "https://wac.edgecastcdn.net/001A39/prod/media/pNISJll75W64CYGsite/e590c92b561ece655cff7b7470db762f_1695831822010_0.jpeg", "caption": "Driver side"}, {"url": "https://wac.edgecastcdn.net/001A39/prod/media/pNISJll75W64CYGsite/4d7508f0d5f635d02ad9ce96a25d464e_1695831822010_1.jpeg", "caption": "Passenger side"}]
September 27, 2023
My 2000 Chevy Silverado front suspension was old and beat-up from years of mechanics pounding on the old control arms to remove ball joints. It was in need of rebuilding and this set of control arms worked perfectly. The front suspension now feels solid and precise, like when it was new. Thanks 1A Auto!
Bad ball joint
October 2, 2023
One of my new ball joints is already out 1 month later after installing. Torqued and greased to oem standards.
December 11, 2023
Quality parts at a good price
Great product
April 30, 2024
Fits 06 chevy silverado Z71 44?? and they preform better than original part.
Satisfied
June 12, 2024
The part was just like the pictures very satisfied with purchase part fit exactly and it was much more heavier duty then the stock part. Very satisfied with purchase.
Great parts
September 18, 2024
All of the parts fit perfectly and looked OEM.
Control arms
[{"url": "https://wac.edgecastcdn.net/001A39/prod/media/pNISJll75W64CYGsite/dbaab3fd029b7a09c69d53375f346799_1728972097809_0.jpeg", "caption": "1"}, {"url": "https://wac.edgecastcdn.net/001A39/prod/media/pNISJll75W64CYGsite/78589e755e99fa939e8ca7910d03d3c7_1728972097809_1.jpeg", "caption": "2"}]
October 15, 2024
Parts match up perfectly,fast shipping and great quality
Good product
November 5, 2024
Product was a great fit and just what I ordered. Only thing was the ball joints were missing a bolt but not a big deal. Will order more parts
Customer Q&A
Who is the manufacturer of these control arms?
April 12, 2017
10
Someone in china
April 12, 2017
Thomas C
10
These are 1A Auto brand parts, and manufactured in either China, Japan, or Taiwan.
April 12, 2017
Alex P
10
Hey I don't know the manufacturer but the quality of the product 100 percent reliable I've had it more than a year and I drive a lot like 200 miles or more a day I highly recommended it !! Sorry for no info in manufacturer
April 12, 2017
Gustavo E
10
Good question. I have no idea, my guess is China.
April 12, 2017
Paul D
10
I would seriously consider paying a bit more for another loaded control arm of better quality. I installed this kit in a lifted Silverado and I'm pretty sure I will be doing the job again next year or sooner. It could be that lifted vehicles eat suspension parts though. Most likely manufactured in China
April 15, 2017
John F
10
I be honomest, don't know. I order them for my mechanic. He refer me to 1A Auto. So far I'm happy. Save me a arm and a leg.
April 16, 2017
Hugo F
10
China
May 4, 2017
John F
are the upper control arms in this set good for a lifted silverado? lift height is 6 inches.
January 4, 2018
10
These are more designed for stock applications, and it is recommended to purchase heavy duty upper arms for a lifted truck.
January 4, 2018
Alex P
10
For a Procomp 6 inch lift kit these control alarms do work other companies may use their own control arms these are stock control arms Enter an answer to this question.
January 4, 2018
Frank C
10
These upper control arms work with a Procomp 6 inch lift other companies I do not know they may use their own style control arms. Depends on what 6 inch lift system you have
January 4, 2018
Frank C
10
ABSOLUTELY. I lifted my Chevy Suburban 5 inches. I could have increased the lift size but I had small tires.
January 5, 2018
Michael P
Will these work for a 97 Chevy Silverado k1500?
May 24, 2018
10
Pretty sure these will not work
May 24, 2018
JAMES T
10
No these will not work on a 1997 K1500.
May 24, 2018
T I
I need lower control arms for my 97 k1500. Can someone guide me to the right direction?
May 27, 2018
can this fit on a 2000 front wheel drive chevy suburban?
June 30, 2018
10
This will fit the following vehicle:
2000-2006 Chevy Suburban 1500 Front Upper & Lower Control Arm with Ball Joint 4 Piece Set
June 30, 2018
Peter L
10
Absolutely perfect my 2019 Chevy Z71 pickup truck I've had it since I was 16 first vehicle ever built and rides like a brand new Chevy from the dealership
April 15, 2020
Brad E
DO THE BALL JOINTS HAVE GREASE FITTINGS?
March 29, 2019
10
Our ball joints are going to come pre-greased and they will not have fittings on them.
March 29, 2019
Peter L
Would the these be ok if I've lifted my truck 3inches??
February 6, 2020
10
Thank you for your inquiry. Actual Measurements are not listed or available. Our parts are exact replacements for your vehicle's OEM parts. As long as your year, make, and model match up with our listing, these parts will directly fit and function like the originals. When it comes to lifted or lowered vehicles, we would not be able to guarantee the longevity of the parts. Please let us know if you have any other questions. Thank you!.
February 6, 2020
Curtis L
Will this fit a 2006 Chevy Tahoe Z71?
August 7, 2020
10
Thank you for your inquiry. Yes, according to the information you provided, this part will fit your vehicle. Please let us know if you have any other questions!
August 7, 2020
A C
Are this ball joints on the upper and lower control arms replaceable ?
November 2, 2021
10
The ball joints are not able to be changed out as this will come as a complete assembly with the parts already installed.
November 3, 2021
Emma F
10
No they are not although they look it. I honestly wouldnt buy them again. They went bad unbelievably fast. (Under 18 Months/15,000 miles approx. in Phoenix, AZ) 95% freeway miles.
November 3, 2021
Aaron A
10
They are but u need a 1000 dollar tool to replace a 25 dollar part. Its just easier to replace the whole control arm
November 3, 2021
Jesse C
Does this fit a 2006 Chevy Silverado 1500 rear wheel drive?
November 21, 2021
10
Yes, this part will fit your vehicle as long as you have Front Torsion Bar Suspension.
November 22, 2021
Adam G
can this fit 1500 chevy avalanche 2003 ?
December 26, 2021
10
The avalanche sits on a suburban chassis not a Silverado chassis so there may be some differences. I would contact your dealer to get the part numbers for your control arms and then look on here. Unless someone else on here has a 4x4 avalanche with the auto 4x4 option that can answer this. Good luck.
December 27, 2021
Patrick C
10
Yes, this part will fit your vehicle.
December 27, 2021
Ricale A
What are the torque settings for the 3 bolts on the control arm?
June 13, 2022
10
Please review the installation instructions available for this part. Here's a link for that:
https://www.youtube.com/watch?v=-L0exX3BRaE&feature=emb_imp_woyt
June 13, 2022
Jessica D
Can this fit a 2004 Yukon Denali xl 4wd 6.0 v8?
June 30, 2022
10
Yes, this part will fit your vehicle.
June 30, 2022
Ricale A
GMC is a registered trademark of General Motors Company. 1A Auto is not affiliated with or sponsored by GMC or General Motors Company.
See all trademarks.


