Brought to you by 1AAuto.com, your source for quality replacement parts and the best service on the Internet.
Hi, I'm Mike Green. I'm one of the owners of 1A Auto. I want to help you save time and money repairing and maintaining your vehicle. I'm going to use my 20 plus years experience restoring and repairing cars and trucks like this to show you the correct way to install parts from 1Auto.com. The right parts installed correctly. That's going to save you time and money. Thank you, and enjoy the video.
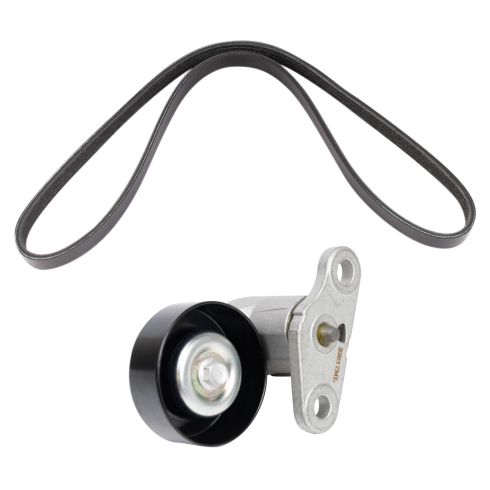
In this video, we're going to be removing and replacing the AC belt tensioner, which is down below on the engine. This is a 2002 with a six liter in it. Procedure's, basically the same for any 99 to 07 with the V8. Basically the 4.8, 5.3 and 6.0 liter are all the same tools you'll need are a flat blade screwdriver and a 3/8-inch drive ratchet with a small extension and a 15 millimeter socket.
Okay, you're going to start out by removing your intake hose assembly because you do need to remove that because you need to take the serpentine belt off first.
Okay, and we're going to kind of speed up through this part here. Use your screwdriver to pry in, break the rubber, loosen the plastic, maybe twist it a little bit as well, and then pull it from the throttle body and also pry it. There's a little clip that holds the radiator hose in. Pry that out with your screwdriver as well. Now to install it, back on my intake hose. Make it easier for later.
Okay, so now you can see your tensioner's right here, so we're going to do to take a 15 millimeter socket and ratchet. Put the socket on there, and then that takes the, you just move the ratchet clockwise and that takes the tension off. You can pull the belt either off of your tensioner, or I'm actually over here pulling it off of the idler pulley in the middle, and then slowly release this back. It's going to actually go back further than original point. I'll get your wrench back off.
Okay, you're going to want to remove this protecting plate. It's five 15-millimeter bolts. I'm just going to do it with an impact wrench real quick just to make it fast. And I'll make it even faster by hitting the fast forward button.
Now you can easily see up in here, here's our serpentine belt which we loosened. This is our tensioner for our AC belt, and this is our AC pulley over here. So you just want a 3/8 ratchet, goes right into the square hole here, and clockwise to release the tension, slip the belt back off the crank pulley.
Then you can take the belt, sneak it back around the pulley and off. So if you're wondering if this tensioner is making the squeaking noise, what you usually want to do is kinda come onto here and shake it back and forth a little bit. Even if you spin it, a lot of times it will be silent, but more so when you shake it back and forth. And I don't know if you can see that, but there's a little bit of play in it. So it's a good bet that it's been making some noise.
Okay, so you can see the tensioner as two bolts holding it, one there, then one over on the other side right there.
Okay, so I'm going to fast forward just to remove those two bolts. So my old pulley, new pulley from 1AAuto. You can see there, all the same. It's gonna mount all the same. Take my bolts, put them through. I'm gonna run my .. right up through here. Hold onto it while I start the bolts with the right hand. There are several bolts Put them on by hand, and then tighten them up. Tighten them up to about 40 to 45 foot pounds. And again, we'll just fast forward through me turning the wrench.
Okay. So you're going to take your new belt and feed it up over the crank, behind the other serpentine belt, and I just put it right in behind. Feed it around the AC pulley. What I want to do is feed it around, get it set on the crank pulley here. Then I kinda set it up on the AC pulley as well. My ratchet with an extension, and push the belt up, put it in there, pull that down, flip that up on top of the tensioner pulley. Then reach in from the side here, and put my belt correctly onto my ac pulley.
Okay. Then let my tensioner back. Feel all the way around my AC pulley, and feel all the way around the crank, and it's all set on there. Now you're going to put the shield back on, and I'm just going to fast forward through that. It's nothing more than putting those 15 millimeter bolts back in and tightening them up.
Okay. To put the belt back on, what you want to find is your routing diagram. We're going to be using this one right here, and so the solid belt is the one that we're going to be looking at, and what you're to do is actually feed it down and around your crank pulley first, then up and over your water pump, around your power steering, and then up in here, and then you'll pull. What I usually do is pull on here, and then pull it up onto the alternator, so I'll kind of show you that. Can't really film it very well, so you have to take.
Okay, and of course, I can't really film it that well, so you kind of have to take my word for it. That's what I'm doing. So you can take your belt, feed it down, down, just kinda make a loop that goes all the way around the crank pulley, up over the water pump heater, down and around our steering pump.
Okay, so first I went down and around my crank pulley, up and around the water pump with the backside of the belt, then around the power steering pump. And so now I have this part that I can hold, so put onto the alternator. Gonna sit it there for a second. Take my socket, put my 15-millimeter bolt on my tensioner.
Okay, and then while I pull this way on the tensioner, take the belt, and pull it up, and onto the alternator. Okay, and the tensioner takes over. I'm just going to push it on a little more to my idler pulley here. Make sure it's pretty well centered.
Okay, so after you have the belt on, just a quick check, make sure it's on all the pulleys, look way down at the crank pulley, and make sure that it's on correctly down there. And also obviously over here, the alternator, and the power steering pulley. Everything looks good.
Okay, and we're going to fast forward through this section, which is just putting that tube back in basically, and pushing the rubber onto the plastic, tightening up the clamps, and reinstalling that little clip that held the radiator hose to it. And after that, you should be pretty much all set.
We hope this helps you out. Brought to you by www.1AAuto.com, your source for quality replacement parts and the best service on the Internet. Please feel free to call us toll free, 888-844-3393. We're the company that's here for you on the Internet and in person.