Kit Includes: (2) Rear Upper Control Arms (2) Rear Lower Control Arms (1) Rear Track Bar
Specification
Location
Rear
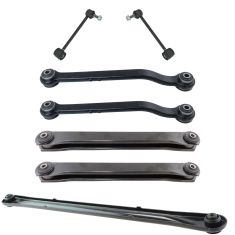
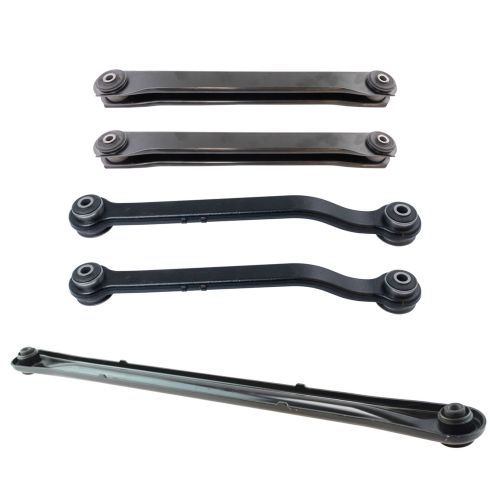
TRQ suspension kits are manufactured using premium raw materials and coatings for extended service life. Each TRQ suspension component is designed to be a direct, maintenance-free replacement to the stock unit. To extend the life of your steering and suspension components, TRQ recommends replacing components in pairs, sets, or kits. All products are fit and road-tested in our Massachusetts R&D facility to ensure we deliver on our promise of Trusted Reliable Quality.
Product Features
Application Specific Design: No modifications necessary
Anti-Corrosion Coated: Enhanced surface life
Pre-greased: No additional maintenance required
Kitted for Restored Performance: Improved road-feel and handling
Our steering and suspension kits are offered in a variety of options to best fit your repair needs and your budget.
Our steering and suspension components are pre-greased and sealed for long life and do not require the extra maintenance typically required by greaseable versions.
Item Condition:New
Attention California Customers:
WARNING: This product can expose you to chemicals including Chromium (Hexavalent Compounds), which is known to the State of California to cause cancer, and birth defects or other reproductive harm. For more information, go to www.P65Warnings.ca.gov
Lifetime Warranty
This item is backed by our limited lifetime warranty. In the event that this item should fail due to manufacturing defects during intended use, we will replace the part free of charge. This warranty covers the cost of the part only.
FREE Shipping is standard on orders shipped to the lower 48 States (Contiguous United States). Standard shipping charges apply to Hawaii and Alaska.
Shipping is not available to a P.O. Box, APO/FPO/DPO addresses, US Territories, or Canada for this item.
Expedited is available on checkout to the United States, excluding Alaska, Hawaii.
Final shipping costs are available at checkout.
How To Replace Track Bar 2007-14 Cadillac Escalade
How to Replace Track Bar 2000-13 Chevy Suburban
How to Replace Rear Sway Bar Link 2000-13 GMC Yukon
How To Replace Lower Rear Control Arm 2007-14 Cadillac Escalade
How to Replace Track Bar 2000-06 Chevy Tahoe
Created on:
Tools used
21mm Socket
21mm wrench
Torque Wrench
Socket Extensions
Flat Blade Screwdriver
Socket Driver
Pry Bar
Jack Stands
Wheel Chocks
10mm Socket
Ratchet
Floor Jack
To start doing this job, what you're going to need to do is raise the vehicle, so that the rear suspension is hanging. Once you've done that, you're going to take a jack and come right underneath your pumpkin here, the rear differential, and we're just going to apply light pressure to this. Okay. Light pressure. Perfect. The next thing we're going to do is just use a little pry bar, or maybe even a screwdriver, whatever you have, and we're going to try to get these clips off of here. The way that you'd want to do that is to just kind of try to weasel your way in between and then pry. That should come right off of there. We can set this aside. We're going to do the same thing to the other one. Awesome.
The next thing we want to do is remove our mounting bolts that hold the brackets for the sway bar to the differential. Use a 10-millimeter. Do the same to the other side. This is going to be the last one, so you want to be careful because, at this point, the bar can kind of do whatever it wants. All that we have left at this point is our two mounting bolts. You're going to have one here that has a nut on the backside, and then one over here. This one has a nut, but it also has this little flippy-do there that's kind of going to hold it for you, so it doesn't spin too much. Using two 21-millimeters, we're going to go ahead and remove this. Now that that one is nice and loose, we're going to come on over here and do the same over here. There's the nut.
Okay. I'm going to hold on to the bar. There it is, friends.
Once you're sure you have the same part, go ahead and install. Put this side in first right there. I'm going to bring this up. Start in my bolt. Same for this one. Start in that nut there. Another one. All right. Let's tighten it up. Bottomed out right there. Add a little bit more. It's nice and tight. Do the same to the other side. All right, it's nice and bottomed out. Let's go ahead and make sure that it's nice and snug. Awesome. The next thing I like to do is put a little bit of copper Never-Seez up inside these bolt holes. Now, we're going to take our sway bar bushing bolts here. Make sure that you're not caught on anything. Swing it right up. Line up those bolt holes. We're going to start in all the bolts before we tighten anything down completely. Let's go ahead and snug these up. Now, we're going to torque them to 37 foot-pounds.
Torqued. Now, it's going to be time to get our E-brake cable brackets back on. You're going to see you have a couple of little clippy-dos on the backside. They go over this metal area, and then they're going to slide over the arm itself. This up here. Clip that right in. Perfect. Do the same thing to the other one. Clip it in. Okay. Make sure you have it completely clicked in. I like to give it a nice tug. The last thing you want is your E-brake cable coming off and potentially hitting up against anything where it might get damaged. Let's get this back down. We'll get it out of the way, and we'll take it for a road test.
Tools used
21mm Socket
Socket Extensions
Flat Blade Screwdriver
Rust Penetrant
Jack Stands
18mm Socket
Center Punch
Ratchet
Floor Jack
1/2 Inch Breaker Bar
1. Removing the Track Bar
Pop off the e-brake cable bracket with a flat blade screwdriver
Lift the e-brake cable out of the hooked bracket
Counter hold the passenger 21mm nut with a 21mm wrench
Loosen the 21mm bolt from the track bar
Break the driver side 21mm bolt free with a breaker bar
Remove the 21mm driver side bolt
Counter hold the upper bolt on the sway bar link with a wrench
Remove the upper 18mm bolt from the sway bar link
Remove the track bar
2. Installing the Track Bar
Insert the track bar with the tabs facing the front of the vehicle
Thread in the drive side bolt with the captured nut
Thread in the passenger side bolt
Counter hold the back end and tighten the bolts
Insert the sway bar link into place
Counter hold and tighten the 18mm bolt
Insert the e-brake cable into the hooked bracket
Press on the clips to the track bar and e-brake cable
Hi, I’m Mike from 1A Auto. We’ve been selling auto parts for over 30 years!
We're going to replace the track bar, also known as the panhard rod. The E-brake cable is clipped to it. I'm going to pop these off to begin with just using a flat bladed screwdriver. Just prying them off, they're a bit rusty. Let's see if I can get that free. Pry this down and it'll pop off. Once one side is loose, the other side will pop off. I'm going to put this aside so I don't lose it.
Also, going to move it off of this bracket, E-brake cable. Lets you have a little more space because I need to get to this bolt here for this side. I'm going to take some rust penetrant and spray the back side. I will also spray the other one while I'm at it. It is located up here by the axle.
We've got the vehicle raised and supported on a two post lift. You don't have to support the rear axle. This is not holding up the rear axle. I just have it supported just to keep the vehicle level while it's on the two post lift, and we work back here. I'm going to take a 21 millimeter socket and ratchet with an extension. The sway bar link is here. Try to find the, there it is. I need to push this direction and try to break it free. All right. So that's going to move fairly easily.
Using a ratchet and extension, make it around the sway bar. That is turning but it is also turning the bolt on the back side. I wanted to make sure it was free. I will counter hold with a 21 millimeter wrench. And as I counter hold it I use my ratchet and socket, take it off. It doesn't quite fit 'cause the sway bar link is there, but it's pretty well enough. Then I get this pretty loose, but I before I remove it completely, I will stop. This side, the back side of the bolt is held in with a welded nut and this tap so it doesn't spin. Take a breaker bar and a 21 millimeter socket and break it free.
You can see that tab spun, it's going to push against the other side. Now I feel it's loose, so I'm going to switch to a ratchet. This bolt can come all the way off because the track bar will just sit in this slot. This is where our link has to come out of here so we can pull the bolt out otherwise it will hit. Undo the upper sway bar, upper part of the sway bar link. Spray some rust penetrant. I'm going to counter hold this bolt from the outside. Take my breaker bar and 18 millimeter socket, free up the bolt that's going through the upper link. Counter hold the outside nut.
I've got it really loose, and now I'm just going to take it out by hand. Swing this sway bar mount out of the way. Unhook the bolts and we'll that away. I'm going to hold the track bar so it doesn't fall. Going to lift it out off of this mount and out of the vehicle.
These are our old track bar from the vehicle and our new one from 1AAuto.com. You can see it's got the same tabs here. These are where those E-brake clips are going to connect to. The mounting holes are in the same position with the bushings. Same style rubber bushings. This'll fit in your vehicle nicely and make a great replacement.
Place the new track bar in the vehicle. Make sure you have these tabs facing the front 'cause our E-brake cable's going to sit in this channel. Going to slide up this way. Lay it into the bracket on the rear axle, place it up, the mount the body. Place the bolts that came out. That's our capture nut, it's going to go on this side.
Move this arm around. I need to use a big punch to align it. So I'm going to put the bolt in, work it in, and get the socket and ratchet. You can actually push on the axle a little bit. Find the hole and thread it in. Our captured nut, place it up there. Just get it threaded in for now. Do the same thing, take the ratchet.
Reinstall the nut and snug these down. And snug this bolt down. And hold the tab, captured nut. Just going to make sure there's some weight on the rear axle by lifting the jack up slightly. Tighten this one down. Counterhold this bolt and make it tight.
Reinstall the sway bar link. Pull it from the inside out. Tighten the sway bar link, and counterhold the bolts or the nut on one side. Reinstall the E-brake cable on this metal bracket. Reinstall the clips that were holding this to the track bar. Clip it on here. There's a locating tab on the top and the bottom that are going to go between these. Catch the top ones first. Push them over. Catch this side, clip it in. Track bar is replaced.
Thanks for watching. Visit us at 1AAuto.com for quality auto parts, fast and free shipping, and the best customer service in the industry.
Tools used
Torque Wrench
Flat Blade Screwdriver
Rust Penetrant
18mm Wrench
Pry Bar
19mm Wrench
18mm Socket
Ratchet
1/2 Inch Impact Gun
22mm Socket
I'm gonna take the center cap off, use a straight blade screwdriver, take that off. Use a 22-millimeter socket to take off the lug nuts. Take the wheel off. Now, you can do this without taking the wheel off. It just makes it a lot easier to take the wheel off. Now, this is a little bit rusty, so I'm gonna spray some rust penetrant right here and the nut up here.
Let that soak for a little bit. Now, use a 19-millimeter wrench and just hold the stud from spinning. Use an 18-millimeter socket to take this nut off. Slide that off. And for the top bolts, use an 18-millimeter wrench and an 18-millimeter socket. Take the nut off. This is getting pretty loose. Take that nut off, slide the bolt up. Let me just grab the link. Slide it out. You might need a pry bar to pry it up. There we go.
All right. Take the new link, slide it in position. If you have to bend the ears out a little bit, you can. And get the studs to go through the sway bar and slide the bolt through. Put the nut on. Get that started, the lower nut. Now, I'll tighten this nut up, and then tighten this upper nut to 48 foot-pounds and tighten the lower nut to 48 foot-pounds. Reinstall the wheel. Put the lug nuts on. Now, I'm going to torque these lug nuts to 140 foot-pounds in a star pattern to tighten the wheel down evenly. Then just go around again to double-check. Then reinstall the center cap.
Tools used
21mm Socket
21mm wrench
Torque Wrench
22mm Socket
Tools used
21mm Socket
21mm wrench
Torque Wrench
13/16 Inch Wrench
18mm Wrench
Pry Bar
18mm Socket
Straight Cutters
Wire Ties
3/8 Inch Impact Gun
First, I'm gonna remove the bolt for the right side upper sway bar link. I'm gonna use an 18 millimeter socket and an 18 millimeter wrench. I'm gonna slide that out. I'm gonna use a pry bar and just pry the link out, out of the bracket. Pry the sway bar down a little bit. I'm gonna slide that out of the way. And then with the 21 millimeter socket and get on this bolt and then use a 13/16th wrench on the nut on the backside or a 21 millimeter wrench and take this bolt out.
Just keep in mind the whole rear suspension and rear end is gonna shift a little bit when you take that out. Now, normally this rear parking brake cable has holders that hold these areas of the cable. This vehicle doesn't have that. We just have wire ties. So I'm just gonna cut the wire ties. If you don't have wire ties, just remove the cable so it's not attached. Now, we're gonna take this bolt out. Just use a 13/16th wrench or 21 and 21 millimeter socket. Loosen this up. Be careful you don't want this to swing down and pull that bolt out. And there we go.
All right, now we'll take the bar, get it lined up. You can get the bolt started. Get the nuts started on the backside. Now, we have to get this upper one lined up. This might be a little bit tricky. You can take a pry bar and just pry the axle over. You can try to pry the sway bar itself as you do that and get that lined up. Just watch your fingers. That's good. And put the nut on.
All right. At this point, I'm just gonna use a couple screw jacks and try to raise up the rear suspension a little bit. Ideal if you could tighten these bolts while the vehicle's on the ground. That's the best method to do that, but it's not the easiest way to access the bolts. It's not gonna be easy to use a torque wrench. So I'm just gonna do the best I can, raise this up a little bit and just get it somewhat close. Now, I'm gonna torque this bolt. Use the wrench on the backside and torque this to 77 foot-pounds. And do the same with the other one.
All right, now I can lower these down. And now it gets this sway bar link in position and just use the pry bar just pry this down a little bit. Get this to line up, watch your fingers. Just give it a tap and take the bolt, the bolt lined up. Now, I'm gonna torque this bolt to 48 foot-pounds. Now, we're gonna reattach this brake cable, this parking brake cable. Now I don't have those brackets, so temporarily I'm just gonna use wire ties, but if you had those brackets, you're gonna wanna reattach those. Now, I'll just trim off the excess.
PSA65088
In Stock
Product Reviews
Loading reviews
There are no reviews for this item.
Customer Q&A
Will this fit on 03 yukon xl denali?May 20, 2023
SERGIO A
10
Yes, this part will fit your vehicle.
May 22, 2023
Emma F
Will this fit a 2004 yukon xl 1500 6.0 awd?March 14, 2024
Michael B
10
Yes, this part will fit your vehicle.
March 14, 2024
Emma F
Customer service
877-844-3393
Monday - Friday 8:00am - 9:30pm ET Saturday - Sunday 8:00am - 4:30pm ET
Cadillac is a registered trademark of General Motors Company. 1A Auto is not affiliated with or sponsored by Cadillac or General Motors Company.See all trademarks.
Enter Vehicle Year Make Model
Specify your vehicle's year, make and model to guarantee fit.
Year
Make
Model
Options
Drivetrain
This part doesn’t fit a . Select from parts that fit.