Replaces


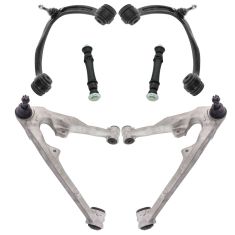
6 Piece Suspension Kit
$370.95
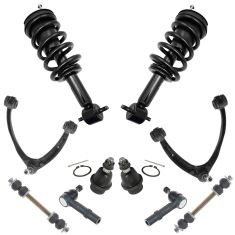
10 Piece Steering & Suspension Kit
$380.95
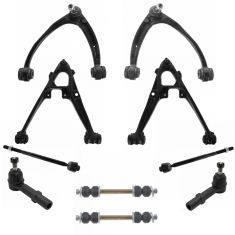
10 Piece Steering & Suspension Kit
$397.95
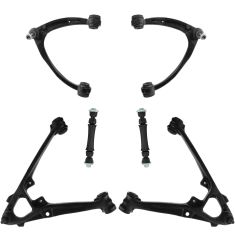
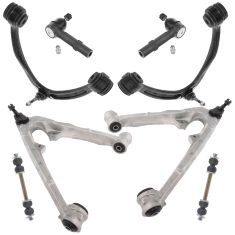
6 Piece Suspension Kit
$451.95
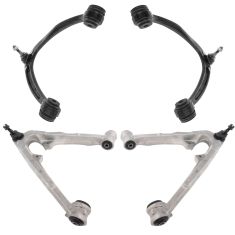
4 Piece Control Arm with Ball Joint Set
$452.95
12 Piece Steering & Suspension Kit
$467.95
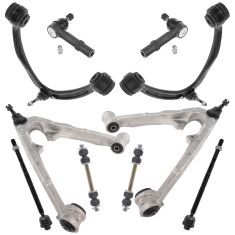
8 Piece Steering & Suspension Kit
$471.95
10 Piece Steering & Suspension Kit
$503.95
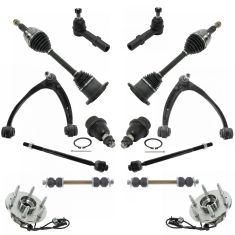
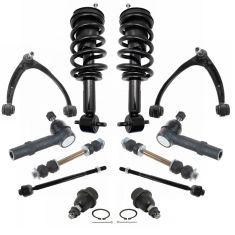
14 Piece Steering, Suspension, & Drivetrain Kit
$619.95
Part Details
Specifications
Product Features
TRQ suspension kits are manufactured using premium raw materials and coatings for extended service life. Each TRQ suspension component is designed to be a direct, maintenance-free replacement to the stock unit. To extend the life of your steering and suspension components, TRQ recommends replacing components in pairs, sets, or kits. All products are fit and road-tested in our Massachusetts R&D facility to ensure we deliver on our promise of Trusted Reliable Quality.
Replacing struts used to require specialized tools to compress, remove, and transfer the old spring and mount. Our Pre-assembled, complete strut & spring assemblies come with all new parts and make the job much quicker and easier for the do-it-yourself mechanic.
Strut & spring assembly contains:
Install Tip: When replacing steering components, have a professional alignment performed afterwards. This ensures proper tracking and even tire wear.
Our steering and suspension components are pre-greased and sealed for long life and do not require the extra maintenance typically required by greaseable versions.
Attention California Customers:
 WARNING: This product can expose you to chemicals including Chromium (Hexavalent Compounds), which is known to the State of California to cause cancer, and birth defects or other reproductive harm. For more information, go to www.P65Warnings.ca.gov
Lifetime Warranty
This item is backed by our limited lifetime warranty. In the event that this item should fail due to manufacturing defects during intended use, we will replace the part free of charge. This warranty covers the cost of the part only.
FREE Shipping is standard on orders shipped to the lower 48 States (Contiguous United States). Standard shipping charges apply to Hawaii and Alaska.
Shipping is not available to a P.O. Box, APO/FPO/DPO addresses, US Territories, or Canada for this item.
Expedited is available on checkout to the United States, excluding Alaska, Hawaii.
Final shipping costs are available at checkout.
Created on:
Tools used
Brought to you by 1AAuto.com, your source for quality replacement parts and the best service on the Internet.
Hi, I'm Mike from 1A Auto. I hope this how-to video helps you out, and next time you need parts for your vehicle, think of 1AAuto.com. Thanks.
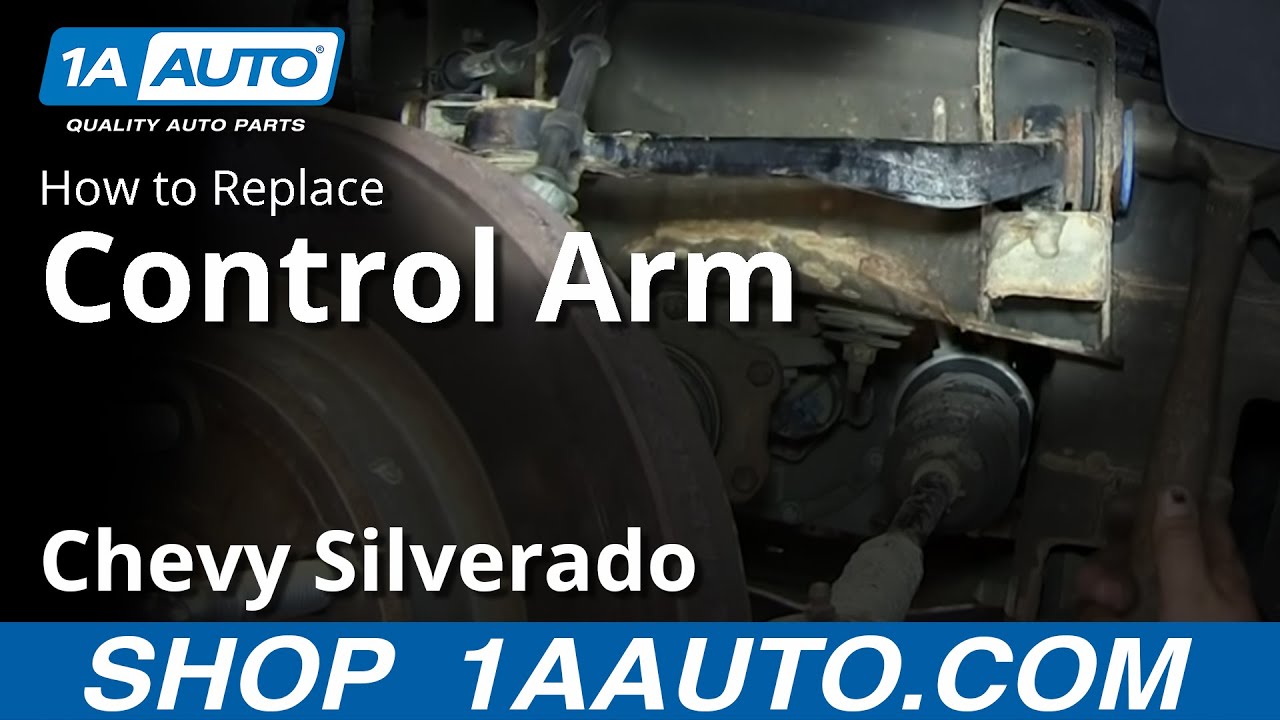
In this video, we're going to replace an upper control arm and ball joint assembly on this 2011 Chevy Silverado. This is a 1500 4-Wheel Drive; this procedure is the same for any 2007 to 2013 Silverado and Sierra 1500. The passenger side is basically the same as the driver's side.
You'll need a new control arm from 1A Auto.com, jack and jackstands, 10 to 22mm sockets with a ratchet and extension, an 18mm wrench, and an additional wrench for some extra leverage, breaker bar or pipe for extra leverage, penetrating oil, hammer, pry bar, and a torque wrench.
From the top, there are three 18mm nuts that hold the top of the strut in place: you see one there; one has a wire loom on it there that I'm going to reach down and grab, and just pull off. Apologies for the camera shot, but you just grab the wire clip and pull it up off the stud. Okay, so you have your other one there, and your third one, there. Now, use an 18mm socket with a long extension, and remove those three nuts. Remove the center cap just by prying with a screwdriver, and if you don't have the benefit of air tools, loosen the lug nuts with the vehicle on the ground, then raise and secure the vehicle, and then remove the lug nuts the rest of the way ... remove the wheel and tire, and they are 22mm lug nuts. Turn the wheel using hands, or use the steering wheel, and then you need to remove the stabilizer link; make sure you put some penetrating oil on the top end of it there, then use a wrench on the top side, and a socket wrench on the bottom side, and remove it all the way. I'm going to speed up here a little bit; we "cheat" a little bit by just using an impact wrench to take that off. That just speeds things up for us. Then, we'll remove the bolt the rest of the way: push down on the suspension, and pull the link out of there.
Up underneath, there are two 15mm bolts; hold the bottom of the shock strut in place. I was just using a 15mm socket and ratchet; you might want a breaker bar to break them loose, but they come apart pretty easy on this truck, and we'll fast forward as we just take those out. Take those bolts out, press down on the suspension some, and bring the strut down, and then up and out.
Now with some penetrating oil, spray down the ends of the two bolts that hold the control arm to the frame. There are little tabs that come out of the frame and go through these washers; and I'm using a paint marker to mark on the washers where those tabs are, so that when we re-assemble this, we can give it a good preliminary alignment. You will want to re-align your truck after you do this repair, but this at least gets it somewhere close to where it was originally. An 18mm nut holds the ball joint to the steering knuckle; put an 18mm wrench on there, and then hook another wrench onto it for extra leverage. Loosen it up. Here, you can see we still have the nut on the ball joint; we're going to put a big pry bar in there; pry between the steering knuckle and the ball joint, and hit the steering knuckle with a hammer until it pops apart.
There's a 10mm bolt on top of the control arm that holds the clip that holds the wire harness: remove that. Now, we're going to support the suspension with a jack. Remove the nuts that are on the end of the bolts that go into the frame; it's a 21mm socket with a ratchet, and we use a pipe for some extra leverage to get the bolts going and once we have them going, they come off easier than just with the ratchet, and I'll fast forward as we finish that up, and do the other side. As you see, here, use a hammer to start driving those bolts out, and then you can work them out by hand. You may have to use a punch and drive them further through. Now, remove the nut the rest of the way off of the top ball joint there, and then you should be able to pull the control arm up and then pull it out; you might need to use a crowbar or a large screwdriver to help pry it out.
The ball joint in our new control arm comes with a grease-able fitting, so we'll install that. Put the new control arm up in place, and you just kind of wiggle it up and down, I guess, to get the bolts to line up preliminarily with the frame. Now, put the bolts back in, get one bolt started in as much as you can, and then actually, if you start the other bolt in on the other side, this kind of lines things up; you should be able to get that bolt most of the way in. Use a hammer to tap it in if you need to, and then go back, and again, if you just move the control arm around a little bit, you should be able to push it in. I'm just going to fast forward as we start the nuts on ... And now, we're putting a wrench on the bolt end, and you can see we just pull it up, and re-align that mark with the tab on the frame, and just preliminarily tighten the nuts up just to hold it in place well. Here, we're just going to let the jack down some. This just relieves a little pressure so that we can then lift the upper control arm up, and get the ball joint lined up and then back into place, and then once it's all set, we'll actually jack the suspension back up until it's basically in the position it should be when the vehicle is riding on the ground.
You put the ball joint nut on, and start tightening it; most likely, it's going to start making the stud on the ball joint spin, and if that happens, you'll see here in a second, you can put a 6mm Allen wrench into the ball joint stud. Hold it; you need to be careful: sometimes as you pull the ball joint stud through, it can interfere with the axle, and you might need to undo the axle nut and push the axle through a little bit in order to get the wrench back out. Make sure you put the wrench on there, and put the second wrench on for some extra leverage, and tighten that nut right up.
Now again, we have the suspension up in the about the same position it's going to be when it rides on the ground; you want to make sure you have it up there, and then torque the bolts for the control arm to 100 foot-pounds, and just make sure that the marks on your washers and everything still line up. Now you can let your jack back down, reinstall the 10mm bolt that holds the wiring harness clip, and use a grease gun to put some grease into the ball joint, and we generally do it until we see the boot between the ball joint and the steering knuckle start to expand. Bring this strut back in: if you look on the top of the strut where the coil spring ends, that goes to the outside, and you put the strut back in, and then lift it up into place, and then you can just start the nuts onto the top. Install all of the lower bolts, and the strut, and tighten them up; you want to tighten them up between 70 and 75 foot-pounds. We speed up as we put the stabilizer link back in place; use a pry bar to lift up on the sway bar a little bit; put the link back in place, put the bolt up through, and then tighten the nut down on top.
The,n put our wheel back on, put the lug nuts back by hand first, then tighten them preliminarily, and with the vehicle back down on the ground and secure, torque the lug nuts to 110 foot-pounds using a crossing pattern. Tighten up and torque the top three nuts to 75 to 80 foot-pounds, and put that wire clip back in place, and you should be all set.
We hope this helps you out. Brought to you by www.1AAuto.com, your source for quality replacement parts and the best service on the Internet. Please feel free to call us toll-free, 888-844-3393. We're the company that's here for you on the Internet and in person.
Tools used
Brought to you by 1AAuto.com, your source for quality replacement parts and the best service on the Internet.
Hi, I'm Mike from 1A Auto. I hope this how-to video helps you out, and next time you need parts for your vehicle, think of 1AAuto.com. Thanks.
In this video, I'm going to show you how to replace the front shocks and spring assemblies on this 2011 Chevy Silverado. This is a 1500 with full-wheel drive. It's the same as any Chevy Silverado 1500 as well as the GMC Sierra 1500. We'll show you the passenger's side, but the driver's side is the same procedure. We do always recommend you replace these in pairs. You'll need new struts from 1AAuto.com, you'll need 15mm to 22mm sockets with a ratchet, a long extension, breaker bar or pipe for some extra leverage, penetrating oil, torque wrench, and jack and jack stands.
From the top there are three 18mm nuts that hold the top of the strut in place. You can see one there, one has a wire loom on it there that I'm going to reach down, grab, and just pull off. I apologize for the camera shot. You just grab the wire clip and pull it up off the stud. You have the other one there and your third one there.
Now use an 18mm socket with a long extension and remove those three nuts. Remove the center cab just by prying with a screwdriver, and if you don't have the benefit of air tools, loosen the lug nuts with the vehicle on the ground, then raise and secure the vehicle. Then remove the lug nuts the rest of the way. Remove the wheel and tire, and they are 22mm lug nuts.
Turn the wheel using hands or using the steering wheel, and then you need to remove the stabilizer link. Make sure you put some penetrating oil on the top end of it there, then use a wrench on the top side and a socket and ratchet on the bottom side to remove it all the way. Going to speed it up a little bit using an impact wrench to take that off. It just speeds things up for us.
Now with the shock or strut in place, we're just using a 15mm socket and ratchet. You might want to use a breaker bar to break them loose, but they come apart pretty easy on this truck. We'll fast-forward as we just take those out. With those bolts out, press down on the suspension some and bring the strut down and then up and out.
You can see the new struts from 1A Auto are exactly the same. There are two clips on the old strut that you want to pry off with a screwdriver, and then it's easiest to reinstall those just when you put the strut back into the vehicle. Put them on there, put the bolt up through, and you'll see us to do that. Putting the strut back in, if you look on the top of the strut where the coil spring ends that goes to the outside, and you put the strut back in and then lift it up into place.
Then you can just start the nuts onto the top. Put the bottom down in place, take your bolt, run it up through, and then those clips that you took off of the original strut, put them into place, and we just kind of hold them with our fingers, get the bolt started, and then you can press them down into place and tighten up the bolts the rest of the way.
You can see here we use a screwdriver to put through the clip to hold it in place until it gets down far enough that it holds itself in place. Repeat it for the other side as well. You can tighten these up between 70 and 75 foot-pounds. Speed up as we put the stabilizer link back in place. Use a pry bar to lift up on the swag bar a little bit, put the link back in place, put the bolt up through, and then tighten the nut down on top.
Then put our wheel back on, put the lug nuts back on by hand first, then tighten them up preliminarily. With the vehicle back down on the ground and secure, torque the lug nuts to 110 foot-pounds using a crossing pattern. Tighten up and torque the top three nuts to *38* foot-pounds, and put that wire clip back in place. You should be all set.
We hope this video helps you out. Brought to you by www.1AAuto.com, your source for quality replacement parts and the best service on the Internet. Please feel free to call us toll-free, 888-844-3393. We're the company that's here for you on the Internet and in person.
Tools used
Hi, I'm Mike from 1A Auto. We've been selling auto parts for over 30 years.
Remove the center cap with a large flat-bladed screwdriver or a plastic prying tool you can get from 1AAuto.com. Push in here and pop it off. Use a 22 millimeter socket and breaker bar to loosen the lug nuts while the vehicle is still on the ground. Raise and support the vehicle and finish removing the wheel.
Support the suspension arm assembly with a jack or a jack stand. We're using this because we're working on a two post lift. The suspension is going to want to drop when we remove the strut and spring assembly, so that's why we need to have it supported. At the top here, there are three studs with nuts. We will start by removing those. And then, loosen the two stud and nuts on the bottom and pull the strut assembly out.
I will spray some rust penetrant on the nuts and bolts here. Use a 15 millimeter wrench on the top ones. If they are stuck, use a dead blow, break them free. With those broken free, I'm going to switch to a ratcheting wrench, make things go a little quicker. These two lower mounting bolts go through the control arm. There is a 15 millimeter head on this side, and an 18 millimeter nut on this side. I'm going to try to break this nut free first. Take my wrench and then hit it with my mallet.
So it looks like it's actually turning the nut, and not the bolt, which is good. Free it up. I'm going to try to do the same for the other side. With the nut loose, I'm going to kind of hold it with my 18 millimeter, and take a 15 millimeter socket and ratchet. Now I've got it loose, I can undo it with my fingers. Slide the long bolt out. I'll put these together and put them aside. So repeat the removal for the other bolt. I'm going to hold the shock and I'll lower the suspension down. I'm going to capture one of the top nuts just so if the strut and shock combination comes loose, it doesn't fall completely out. I'm going to take a pry bar and sort of push against the bottom. Reach up, hold the strut up, and undo that top nut. Pull it out of the mount. It's not going to come down this way, so it's going have to come out through the top. We have our strut and spring assembly.
Here's our old strut and spring assembly from our vehicle, and our brand new assembled strut and spring from 1AAuto.com. So the nice things is you don't have to worry about swapping these springs, which can be very difficult. It comes fully loaded, ready to go. As you can see, it's got the same mounting bolt holes in the bottom. It has the same three studs on the top to mount. It has the same three mounting studs on the top as the original that came out. And this should go in your vehicle great and give you a good ride. This is just a warning sticker. You can remove this before you install it. You don't need to mess with this center nut. It's all set.
The spring is assembled. The warning's telling you not to undo it. Just leave it alone. You can take the sticker off. So we're going to go ahead and install this in the vehicle now. Before we install it, just remove these nuts that it comes with. Place them aside. I'm going to loosen this one and hold onto it, because when I install it, I'm going to use it to just hang the strut in place so it doesn't fall. So just keep that in a handy spot. When you install this, there are two mounting holes in the back. They are slotted, so they give you a little bit of room to work with.
I'm going to line the strut up with the two studs in the back and the one in the front, faced the way that it's already set up. And these are lined up to match up with the control arm. We're going to go in the reverse the way we took the old one out. Slide it up into place. That's why I kept the nut handy. I can reach up and capture one so it doesn't fall on me. I'm going to use that one nut I installed and a ratcheting wrench to just draw the strut up into place. I'm going to pry up on the suspension a bit, on the strut, do this. I have a large pry bar on one side of the suspension arm, so I basically just pried the control arm down, and then pried the shock into place. Take a punch and align the bolt holes.
You're going to have to spend some time moving the shock around to get these bolts to line up, either using an awl or a punch or a little pry bar to try and pry it around. This one doesn't quite line up. I've got the other one captured, so we'll take a pry bar and sort of pry the strut around. Try to wiggle it in. There it is. I captured the other two nuts on the top studs. These are locking nuts. And if they're torqued, they'll be locked in place. The bolts that we're replacing these with, the head is a 13 millimeter, the nut is still a 15. I'm just going to snug these up. And we'll use a 15 millimeter ratcheting wrench. Tighten up the top nuts. I torqued these lower bolts to 37 foot-pounds. Caught a hold of the top of the bolt and nut. Repeat the other one. Torque the top nuts to 37 foot-pounds using the deep socket and torque wrench.
Place the wheel back on the car. Thread the lug nuts on by hand. With the vehicle on the ground, I'm going to torque the lug nuts. Torquing these 140 foot-pounds. Going in a cross pattern. Reinstall the center cap. Line up this valve stem picture with the valve stem on the wheel. Just pushing it into place.
Thanks for watching. Visit us at 1AAuto.com for quality auto parts, fast and free shipping, and the best customer service in the industry.
Tools used

PSA59879
