Replaces
Part Details
Item Condition:
New
Attention California Customers:
 WARNING: This product can expose you to chemicals including Lead and Lead Compounds, which are known to the State of California to cause cancer, and birth defects or other reproductive harm. For more information, go to www.P65Warnings.ca.gov.
Lifetime Warranty
This item is backed by our limited lifetime warranty. In the event that this item should fail due to manufacturing defects during intended use, we will replace the part free of charge. This warranty covers the cost of the part only.
FREE Shipping is standard on Orders shipped to the lower 48 States (Contiguous United States). Standard shipping charges apply to Hawaii, Alaska and US Territories. Shipping is not available to Canada.
Expedited is available on checkout to the United States, excluding Alaska, Hawaii and US Territories as well as P.O. Boxes and APO/FPO/DPO addresses. Final shipping costs are available at checkout.


Created on:
Tools used
Brought to you by AAuto.com your source for replacement parts and the best service on the internet.
Hi, I'm Mike Green. I'm one of the owners of 1A Auto. I want to help you save time and money repairing and maintaining your vehicle. I'm going to use my 20 plus years experience restoring and repairing cars and trucks like this to show you the correct way to install parts from 1aauto.com. The right parts installed correctly, that's going to save you time and money. Thank you and enjoy the video.
Ok so we're going to replace the outside door handle on this 1996 Chevy Tahoe. This is exactly the same for any '95 to '98 GM truck or '95 to '99 Suburban, Yukon or Tahoe. You will need to see a couple of our other videos where we take off the door panel and the interior door panel just because it's kind of involved. It's not difficult but there are quite a few steps to it. Basically you have to remove the interior door panel and then the panel that holds the regulator and lock actuator and then to get to the door handle itself.
As you can see the tools that you need aren't that complicated; 7 mm socket and ratchet, a Phillips screwdriver, flat blade screwdriver, a putty knife or a door panel clip tool and a 10 mm socket and ratchet. Ok the bulk of the work on this repair is actually taking the door panel off and the interior door panel off and I have those videos as video responses to this video. Where we're going to start actually is you've basically taken the interior door panel off and the panel with the regulator and everything off and now you use a T-30 torqued driver and you really need a bit with a socket like this and a wrench or a ratchet handle. You don't have to have an air ratchet like I have but you need a ratchet handle to put enough torque on those to get them out so you remove those and then go from there.
Ok so I've raised my window and I've secured it with plenty of painters tape. Now you want to remove that 10 mm bolt and this 10 mm bolt. Ok now looking in there you can see that there's a clip right here and you see I've got it pried away. You've got to pry it; there's a hole right there and there's a tooth on the clip so you have to pry it away and up and then you can get that rod out like that. Good, now those bolts are undone. The panel comes up and out and this rod comes with it and then here again, we'll take the screwdriver and pry out this here and then push on the clip and then the rod comes out. Ok so you've got your new handle; make sure you've got your clip on here. This face should be on this side so you push the rod into it, make sure you've got your clip on here. Take this rod it's got the well on this part has a little red end and push it into your door handle and lock it. Then put it down in, up and on. Ok so here's our one 10 mm bolt.
I just have those on there hand tight. Now here's the lock mechanism and I'm going to make this look easy, nope. You want to bring it up into place and guide your webbed rod right into the hole. Ok so upon editing I realized that you couldn't really tell what I was doing in that shot. Basically, right in where that circle is in behind that weather strip the rod that was painted red at the bottom that you attach to the door handle comes down and you're lifting up the lock mechanism and making sure that rod goes down into the hole that's on the lever right in there. Obviously you'll know if you get it right because if you do the door will work; if you don't the door will not open. Make sure that all your doors are not locked when you test; basically it's a good tip for any time.
Then hang it up and put one of the 10 mm things in there. Ok I'm just going to tighten that up a little bit. Put another one in place. Now I'm going to take this rod, once you get it in get it started then take your hand out and reach in with this finger and push the rod in the rest of the way. Now I've got everything on, not quite tight yet I'm just going to test it real quick, that's good. Lock, unlock, ok. Now I'll tighten up the bolts in the handle and these two 30 screws and get the door back together.
That's basically how you do the door handle from this point on it's pretty much reassembling everything. Once you've taken it apart it's usually pretty easy to put it back together but we do have the videos on installing the door panel and the window regulator and lock actuator plate so you can either search our other videos or check out the replies to this video.
We hope this helps you out, brought to you by www.1AAuto.com your source for quality replacement parts and the best service on the internet. Please feel free to call us toll free 888-844-3393. We're the company that's here for you on the internet and in person.
Tools used
Hi, I'm Mike from 1AAuto. We've been selling auto parts for over 30 years! We're dedicated to delivering quality auto parts, expert customer service, and fast and free shipping, all backed by our 100% satisfaction guarantee. So visit us at 1AAuto.com, your trusted source for quality auto parts.
In this video we're going to be working with our 1996 GMC Sierra. We're going to show you how to remove and replace your vehicle's exterior door handle. If you like this video, please click subscribe. We have a ton more information on this and many other vehicles, and if you need this part for your truck, you can follow the link down in the description over to 1aauto.com.
Here are the items you'll need for this repair.
Remove the two Phillips head screws inside of the armrest on the door. Do this with a Phillips head screwdriver. To remove the bezel around the interior door handle, you need to kind of get in there with a trim tool or a flat blade screwdriver, and push down on the tab to release it. There are three: one at the top, one at the bottom, and one on the side.
Remove the extension at the top of the door panel by prying out with a trim tool. Using your trim tool, pry up at the back of the power window switch. Lift it up and pull back to release the hook at the front. Disconnect the connector for your tweeter. Pop up the tab on this two pin connector at the front of the window switch, and pop the connector out, and then push down on the tab for the main connector and remove that from the switch. I'm using a pick here. You could also use a small flat blade screwdriver or a trim tool if you had to, really whatever works best for you.
Using the trim tool, pop out on the door reflector and remote the connector. This is another one of the ones we'll have to lift up on the tab with a pick. Using a trim tool, pry out the bottom of the door. You may need to work it a little bit to figure out where the tabs are. You'll also need to pop out this pin at the top on the front of the door. Once all the tabs are out, lift the panel up and remove it from the door.
Peel off the inner water shield on the door. There's also a small piece over in the corner. Make sure your window is rolled all the way down. There are ten 7 millimeter screws around the perimeter of the inner panel. One under the speaker here that's a little tricky to see, and a 10 millimeter at the front. We'll need to remove all of those with a socket and ratchet. Pull the panel forward. Pull out the handle rod. It may help to have a tool to help you get some leverage on it. You'll also want to pop that out of its guide clip. Same thing with the lock rod down here. We'll also need to pop this out of its guide rod and pull it out of the lock actuator as well. Pop out the tab for the courtesy light in the door. Lift up on the cover for the door lock actuator, and remove that connector. You need to fish it out and around. Pop that retainer through, and then pop out all the rest of the retaining clips to remove the harness from the door.
You'll also need to unplug the window motor and the door speaker. Pull the harness through the door. Slide the door panel forward until the window roller is out of its channel, then slide the guide out of the back, and remove the assembly from your vehicle.
Lift up on the glass in the door. Bring it all the way up, and use some painter's tape to secure it in the up position. Move the 10 millimeter bolt on the door jamb side of the handle. You'll also need to remove the 10 millimeter bolt on the backside of the door handle. You'll need to remove both of the rods for the door handle, as well as the door lock. You may need a small flat blade screwdriver to help get the leverage you need to remove them. It's kind of tough to see, but you can sort of feel in there with a small screwdriver. Hopefully get enough leverage to pop that out. Remove the door handle from the door. Now just like you did to remove your lock rod, you're going to want to pry this clip up. You can just split it like I am here and remove the latch from the vehicle.
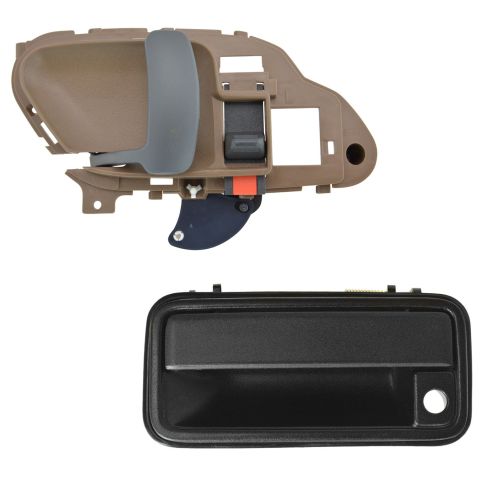
Here we have our old part that we removed from our vehicle, and our new part from 1aauto.com. As you can see, these parts are exactly the same with the same handle, same lock provision, the same latch mechanism on the back, and the same two bolt mounting locations. If your old door handle is broken, cracked, damaged, or non-secure in your door, this new part from 1A Auto is going to go in direct fit, just like your original equipment, and fix you up right.
Reconnect the door latch rod, and reinstall the door handle into the vehicle. Line up your door handle and reinstall the two 10-millimeter bolts. Pop the lock rod back into its clip.
Remove the tape that's holding your window up, and support the window from the bottom side, then carefully lower your window and allow it to rest on the bottom stop.
Reconnect your door speaker and your window motor, and send the rest of your wiring harness back through the door. Slide the back half of your window regulator back into the window track. Once the back is in, slide forward and install the front part of the regulator into the glass as well. Reconnect the door lock as well as the door handle. Don't forget to engage the lock actuator, and snap both rods back into their guides.
Realign your door panel. Reinstall your wiring harness. Make sure that all the tabs and retainers go back in their appropriate places. Make sure you run the harness through, and reconnect the door actuator as well. Lock the clasp in for your reflector, courtesy light, and reinstall the ten 7 millimeter screws around the perimeter, as well as the one 10 millimeter. Reinstall the water shield. Sometimes this adhesive doesn't really want to stick a second time, if that's the case, it's all right to put some tape on there to secure the edges.
Pull your wire harness back through the door and lay the top edge into the door frame. Line up the plastic containers and push them all back into place. Reinstall the inner door handle bezel by lining it up and snapping it in. Reinstall your reflector. Place the upper door extension into place. Reinstall the two Phillips head screws in the armrest.
Reconnect your door speaker as well as the two electrical connections on the power window switch. Slide the front hook into the door panel. Snap the back into place, and you're good to go.
Tools used
Brought to you by 1AAuto.com your source for quality replacement parts and the best service on the internet.
Hi, I'm Mike Green. I'm one of the owners of 1A Auto. I want to help you save time and money repairing or maintaining your vehicle. I'm going to use my 20 plus years' experience restoring and repairing cars and trucks like this to show you the correct way to install parts from 1AAuto.com. The right parts installed correctly. That's going to save you time and money. Thank you and enjoy the video.
In this video we're going to be showing you how to replace an inside door handle on this 1996 Chevy Tahoe. Same as any 1988 to 1998 Chevy or GMC pickup truck and then also 1992 to 1999 Tahoe, Suburban and Yukon. The tools you'll need for this repair are a 7 mm socket and ratchet or a Phillips screwdriver, flat blade screwdriver, putty knife or door-panel clip tool, a drill with a 3/8-inch drill bit and a 10 mm wrench.
Start out by removing the door panel obviously and I'm just going to do high speed through this. If you want to see the door panel removal in regular motion just check out our other videos. I'll also put the door panel video as a video reply to this video as well.
To remove your door handle what you're going to need to do is drill out this little rivet right here. I'm using a 3/8 drill and you basically need to get into it a little bit. Once you're through it drill it into the door handle plastic a little bit. I drilled in there pretty good. I'm just using a little Torx bit here. Try and push that rivet through a little bit. Okay. Now I got that off. You want to slide your door handle forward and then it comes out. Here's one of the clips. Basically what I did is I kind of set the plastic down on here and I pushed that through. Then generally this isn't a problem because usually your door handle is broken anyways. Basically I'm just kind of trying to get the screwdriver back in here and prying up on the rod and removing it.
Now your old door handle is out. I can save this little piece of plastic. Good little sealer. Now this door handle isn't broken so you can see new door handle it's just like the old. In fact this is a little thicker. This whole mechanism is just a little bit thicker on ours. It has got thr clips in it and everything and everything is going to bolt up just like the original did. You can see our rivet is even a little bigger. It all looks pretty much the same. We also offer the same door handle with a chrome handle. Everything will bolt up the exact same. Gives a little flare to your inside if you wanted to. Also, this is correct for I think the Denali and Escalade.
Now we just want to push this rivet through the door. It's just kind of a matter of bending everything in. Using advanced techniques. There it goes. Hopefully you saw that. Now that is clear. You want to have a bolt that is a sheet-metal bolt, nice rigid things. It can't be too long. You don't want this sticking way into your door and then contacting the window or anything. What we are going to do is take our new door handle and just put the plastic back on it. Putting that back on is pretty easy. Take your rods. Let's do this one first. It's just a matter of pressing it right down in and the little locks lock it for you. Get this one. Press it right in. Put the door handle down in. Push it into place and make sure it's all back in there and on the bottom. Slide it backwards. Now is the time to test it. Everything feels to be good. You're going to take your bolt; put it right in and you're in business. Now we can put the door panel back on and it's all set.
Again, going to do the door panel installation in fast motion. If you want to see this in regular motion just check out our other videos. Also I'll have that as a video reply to this video, and if you took the door panel off most likely you can probably get it back on but that's about it. I hope this got your door handle fixed, and we hope this helps you out.
Brought to you by www.1AAuto.com your source for quality replacement parts and the best service on the internet. Please feel free to call us toll free 888-844-3393. We're the company that's here for you on the internet and in person.
Tools used
Brought to you by 1AAuto.com, your source for quality replacement parts and the best service on the Internet.
Hi, I'm Don from 1A Auto. I hope this how-to video helps you out, and next time you need parts for your vehicle, think of 1AAuto.com. Thanks.
In this video we're going to show you how to replace the rear exterior door handle on this 1996 Chevy Tahoe and we show you on the passenger side but the driver side's the same procedure. The items you'll need for this are a new rear exterior door handle from 1AAuto.com, 7mm and 10mm socket and ratchet, flat blade screwdriver, putty knife, and a pair of pliers.
You want to start off by removing these two 7mm bolts and we'll just fast forward as Don does this. Using a flat blade screwdriver, pry right here at the top of this panel and remove it.We use a putty knife here to just pry back behind the door panel, see if you can get your hands back there, and you want to just pull out near the clip and it will release it. You want to do this all the way around the door panel. Once all those clips are released, you want to lift it up and off the windowsill. On the back of your door panel you want to disconnect your courtesy light harness by just pushing the tab and pulling it free. Do the same thing for your speaker harness. Then you want to just pry out the tab on this harness and pull it free. Peel back your water shield and in here there's a 10mm bolt on the back of your handle and there's another one right here and we'll just fast forward as Don removes those. Now pull your door handle out and next you want to push back this clip. To do that, pry it out with your flat blade screwdriver, get the pliers on it and push it back. Now you can pull the door handle rod out of that clip.
On the left is the old exterior door handle. On the right is the new one from 1A Auto. You can see they're identical and they'll fit exactly the same. Take your new door handle and push the door handle rod back into place. Once it's all the way in, use your pliers to pull that clip back. Then just bend that tab back down and push the door handle back into place. We'll just fast forward as Don replaces those two 10mm bolts and tightens them up. To replace the one in the door, you want to just put the bolt into the socket and feed it into the door.
To replace the door panel, just reconnect your courtesy light harness, your speaker harness, and your window switch harness. You want these clips to go into these holes right here so first just push your door panel down into the windowsill. Now just look back behind the door panel, make sure they line up, and then just hit them into place. Just repeat this process around the door panel making sure that they are lining up so you don't break them when you hit it .Just replace those two 7mm bolts and replace this bezel and just hit it into place and you're all set.
We hope this helps you out. Brought to you by www.1AAuto.com, your source for quality replacement parts and the best service on the Internet. Please feel free to call us toll-free, 888-844-3393. We're the company that's here for you on the Internet and in person.


