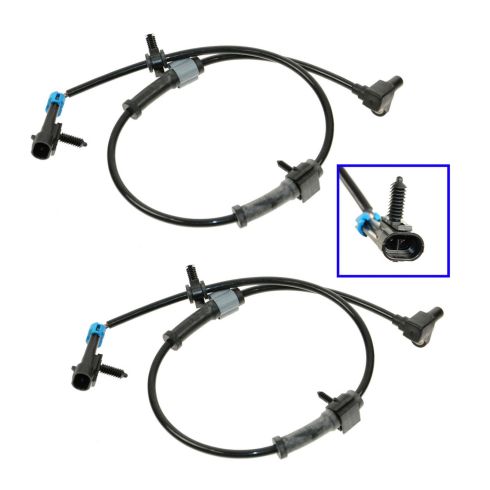
Kit Includes: (1) Front Passenger Side ABS Wheel Speed Sensor (1) Front Driver Side ABS Wheel Speed Sensor
Quantity: 2 Piece
Specification
Side Location
Driver & Passenger Side
Location
Front
These replacement ABS (Anti-Lock Brake) Sensors with harnesses are just what you need to get your vehicle's ABS system in good operating condition again!
A bad, corroded, frayed, or malfunctioning ABS sensor can cause an ABS light to illuminate on your instrument panel, and store an ABS diagnostic error code. If your ABS sensor or wiring harness is corroded or damaged it will prevent your ABS sensor, and ABS system from working properly.
Specifications:
Comes as a PAIR
Fits both the LH (Driver Side) & RH (Passenger Side) FRONT WHEELS
Includes Harnesses with Plugs
Correct connectors and wire length
Built to strict quality control standards
Replaces dealer part numbers: 15112402, 15225723
Direct replacement
100% electrically factory tested
Plugs into existing body mounted ABS harness
No Splicing needed
Fits both 2WD & 4WD models as listed per application
Note: For 2007 models, this fits the old body style or Classic style truck. The Classic style truck has a crease that runs down the center of the door skin. New body styles have a smooth door skin
Item Condition:New
Attention California Customers:
WARNING: This product can expose you to chemicals including Lead and Lead Compounds, which are known to the State of California to cause cancer, and birth defects or other reproductive harm. For more information, go to www.P65Warnings.ca.gov.
Lifetime Warranty
This item is backed by our limited lifetime warranty. In the event that this item should fail due to manufacturing defects during intended use, we will replace the part free of charge. This warranty covers the cost of the part only.
Returns: Parts with electrical components cannot be returned once installed.
FREE Shipping is standard on Orders shipped to the lower 48 States (Contiguous United States). Standard shipping charges apply to Hawaii, Alaska and US Territories. Shipping is not available to Canada.
Expedited is available on checkout to the United States, excluding Alaska, Hawaii and US Territories as well as P.O. Boxes and APO/FPO/DPO addresses. Final shipping costs are available at checkout.
How to Replace ABS Speed Sensor with Harness 1999-2004 GMC Sierra 2500
Created on:
Tools used
Adjustable Wrench
21mm Socket
Flat Blade Screwdriver
8mm Allen Wrench
18mm Socket
Slip-Joint Pliers
Ratchet
1/2 Inch Breaker Bar
22mm Socket
1. Remove the wheel
Use a 21 mm socket to remove the plastic covers and loosen the lug nuts.
Raise and secure the wheel and remove the lug nuts.
2. Remove the brakes
Unbolt the two bolts with your 18 mm socket and ratchet.
Use a breaker bar if necessary.
With a large screwdriver, pry the caliper apart and off.
Unbolt the caliper bracket with a 21 socket.
Pull off the brake rotor.
Secure the brake caliper out of the way.
3. Remove the ABS sensor
Use an Allen wrench and a pair of pliers to unbolt the ABS sensor.
With an adjustable wrench, disconnect the ABS sensor cable from the strut.
Disconnect the wiring harness and the ABS sensor.
4. Install the new ABS sensor
Plug the ABS sensor into the wiring harness and anchor the cable back down using an adjustable wrench.
Bolt down the ABS sensor to the hub.
5. Reinstall the brakes
Mount the brake rotors.
Put the caliper brackets back on and bolt down with a 21 mm socket.
Torque the caliper brackets to 110 ft lbs
Using a large flat blade screwdriver to pry open the caliper enough to get it mounted onto the caliper bracket.
Torque the 18 mm caliper bolts to 85 ft lbs.
6. Put the wheel back on
Put the wheel on and hand tighten the lug nuts.
Lower the vehicle
Use a star pattern to torque the lug nuts to 120 ft lbs.
Brought to you by 1AAuto.com, your source for quality replacement parts and the best service on the internet.
I'm Mike Green. I'm one of the owners of 1A Auto. I want to help you save time and money repairing and maintaining your vehicle. I'm going to use my 20 plus years of experience restoring and repairing cars and trucks like this to show you to correctly to install parts from 1AAuto.com. The right part installed correctly, that's going to save you time and money. Thank you, enjoy the video.
In this video, we are going to replace the front ABS harness on this 2002 GMC Sierra, same as most of these vehicles from '99 to '06. These can get broken, you can hit an obstruction, and the harness can get torn or they can just sometimes wear out and break over time. We shall need our 18, 21 and 22 mm sockets with the ratchet. You may need a pipe or breaker bar for some leverage on some of those bolts that are little difficult; Allen wrench and adjustable wrench, large flat plate screwdriver, and a pair of pliers.
Start out by using a 21 mm socket and just loosening the plastic retainers and taking off the hubcap if you have the style wheels. You want to raise and secure the vehicle if you are not working with air tools like I'm, then loosen the lug nuts for the wheels on the ground, then raise it with a jack, support it with a jack stand and remove the lug nuts rest of the way and remove the tire.
Okay we are going to remove the caliper, which is two 18 mm bolts; one there and one up here. I'm going to speed things along here and you can see I'm able to get those bolts with the ratchet on. You might want to use a pipe to give you a little extra leverage. I will show that in the next step, and then I actually go to the air tools to get the bolts off the rest of the way. Then I pick a screwdriver; put it in this hole in the caliper here; prying out the caliper. This forces the piston back while I get the caliper up and off. Then you got to take off this caliper bracket, which involves taking off these two bolts here.
Okay fast forward again. You all notice I have a pipe there, that's for some extra leverage on these bolts. These are 21 mm bolts in size and we will just fast forward through me taking them out. Then you are going to pull your brake rotor right off as well. The brake rotor has threaded holes here. If you couldn't get it off, it doesn't pull off, you want to use an M10 or M12 7 cm long bolt and you put the bolts in there and that forces the rotor off. Here I'm just taking one of my bolts and my caliper bracket and just threading it in on a few turns and then putting my brake caliper back on just kind of threading that bolt in and putting on a few turns. This just puts the caliper on a safe place while I'm working.
You need to get here; here is your sensor, the end of your sensor right here. Now I'm going to take an Allen wrench, put it in that bolt that's holding the sensor or adjustable wrench. This whole things is leveraged on this power wrench. This is the bolt, pair of pliers where I want the sensor, pull it up and out. Pull the sensor up and out. Pull this off for a second, put your sensor right up through there. Now using one of these pair of pliers and force these clips out. There is one more up here. It comes out and then right here near your shocks. Right up here near your shocks for the connectors, use a screw driver, pry the pin up and out and very carefully cut the bottom side and over here, the bottom side, all right unplug it. I think here is my old sensor. New sensor from 1A Auto you can see has all the same hooks and connectors.
Start up here and push it back in just like before, put this heat shield down around it, pick the shock, wrap the heat shields down, press it down in. Press that in. Here this pin didn't actually come out. That probably needs a little punch. Punch that through. Down in, that goes in there. Put that right through; just make sure you clean the sensor off. Guide that sensor into the hole with my thumb and then down in. Allen wrench and the screw. I'll just speed it up here as we screw in with the Allen wrench and then use the adjustable wrench to tighten it up and continue with the fast motion as we take that bolt that was holding the caliper, put the caliper up, and put the bracket back on, thread the bolts in and then preliminarily tighten them.
Torque these to a 110 foot pounds and put the brake shoes back on here. Now bring that calipers down and start those long bolts in. You want to make sure that those are nice and clean and have some grease on them because the caliper needs to slide back and forth on those bolts. Torque these caliper bolts to 85 food pounds. Fast forward again here as we hoist the tire up on. You want to start all lug nuts by hand first and then I just use the air ratchet or the impact wrench just to tighten up the lug nuts preliminarily. I don't tighten them all the way up until the vehicle is on the ground.
The wheel works to 120 foot pounds. Again we will speed up here and you can see that kind of cross into the opposite lug nuts and then afterwards I actually go around one by one and just make sure they are all torqued. Okay now put the cap back on and then please stay with it for one more very important step. Make sure that whenever you are taking your brake spare parts that before your drive your vehicle, you pump your brakes so much times and then do test it up before road testing it.
We hope this helps you out. Brought to you by www.1AAuto.com, your source for quality replacement parts and the best service on the internet. Please feel free to call us toll free, 888-844-3393; we are the company that serves you on the internet and in person.
BSA71230
In Stock
Product Reviews
Loading reviews
4.42/ 5.012
12 reviews
5 Stars
4 Stars
3 Stars
2 Stars
1 Star
8
3
0
0
1
Fit and function were spot on.
Steve
April 24, 2017
As expected, arrived on time and were perfect replacements.
Perfect Fit - Easy Change out
cynthia
February 24, 2018
Excellent fit, quick shipping. Video helpful - but could use a section on what to do if the old sensor tip stays in the wheel. Heat up a screw or bolt slightly larger than the copper windings, screw it into the cap still in your wheel about 1/2 way...... quench with cold water and use the screw or bolt to wiggle the cap free!!!!
Worked as expected
Eric
April 23, 2018
Fit right in where the old ones were no problem.
Right size right product
Great!
Phong
August 27, 2018
Bought it n didn't need it. Wish I could just return it like goin to the local store. I'll just sale it online to get my money back.
I fixed the current issues without using these new item.
Fixed Abs activation
B
April 7, 2019
Purchased the speed sensors at a great price. They were easy to install and corrected my low speed abs activation. Some people say to replace the whole hub but in my case the sensor alone did the trick. GMC 2500 140000 mi
Fixed the issue
Christopher
April 21, 2019
Sensors worked perfect. Abs code gone, no issues and came with plastic clips
PArt worked fine but...
B
September 5, 2019
The part was a exact match for my truck and eliminated the problem I was having, but it would have been nice if they would have provided a new screw to mount the new sensor. The old screws were pretty corroded but we had to reuse them anyway because new screws were not provided.
Have BRAKES!
Todd
October 21, 2019
Thank you 1aauto for the fast delivery of the wheel speed sensors for my 2002 Silverado! Fast delivery and easy install. Can drive the truck and dont have to worry about anti-lock brakes coming on when not slipping!!!
Just what the doctor ordered
L
December 9, 2019
These were just what I needed to cure faulty ABS activation. They fit perfectly and the price is great.
Thanks 1A AUTO!
Aftermarket parts do not fit properly.
T
February 5, 2020
I ordered the wheel speed sensors (WSS) for my truck. Website said they fit my make and model. When the WSSs arrived and I started my job. What I pulled off did look exactly like what I bought. They did not fit. I could not get them to fit into my wheel bearing. Turns out the new ones were sent with a larger O-ring that made them not fit.
I tried to swap O-rings from the WSSs I took off, that worked.
One WSS was 100 ohms less that the other one. When I tested before start-up. I was not happy with this.
When I started up my truck and cleared my computer with my scanner. Codes popped right back up saying both WSSs are not reading.
I have not tried to return the parts for my money back because they are on my truck now, and the 1A Auto website states they do not refund money on electronic parts.
I had module master test my EBCM, they said it is fine for voltage out to the WSSs. When I test at the plug where the WSSs plug into I have the same voltage. I am going to buy my new WSSs from
Worked well
Robert
February 27, 2020
Worked well. Didnt fit exactly in the hub like old one but it worked good
Perfect!!!
Francis
December 20, 2021
Great product, OEM fit, couldnt ask for more!
Customer Q&A
Does this fit a standard 1500 Silverado not an HD?March 21, 2016
Jamie M
10
no
March 22, 2016
Brian F
What brand are these?January 27, 2020
Justin W
10
Gm ac delco
January 27, 2020
T H
10
Thank you for your inquiry. These are our 1A Auto in-house brand parts. 1A Auto's house brand parts are manufactured by various aftermarket companies specifically for us and built to your vehicle's exact OEM specifications. Please let us know if you have any other questions.
January 27, 2020
A C
Will these fit an 02 GMC Duramax with a 4 inch lift?June 29, 2022
Ray R
10
We are unable to gurantee fitment of any of our parts if the vehicle has been modified with a lift.
June 29, 2022
Jessica D
10
Yes it should fit just fine I installed mine on my 05 with a 6" lift.
October 18, 2022
Lorenzo G
Customer service
877-844-3393
Monday - Friday 8:00am - 9:30pm ET Saturday - Sunday 8:00am - 4:30pm ET
GMC is a registered trademark of General Motors Company. 1A Auto is not affiliated with or sponsored by GMC or General Motors Company.See all trademarks.
Enter Vehicle Year Make Model
Specify your vehicle's year, make and model to guarantee fit.
Year
Make
Model
Options
Drivetrain
This part doesn’t fit a . Select from parts that fit.