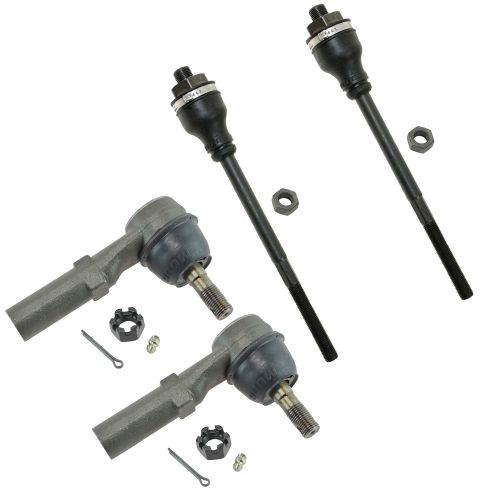
Kit Includes: (2) Front Outer Tie Rods (2) Front Inner Tie Rods
Quantity: 4 Piece
Install Tip: When replacing steering components, have a professional alignment performed afterwards. This ensures proper tracking and even tire wear.
Item Condition:New
Lifetime Warranty
This item is backed by our limited lifetime warranty. In the event this item should fail due to manufacturing defects during intended use, we will replace the part free of charge. This warranty covers the cost of the part only.
FREE Shipping is standard on orders shipped to the lower 48 States (Contiguous United States). Standard shipping charges apply to Hawaii and Alaska.
Shipping is not available to a P.O. Box, APO/FPO/DPO addresses, US Territories, or Canada for this item.
Expedited is available on checkout to the United States, excluding Alaska, Hawaii.
Final shipping costs are available at checkout.
How To Replace Inner Tie Rods 2001-10 GMC Sierra 2500 HD
How to Replace Tie Rods 2001-10 GMC Sierra 2500 HD Truck
Created on:
Tools used
Adjustable Wrench
Bearing Grease
Torque Wrench
Paper Towels
Jack Stands
Floor Jack
Grease Gun
Liquid Thread Locker
1. Removing the Inner Tie Rod
Raise and secure the vehicle
Measure the length of the inner tie rod to the outer tie rod with a tape measure
Measure this length at extension and in compression
Note those measurements
Clean grease from the inner tie rod fitting
Loosen the inner tie rod from the steering rack with an adjustable wrench
Hold the outer tie rod in place with a wrench
Loosen the inner tie rod from the outer tie rod with the adjustable wrench
Remove the tie rod at the steering rack
Turn the inner tie rod counterclockwise to remove it from the outer tie rod
2. Installing the New Inner Tie Rod
Apply thread lock to the threads on the steering rack side of the inner tie rod
Use a floor jack to keep the stabilizer link above the working area
Thread the inner tie rod on to the steering rack
Tighten the inner tie rod to between 70 – 80 foot-pounds of torque
Twist the nut onto the outer end of the inner tie rod by hand
Turn the tire in to push the inner tie rod into the outer tie rod
3. Adjusting the Inner Tie Rod
Measure the length of the inner tie rod to the outer tie rod with a tape measure
Turn the inner tie rod with the adjustable wrench until its length is the noted length from Step 1
4. Greasing the Fittings
Use a grease gun to add grease to the inner tie rod fitting
Add grease until the tie rod boot starts to change shape
Add grease to other fittings as necessary
Brought to you by 1AAuto.com, your source for quality replacement parts and the best service on the Internet.
Hi, I'm Mike from 1A Auto. I hope this how-to video helps you out, and next time you need parts for your vehicle, think of 1AAuto.com. Thanks.
In this video, I'm going to replace an inner tie rod on this 2002 GMC Sierra. This procedure is the same for millions of GMC Sierra, Chevy Silverado, 1500 and 2500, 3500, pretty much all the same basic procedure. You'll need a couple of large adjustable wrenches. I found those work fine. You don't really need the exact size. Two large adjustable wrenches will work.You'll also need a tape measure and you'll need a grease gun with grease, and we do recommend that you have your vehicle aligned after a repair like this.
Here you can see, I have the vehicle up on a lift. Here is my inner tie rod running from here to here. This is the outer tie rod. You could see, I pull this boot down and I pull and what I'm looking at is basically the relationship of here to here and I can see some movement in here. I want to replace this. What I'm going to do is, I'm going to pull out, then I'm going to measure from there to there. Just a shade under ten inches, 9 and 15/16"?. Now, I'm going to pull it back in, and check here. It's about 9 and 7/8"?. When I put this back together, I'm going to set this right between 9 and 7/8"? and 9 and 15/16"?. I'm going to pull it apart. I'm just going to clean this off.
Take a nice big adjustable wrench. I'm loosening that up. On this end, I'm going to put a wrench on my outer tie rod just to hold it in place. We'll get that loosened up. I'm just going to speed up here. We loosened up the nut that's close to the center steering rack and then we loosened up the tie rod where it connects the outer tie rod. Take that nut off for the center steering first and then just turn the whole entire inner tie rod counter clockwise and take it out of the outer tie rod.
Here's a new tie rod from 1A Auto. It's always a good idea to put some thread lock on the inside. If you have your vehicle up on a lift, or a jack, you'll want to jack it up just to get, make sure your stabilizer bars up and out of the way. Thread it in and then use a wrench and tighten this. This should be tightened to 74 foot-pounds. Anywhere between 70 and 80 foot-pounds. In this shot, what I didn't explain very clearly, you can see where that red arrow is. I have a jack underneath the suspension. It just helps lift it up so that the stabilizer bar isn't in the way when you start the tie rod into the center steering link. With this wrench, just pull it nice and tight. Now I'm going to assemble the outer end. I'm going to put this nut on. Then to bring this down on my tire and in. Make sure it's going together straight. If you remember our measurement, basically, we want to be right at 9 and 31/32, so we've got a long way to go. I'm going to speed it up here as I keep using the wrench to turn the tie rod end into the outer tie rod end. I measured a couple of times just to see where I'm at. That is, it's just a little bit further than we want. Knock it off, right there. We've got our one wrench on here and then to tighten, hold on to the outer tie rod, taking that up nice and secure. Now make sure we grease the fitting. What I'm watching, I'm watching this boot here. Once that boot starts changing shape a little bit, I know the grease is in there. Then, while on here. I'm going to hit all my other grease spots as well.
We hope this helps you out. Brought to you by www.1AAuto.com, your source for quality replacement parts and the best service on the Internet. Please feel free to call us toll-free, 888-844-3393. We're the company that's here for you on the Internet and in person.
Tools used
Adjustable Wrench
35mm Socket
Torque Wrench
Tie Rod Fork
Jack Stands
Grease Gun
Rubber Mallet
Tie Rod Puller
7mm Socket
Lug Wrench
Ratchet
Floor Jack
Needle nose pliers
1. Remove the wheel
Loosen the lug nuts.
Raise and secure the vehicle.
Remove the wheel.
2. Remove the tie rod assembly
Remove the tie rod bolt.
Use a pickle fork and hammer to separate it.
Use an adjustable wrench and a fitted wrench to remove the tie rod assembly.
3. Install the new tie rod assembly
Adjust your new tie rod assembly to match the old one for a preliminary alignment.
Mount the new tie rod assembly and tighten it in with a wrench.
Tighten the nut on the tie rod stud to 65 ft lbs.
Install the cotter pin.
Use a 7 mm wrench to install the grease fitting
With a grease gun, grease the inner and outer joints.
4. Put the wheel back on
Preliminarily tighten the lug nuts.
Lower the car and torque the lug nuts to 120 ft lbs using a star pattern.
Brought to you by 1A Auto.com, your source for quality replacement parts and the best service on the internet. Hi, I'm Mike Green. I'm one of the owners of 1A Auto. I want to help you save time and money repairing and maintaining your vehicle. I'm going to use my 20-something years experience restoring and repairing cars and trucks like this, to show you the correct way to install parts from 1A Auto.com. The right parts, installed correctly, that's going to save you time and money. Thank you, and enjoy the video.
In this video I'm going to show you inner and outer tie rod replacement. This truck actually just needed the inner, but if you're replacing the inner, you might as well replace the outer as well. These tie rods fit this whole generation of GM trucks and SUV's - trucks from 98 - 06 and SUV's from 99 - 07. The tools you'll need are a jack and jack stands, a 22 mm lug wrench or socket and ratchet. You'll need either a 35 mm wrench or a 12 inch adjustable wrench that can go to 35 mm and then you'll need a second adjustable wrench as well, a tie rod removal tool, a grease gun, torque wrench, and pliers. The clunking noise was the inner tie rod. You can see here, when I shake the tire back and forth you'll see the inner tie rod move but that steering arm inside doesn't move, so you know there's play in there and it needs to be replaced.
Start out by raising and securing the vehicle on a jack stand and then remove your cap and wheel. We're going to remove this bolt. We've got a ratchet. If you don't have a breaker bar, use a ratchet and a piece of pipe. The bolt should come off pretty easily. Take the bolts off most of the way. I'm planning on replacing the outer tie rod as well, so I'm going to use a pickle fork to separate it. The best way to go about this is to get the wrench on it from underneath and push. That should break her free. I'm just going to speed up as I pull that out. You want to make sure that your outer tie rod spins with the wrench so the whole assembly spins and you don't shorten or lengthen the tie rod -- the inner and outer tie rod assembly.
There's your whole assembly out. If you can see here, I've got my old assembly, inner tie rod and outer tie rod, and I want to measure right from the edge of this surface here right to the end. I'm taking my new inner tie rod and outer tie rod and I put them together, just to compare. This will give you a good preliminary alignment. We'll put this nut a little closer. We can put it together now. It will be a good preliminary alignment until you can get your vehicle to a shop where you can get a real alignment.
I'm just leaving my nut right there and spinning my outer tie rod off. The nut marks the place where your tie rod was and then taking off that outer tie rod just makes it easier to get the inner one on. That allows me put my inner tie rod on. Speed it up here as I use the wrench to tighten the tie rod up. Then I can put my outer tie rod right back on and go right up to the nut. Then I'll just fast-forward here as I put that outer tie rod back on the inner tie rod. Now I'm just taking the nut or just getting the outer tie rod in place. Take the nut off the new tie rod, and I'm just going to get some of the debris off the steering knuckle there, and then you can push on the stud on the tie rod and get it lined up with the steering knuckle, and then push it up and in, and start your nut back on.
We'll tighten this up to 65 foot-pounds. Pull a little tighter here and we can get this cotter pin through. We'll fast-forward here as we install the cotter pin and bend the end over and then use a 7 mm wrench and install our grease fitting. We'll take a wrench screw up here. The other one holds the outer tie rod and just tighten up the block nut. Now you want to use a grease gun and grease both the joint for the outer tie rod and the inner tie rod.
Use some more fast-forward here. As you put the wheel and tire back on, start all the lug nuts one by one by hand first, then use your wrench to preliminary tighten them, then you can lower the vehicle back down on the ground, torque the lug nuts to 120 foot-pounds. I'm using a crossing pattern and then I do it one more time, go around all eight and make sure they're tight. Then you can put your center cap back on and you should be all set.
We hope this helps you out. Brought to you by www.1AAuto.com, your source for quality replacement parts and the best service on the internet. Please feel free to call us toll-free, 888-844-3393. We're the company that's here for you on the internet and in person.
MGSFK00046
In Stock
Product Reviews
Loading reviews
5.00/ 5.04
4 reviews
5 Stars
4 Stars
3 Stars
2 Stars
1 Star
4
0
0
0
0
It's rare to find this level of ease and dependability with vendors these days.
I
December 28, 2020
My parts where reasonably priced. I ordered my parts and received them on time and in good condition. I did not need a couple of them. I set up an easy online return with an email confirmation and return at no cost to me. You all provide customer service the way most reputable vendors did back in the day, with respect and reliability. These days that's a rarity! Couldn't be happier, thank you 1A. I'll be repeating my business.
1A takes care of customers
M
April 4, 2021
The ordering process was simple. It was easy to find the parts guaranteed to fit my truck and in the brand(s) that I trust. I received the parts as scheduled but one of the boots on the upper ball joint had been damaged. I contacted support and the replacement was on its way immediately. Fantastic service!
Very satisfied
Joe
November 7, 2021
Quality products
1A Auto cant be beat
Edward
November 11, 2021
Moog parts always work out well.
1A Auto has excellent videos.
Parts well priced, delivered quickly.
Customer Q&A
Do these tie rods have grease zerks?October 18, 2022
John D
10
Yes
October 18, 2022
Mike G
10
Yes they do
October 18, 2022
SHANE L
10
Hello, yes this kit has grease fittings.
October 18, 2022
Ricale A
Customer service
877-844-3393
Monday - Friday 8:00am - 9:30pm ET Saturday - Sunday 8:00am - 4:30pm ET
Enter Vehicle Year Make Model
Specify your vehicle's year, make and model to guarantee fit.
Year
Make
Model
Options
Drivetrain
This part doesn’t fit a . Select from parts that fit.