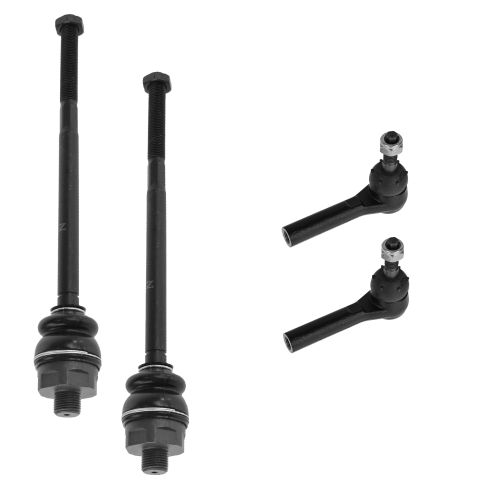
Kit Includes: (2) Front Outer Tie Rods (2) Front Inner Tie Rods
Specification
Side Location
Driver & Passenger Side
Location
Front
Inner & Outer
Install Tip: When replacing steering components, have a professional alignment performed afterwards. This ensures proper tracking and even tire wear.
Our steering and suspension components are pre-greased and sealed for long life and do not require the extra maintenance typically required by greaseable versions.
Item Condition:New
Attention California Customers:
WARNING: This product can expose you to chemicals including Lead and Lead Compounds, which are known to the State of California to cause cancer, and birth defects or other reproductive harm. For more information, go to www.P65Warnings.ca.gov.
Lifetime Warranty
This item is backed by our limited lifetime warranty. In the event that this item should fail due to manufacturing defects during intended use, we will replace the part free of charge. This warranty covers the cost of the part only.
FREE Shipping is standard on Orders shipped to the lower 48 States (Contiguous United States). Standard shipping charges apply to Hawaii, Alaska and US Territories. Shipping is not available to Canada.
Expedited is available on checkout to the United States, excluding Alaska, Hawaii and US Territories as well as P.O. Boxes and APO/FPO/DPO addresses. Final shipping costs are available at checkout.
How to Replace Tie Rods 2001-10 GMC Sierra 2500 HD Truck
How to Replace Front Inner Tie Rod 1999-2007 Chevy Silverado
How To Replace Outer Tie Rod 1999-2007 Chevy Silverado 2500
How To Replace Inner Tie Rods 2001-10 GMC Sierra 2500 HD
How to Replace Front Inner Tie Rod 2000-06 GMC Yukon
How To Replace Inner Tie Rod 1999-2007 Chevy Silverado 2500
How to Replace Outer Tie Rod 2003-2021 Chevrolet Express
How to Replace Inner Tie Rods 2000-06 Chevy Tahoe 2nd Generation
Created on:
Tools used
Adjustable Wrench
35mm Socket
Torque Wrench
Tie Rod Fork
Jack Stands
Grease Gun
Rubber Mallet
Tie Rod Puller
7mm Socket
Lug Wrench
Ratchet
Floor Jack
Needle nose pliers
1. Remove the wheel
Loosen the lug nuts.
Raise and secure the vehicle.
Remove the wheel.
2. Remove the tie rod assembly
Remove the tie rod bolt.
Use a pickle fork and hammer to separate it.
Use an adjustable wrench and a fitted wrench to remove the tie rod assembly.
3. Install the new tie rod assembly
Adjust your new tie rod assembly to match the old one for a preliminary alignment.
Mount the new tie rod assembly and tighten it in with a wrench.
Tighten the nut on the tie rod stud to 65 ft lbs.
Install the cotter pin.
Use a 7 mm wrench to install the grease fitting
With a grease gun, grease the inner and outer joints.
4. Put the wheel back on
Preliminarily tighten the lug nuts.
Lower the car and torque the lug nuts to 120 ft lbs using a star pattern.
Brought to you by 1A Auto.com, your source for quality replacement parts and the best service on the internet. Hi, I'm Mike Green. I'm one of the owners of 1A Auto. I want to help you save time and money repairing and maintaining your vehicle. I'm going to use my 20-something years experience restoring and repairing cars and trucks like this, to show you the correct way to install parts from 1A Auto.com. The right parts, installed correctly, that's going to save you time and money. Thank you, and enjoy the video.
In this video I'm going to show you inner and outer tie rod replacement. This truck actually just needed the inner, but if you're replacing the inner, you might as well replace the outer as well. These tie rods fit this whole generation of GM trucks and SUV's - trucks from 98 - 06 and SUV's from 99 - 07. The tools you'll need are a jack and jack stands, a 22 mm lug wrench or socket and ratchet. You'll need either a 35 mm wrench or a 12 inch adjustable wrench that can go to 35 mm and then you'll need a second adjustable wrench as well, a tie rod removal tool, a grease gun, torque wrench, and pliers. The clunking noise was the inner tie rod. You can see here, when I shake the tire back and forth you'll see the inner tie rod move but that steering arm inside doesn't move, so you know there's play in there and it needs to be replaced.
Start out by raising and securing the vehicle on a jack stand and then remove your cap and wheel. We're going to remove this bolt. We've got a ratchet. If you don't have a breaker bar, use a ratchet and a piece of pipe. The bolt should come off pretty easily. Take the bolts off most of the way. I'm planning on replacing the outer tie rod as well, so I'm going to use a pickle fork to separate it. The best way to go about this is to get the wrench on it from underneath and push. That should break her free. I'm just going to speed up as I pull that out. You want to make sure that your outer tie rod spins with the wrench so the whole assembly spins and you don't shorten or lengthen the tie rod -- the inner and outer tie rod assembly.
There's your whole assembly out. If you can see here, I've got my old assembly, inner tie rod and outer tie rod, and I want to measure right from the edge of this surface here right to the end. I'm taking my new inner tie rod and outer tie rod and I put them together, just to compare. This will give you a good preliminary alignment. We'll put this nut a little closer. We can put it together now. It will be a good preliminary alignment until you can get your vehicle to a shop where you can get a real alignment.
I'm just leaving my nut right there and spinning my outer tie rod off. The nut marks the place where your tie rod was and then taking off that outer tie rod just makes it easier to get the inner one on. That allows me put my inner tie rod on. Speed it up here as I use the wrench to tighten the tie rod up. Then I can put my outer tie rod right back on and go right up to the nut. Then I'll just fast-forward here as I put that outer tie rod back on the inner tie rod. Now I'm just taking the nut or just getting the outer tie rod in place. Take the nut off the new tie rod, and I'm just going to get some of the debris off the steering knuckle there, and then you can push on the stud on the tie rod and get it lined up with the steering knuckle, and then push it up and in, and start your nut back on.
We'll tighten this up to 65 foot-pounds. Pull a little tighter here and we can get this cotter pin through. We'll fast-forward here as we install the cotter pin and bend the end over and then use a 7 mm wrench and install our grease fitting. We'll take a wrench screw up here. The other one holds the outer tie rod and just tighten up the block nut. Now you want to use a grease gun and grease both the joint for the outer tie rod and the inner tie rod.
Use some more fast-forward here. As you put the wheel and tire back on, start all the lug nuts one by one by hand first, then use your wrench to preliminary tighten them, then you can lower the vehicle back down on the ground, torque the lug nuts to 120 foot-pounds. I'm using a crossing pattern and then I do it one more time, go around all eight and make sure they're tight. Then you can put your center cap back on and you should be all set.
We hope this helps you out. Brought to you by www.1AAuto.com, your source for quality replacement parts and the best service on the internet. Please feel free to call us toll-free, 888-844-3393. We're the company that's here for you on the internet and in person.
Tools used
Side Cutters
Torque Wrench
Gloves
Hammer
Rust Penetrant
Wheel Chocks
Copper Anti-Seize
Floor Jack
Safety Glasses
Pliers
22mm Socket
Now one of the first things you're going to want to do before you start any job is to make sure you're safe as possible. You want to have safety glasses and hand protection at all times. The next thing you're going to want to do is safely raise and support your vehicle so that your wheel is off the ground. Next, if there's a center cap, remove the plastic center cap and that'll expose your lug nuts. Remove all six using a 22-millimeter socket. Remove your wheel.
Now that we have a nice clear view of our tie rods, I'm going to spray down this area right here. This is the adjustment area. Use a little bit of penetrant. That's going to help you along. Using some nice long pliers, I'm going to grab right onto this and I'm going to turn it clockwise. That'll break free this jam nut. Okay, that broke free. Let's remove the nut that holds that outer tie rod end to the knuckle. Now we're going to hit right here on the knuckle to break our outer tie rod end free from the knuckle.
Turn your outer tie rod end counter-clockwise and count the amount of times it turns around as you remove it. One, two, three, and so on. Okay. Write down that corresponding number so you can remember. Now it's going to be time to get the inner tie rod end off of here. Here's the new inner tie rod end. And if you were to look right along this edge right here, that's the area we're going to need to grab onto, and then turn this counter-clockwise to break it free and eventually remove it. So we'll come right under here with our nice long pliers and get it off of there. There we go.
There it is friends. Now it's going to be time to install our new inner tie rod end. You might notice that there's no grease fitting to be able to grease this. Really there is. The grease is going to come right through that hole right there and that'll happen through here, starting at this point right here at this fitting. Put grease here, it comes right through and then of course it fills up the boot on the inner tie rod end. All right. I put some thread locker on here. I'm just going to go ahead and start this thing by hand. Now that we have that, as far as we can get it by hand, let's go ahead and snug it up with our pliers. Bottomed out. Just give it a teeny bit more. Awesome. Let's remove that jam nut. Let's put a little bit of copper never seize on the inner tie rod end threads, and then we'll just work that jam nut up the inner tie rod end quite a bit here. Now that we have the threaded area coded, we have our outer tie rod end, let's go ahead and put that on. And we're going to count it in the same amount of threads that we counted the original one off. That was one, two, three, and so on.
Okay? Just bring this so it's close. Put that node off of there. Put this on there. Let's bottom that out. Now we're going to torque this nut to 48 foot-pounds. All right. So now that we have that torqued, we need to pay special attention to where the slot on the castle nut lines up with the hole in the stud. If it doesn't line up, you need to continue tightening until it does. Okay. So that looks pretty good. Let's try it. That slides right through, just pin it over. The cotter pin is going to ensure that there's no way that this nut can come loose. Now it's going to be time to tighten up your jam nut. To tighten this, we're going to turn it counter-clockwise. When you torque it, you would want to torque it to 37 foot-pounds if you have the ability.
Okay. Just make sure that it's nice and snug. By the time you're finished, make sure your outer tie rod end is nice and parallel to the ground or at least as parallel as it can be. Now it's going to be time to get the grease fitting out of here. Use your 8-millimeter. There it is. Let's clean off around the area. Grab your new grease fitting. We'll start it right in there by hand, and then we'll snug it up, nice and tight. Let's give it a little grease
Now let's get the wheel back up on here. Okay. Now with the wheel barely on the ground so it can't spin, we're going to torque the lug nuts to 140 foot-pounds. Torqued. If you have a center cover, put it on there now. Now that you've finished your service, go ahead and take it for a road test and make sure you get it down to a local reputable alignment shop.
Tools used
21mm Socket
Pickle Fork
Metal Cutters
Torque Wrench
Hammer
Rust Penetrant
Pry Bar
7/8 Inch Socket
7/8 Inch Wrench
22mm Socket
Tools used
Adjustable Wrench
Bearing Grease
Torque Wrench
Paper Towels
Jack Stands
Floor Jack
Grease Gun
Liquid Thread Locker
1. Removing the Inner Tie Rod
Raise and secure the vehicle
Measure the length of the inner tie rod to the outer tie rod with a tape measure
Measure this length at extension and in compression
Note those measurements
Clean grease from the inner tie rod fitting
Loosen the inner tie rod from the steering rack with an adjustable wrench
Hold the outer tie rod in place with a wrench
Loosen the inner tie rod from the outer tie rod with the adjustable wrench
Remove the tie rod at the steering rack
Turn the inner tie rod counterclockwise to remove it from the outer tie rod
2. Installing the New Inner Tie Rod
Apply thread lock to the threads on the steering rack side of the inner tie rod
Use a floor jack to keep the stabilizer link above the working area
Thread the inner tie rod on to the steering rack
Tighten the inner tie rod to between 70 – 80 foot-pounds of torque
Twist the nut onto the outer end of the inner tie rod by hand
Turn the tire in to push the inner tie rod into the outer tie rod
3. Adjusting the Inner Tie Rod
Measure the length of the inner tie rod to the outer tie rod with a tape measure
Turn the inner tie rod with the adjustable wrench until its length is the noted length from Step 1
4. Greasing the Fittings
Use a grease gun to add grease to the inner tie rod fitting
Add grease until the tie rod boot starts to change shape
Add grease to other fittings as necessary
Brought to you by 1AAuto.com, your source for quality replacement parts and the best service on the Internet.
Hi, I'm Mike from 1A Auto. I hope this how-to video helps you out, and next time you need parts for your vehicle, think of 1AAuto.com. Thanks.
In this video, I'm going to replace an inner tie rod on this 2002 GMC Sierra. This procedure is the same for millions of GMC Sierra, Chevy Silverado, 1500 and 2500, 3500, pretty much all the same basic procedure. You'll need a couple of large adjustable wrenches. I found those work fine. You don't really need the exact size. Two large adjustable wrenches will work.You'll also need a tape measure and you'll need a grease gun with grease, and we do recommend that you have your vehicle aligned after a repair like this.
Here you can see, I have the vehicle up on a lift. Here is my inner tie rod running from here to here. This is the outer tie rod. You could see, I pull this boot down and I pull and what I'm looking at is basically the relationship of here to here and I can see some movement in here. I want to replace this. What I'm going to do is, I'm going to pull out, then I'm going to measure from there to there. Just a shade under ten inches, 9 and 15/16"?. Now, I'm going to pull it back in, and check here. It's about 9 and 7/8"?. When I put this back together, I'm going to set this right between 9 and 7/8"? and 9 and 15/16"?. I'm going to pull it apart. I'm just going to clean this off.
Take a nice big adjustable wrench. I'm loosening that up. On this end, I'm going to put a wrench on my outer tie rod just to hold it in place. We'll get that loosened up. I'm just going to speed up here. We loosened up the nut that's close to the center steering rack and then we loosened up the tie rod where it connects the outer tie rod. Take that nut off for the center steering first and then just turn the whole entire inner tie rod counter clockwise and take it out of the outer tie rod.
Here's a new tie rod from 1A Auto. It's always a good idea to put some thread lock on the inside. If you have your vehicle up on a lift, or a jack, you'll want to jack it up just to get, make sure your stabilizer bars up and out of the way. Thread it in and then use a wrench and tighten this. This should be tightened to 74 foot-pounds. Anywhere between 70 and 80 foot-pounds. In this shot, what I didn't explain very clearly, you can see where that red arrow is. I have a jack underneath the suspension. It just helps lift it up so that the stabilizer bar isn't in the way when you start the tie rod into the center steering link. With this wrench, just pull it nice and tight. Now I'm going to assemble the outer end. I'm going to put this nut on. Then to bring this down on my tire and in. Make sure it's going together straight. If you remember our measurement, basically, we want to be right at 9 and 31/32, so we've got a long way to go. I'm going to speed it up here as I keep using the wrench to turn the tie rod end into the outer tie rod end. I measured a couple of times just to see where I'm at. That is, it's just a little bit further than we want. Knock it off, right there. We've got our one wrench on here and then to tighten, hold on to the outer tie rod, taking that up nice and secure. Now make sure we grease the fitting. What I'm watching, I'm watching this boot here. Once that boot starts changing shape a little bit, I know the grease is in there. Then, while on here. I'm going to hit all my other grease spots as well.
We hope this helps you out. Brought to you by www.1AAuto.com, your source for quality replacement parts and the best service on the Internet. Please feel free to call us toll-free, 888-844-3393. We're the company that's here for you on the Internet and in person.
Tools used
Adjustable Wrench
Torque Wrench
Hammer
Socket Extensions
Rust Penetrant
Jack Stands
18mm Socket
7/8 Inch Wrench
Socket Driver
Wheel Chocks
Ratchet
Floor Jack
1/2 Inch Impact Gun
22mm Socket
You want to keep in mind when you're doing this job after you're done, you're going to want to go to a local garage and have the vehicle aligned so you don't have premature tire wear. Take the center cap off. I'll just use a straight blade screwdriver, just get behind here, slide it off. Take the lug nuts off. Use a 22-millimeter socket. Gonna take the wheel off. [inaudible 00:00:34] off this jam nut. I'm going to use a 7/8 wrench. And just take some rust penetrant, this thing is a little bit rusty so let that soak a little bit. Gonna take a 18-millimeter socket, take this nut off. And take a hammer and just hit the bottom of the tie rod to release it from the knuckle. Just like that.
Now when I take off the tie rod, just count how many turns you have. So 1, 2, 3, 4, 5, 7...21, 22 and write that number down. Now I'm going to take a large adjustable wrench and loosen up the inner tie rod end. And loosen this up and just slide it off. Take a little thread locker, put it on the threads before you put the new one on and line it up. And then use my adjustable wrench to tighten this up. If you have the ability to use a torque wrench and torque this, you want to torque this to 74 foot-pounds. And take the outer tie rod, one, two, and then count the turns that you counted before. Three...21, 22. Take the jam nut not off...I mean the castle nut off and slide it in the knuckle. Slide the stud part into the knuckle. Put the nut on. Just gonna use a pry bar, pry down on the outer tie rod in to prevent the stud from spinning, and just snug this up a little bit. Use the 18-millimeter socket. And torque this to 37 foot-pounds. And if the hole doesn't line up for the cotter pin, just tighten the castle nut until it lines up. Little more. Should be good. Put the cotter pin through. And take my cutters and just bend this over then just trim the excess.
Tighten up this jam nut. I'm going to use a 13/16 wrench, and if you have the ability to torque it, torque it to 36 foot-pounds. There's a grease fitting right here. Just take a grease gun and give it a couple pumps. And I really give it a couple of pumps until I see the boot move a little bit. And that's good. Put the wheel back on. And the lug nuts. And now I'm gonna torque these lug nuts in a star pattern or cross pattern to 140 foot-pounds to tighten the wheel down evenly. And just go around again, double-check. And put the center cap on.
Tools used
Adjustable Wrench
Torque Wrench
Hammer
Rust Penetrant
Liquid Thread Locker
Brake Parts Cleaner
7/8 Inch Wrench
21mm Socket
Pickle Fork
Metal Cutters
Paper Towels
7/8 Inch Socket
Cloth Rags
22mm Socket
Tools used
21mm Socket
Torque Wrench
Hammer
22mm Wrench
Anti-Seize Grease
1/2 Inch Impact Gun
22mm Socket
Tools used
Adjustable Wrench
Torque Wrench
Hammer
Rust Penetrant
Pry Bar
18mm Socket
Grease Gun
7/8 Inch Wrench
Pickle Fork
Side Cutters
8mm Socket
22mm Wrench
Drill
Cotter Pin
Ratchet
1/2 Inch Impact Gun
22mm Socket
Before you start, you wanna be aware that after you're done this job, you're gonna wanna go to an alignment specialist so that you can have the vehicle aligned so you don't wear out the tires prematurely.
I'm gonna remove the wheel. Use a 22-millimeter socket. Take the lug nuts off. And take the wheel off. I'm gonna loosen up the jam nut. You can use a 22-millimeter wrench or a 7/8 wrench. Just get that loose. That's good. I'm just gonna spray a little rust penetrant on here. And use an 18-millimeter socket, take this nut off. And if the nut doesn't come off and the stud starts spinning, you can use an 8-millimeter socket to hold that stud from spinning, and then just use the wrench to take the nut off. Now you can take a hammer and just give a tap on the bottom of the tie rod, or take a pickle fork and separate it this way. Just if you use a pickle fork, it's probably gonna rip the boot right here. I'm just gonna give it a hit right here. There we go. And now we're gonna take the outer tie rod off. As we unscrew this, just count the threads. So 1, 2, 3, 4, 23, 24. So write that number down. And when you go to put it back together, you're gonna count them to put the other one in the same position that that one was in.
Now I'm gonna take off the inner tie rod end. I'm gonna use a large adjustable wrench because I don't have a wrench that's big enough to fit this. Slide this over and loosen it up. And eventually we'll get that off. Take the inner tie rod end and get this started. Now we're gonna tighten this up with the adjustable wrench. If you have the ability to torque this, you wanna torque this to 74-foot-pounds. Just do the best you can. That's good. Then you wanna take a grease gun and hook it up to this grease fitting and give it a couple pumps. You can do it until you start seeing the boot move a little bit, then you know there's plenty of grease in there. And take the new tie rod end. Get this started. Make sure you count 1, 2, 3, 4, 5, 22, 23, 24 and line this up in the knuckle. Take the castle nut, get that started. Now, what you can do is to prevent the stud from spinning, you can take a pry bar, just pry in between the knuckle and pry down on the tie rod, use an18-millimeter socket and tighten this up. And tighten this to 37-foot-pounds. And then just check to see where the hole is for the castle nut. And if you need to, you can snug it up a little bit more to get it to line up. And that that hole lines up. Now take the cotter pin, slide it through, actually we'll slide it through this way and take some side cutters and just bend it. Tap it out of the way, and then trim off the excess. And we'll snug up the jam nut and tighten that to 50-foot-pounds. Put the wheel back on and the lug nuts. I'm gonna take these lug nuts down to 140-foot-pounds, and I'm gonna do it in a cross pattern to tighten the wheel down evenly. Just go around again. Double-check.
PSA55119
In Stock
Product Reviews
Loading reviews
4.61/ 5.028
28 reviews
5 Stars
4 Stars
3 Stars
2 Stars
1 Star
24
1
1
0
2
Awesome!!
James
September 28, 2015
Parts were perfectly matched to my truck. No problems at all. Installation instructions were spot on!!! Local shops wanted anywhere from $900-$1100 to install. I did it for less than $100 plus front end alignment.
Kyle
November 15, 2017
The inner tie rods matched perfectly to my 2006 Chevy 1500, however the stud on the outer tie rod was thicker than the original. For this reason I was unable to use the outer tie rods because they would not fit through the hole. I needed to get my truck back on the road asap and ended up buying the outer tie rods locally.
04 duramax
Mark
April 22, 2018
Needed new inner outer tie rod. These are a great price. They were an exact fit. Absolutely no issues. Went right in.
Great resource
Mike
August 10, 2018
Great product availability and prices.
Thank you 1A Auto
Quick and accurate!
R
December 26, 2018
I'm finding out how quick A1 is anywhere. I had hit a deer in maine and could not afford to have a shop fix the damage, but with A1 Auto I made it to colorado on budget and on schedual with there next day shipping. I'm now comfortable with the accurracy of their parts, I'm used to always running to the napa to return a wrong or faulty part, but so far A1 Auto has been spot on and as always on point from check engine light to completion of the job!
5 atars
Paul
March 7, 2019
A little better description would be nice. I ended up calling the toll free number and got my question answered, so 5 stars.
Another great part from 1A auto
Bryan
March 18, 2019
Ordering was once again easy and shipping was fast. Part find was perfect.
Tie rods
John
June 9, 2019
These tie rods came in the mail fast and are the second order Ive placed from this company. I am very happy with the quality and would definitely recommend to friends.
Safety inspection requirements
David
August 17, 2019
My first got lost in the shipping but 1 A Auto hopped to it & I got the parts real quick ! I haven't installed the parts yet because I just received them yesterday & they looked to be a perfect match replacement !
Perfect fit
M
October 23, 2019
These went on my 2003 Chevy Silverado 2500hd and are perfect replacement parts.
05 gmc 3500 tie rods
Tomasz
December 4, 2019
Perfect fit great price
Tie rods
D
December 18, 2019
They were perfect and went together easy
Tie rods
Jonathon
January 13, 2020
They worked good
Good parts
M
January 29, 2020
Parts arrived early, which was cool. Then they were exactly what I expected, which was cool. Then they had a video showing how to install, just awesome! Appreciate what you guys do all while having some of the lowest prices and good parts, you rock.
Outstanding customer service
John
April 20, 2020
I would like to say the parts I ordered can individually wrapped and in excellent condition. What would have been better would have been ME making sure I didn't have upgraded parts on my vehicle and these parts would not fit.....BECAUSE OF MY IGNORANCE. I highly recommend 1A Auto's parts and videos are with their weight in gold in helping make this repair easy.
Best part store!
D
May 7, 2020
I wasnt sure at first about using 1a auto, but my expectations were exceeded! Price, quality, and and speedy shipping were all there. Love this site!
M
May 18, 2020
everything I order is correct and comes quickly. high quality parts. awsome company!
Chevy 2500 tie rods
Matt
August 28, 2020
Great product with fast shipping
Great company
Jacobe
September 23, 2020
Great company to buy auto parts from quality parts and fast online service..... ??
Inner & Outter Tie Rod
Adiel
October 19, 2020
Im happy with my purchase of these tie rods pair! I would highly recommend this product. Not only its more affordable then my local auto part stores but it comes with both passenger and driver side. Fast shipping! I will definitely be ordering more parts from 1AAuto.
This is the place to buy from
A
December 14, 2020
Everything went smoth package arrived looked up how to video so I had all the right tools and know how making this a easyand fast job thank you 1A AUTO
Bad parts
Tucker
May 6, 2021
I put my tie rods on and brought it to a shop to get realigned and the mechanic told me that the tie rods I just put on were junk cause they had play in them. Had to pay for new ones and pay for him to install the new ones.... not impressed
Loose in under a year.
Ray
May 12, 2021
Getting new tires and alignment done. And the tire shop does their normal inspection. And found the inner tie rods completely shot. These didn't even last a year. Hope the rest of this kit holds up.
Glenn
September 9, 2021
The inner and outer tie rod ends work great thanks
Nathan
September 28, 2021
Good
EJ
July 26, 2022
Fit perfectly
Good fit
Meredith
March 13, 2023
Fit and aligned well
Great product
Cory
April 13, 2023
Fit perfect for way to put in. You will need a huge wrench, my big adjustable worked
Customer Q&A
Will this fit the 1500 LS not HD?July 7, 2016
DJ V
10
NO
July 8, 2016
Brian F
Are these tie rods for both two and four wheel drive models?July 15, 2017
Paul M
10
Yes
July 15, 2017
Jeff B
I notice their no grease fittings on the outer tie rod. Are these already greased from 1A-Auto???January 28, 2018
Lawence B
10
Thanks for the question! These items are greased from the manufacturer and sealed. Thank you!
January 30, 2018
Adam G
Are these quick steer brand?April 16, 2018
Zachary R
10
Not sure of the manufacturer. I do know they work and fit perfectly. I have had them in my 2500HD for a year and a half without any issues.
April 17, 2018
Logan H
10
We have a few different aftermarket companies build these parts specifically for us, as our 1A Auto house brand. They are manufactured to the same OEM specifications as the original part that came with your vehicle. If you have any further questions, please don't hesitate to ask.
April 17, 2018
T I
Customer service
877-844-3393
Monday - Friday 8:00am - 9:30pm ET Saturday - Sunday 8:00am - 4:30pm ET
GMC is a registered trademark of General Motors Company. 1A Auto is not affiliated with or sponsored by GMC or General Motors Company.See all trademarks.
Enter Vehicle Year Make Model
Specify your vehicle's year, make and model to guarantee fit.
Year
Make
Model
Options
Drivetrain
This part doesn’t fit a . Select from parts that fit.