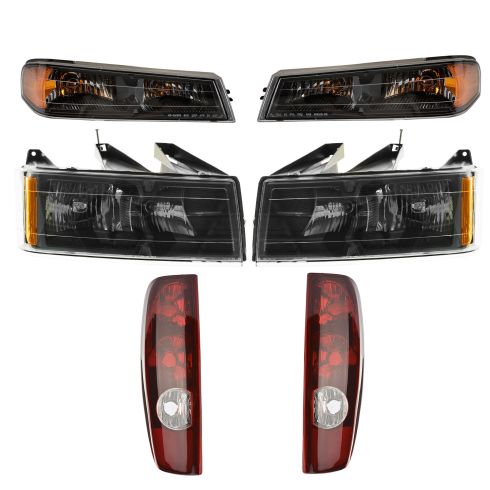
Complete Repair in One Purchase - Stop searching for parts individually and complete your repair with a customized kit or set from DIY Solutions.
High-Quality Parts from Trusted Brands - DIY Solutions' kits and sets are selected from the best automotive brands and include hard-to-find and even obsolete parts you may need for your vehicle.
Guaranteed Fit - DIY Solutions ensures its selected parts are quality-tested to guarantee fit and function.
Assemblies may include halogen or incandescent test bulbs that should be replaced before installation.
Features and Benefits
Direct Fit - No vehicle or wiring modification necessary
DOT, SAE, and FMVSS Compliant - Meets on-road use regulations
Matching set for a restored look
Item Condition:New
Attention California Customers:
WARNING: This product can expose you to chemicals including Chromium (Hexavalent Compounds), which is known to the State of California to cause cancer, and birth defects or other reproductive harm. For more information, go to www.P65Warnings.ca.gov
Lifetime Warranty
This item is backed by our limited lifetime warranty. In the event that this item should fail due to manufacturing defects during intended use, we will replace the part free of charge. This warranty covers the cost of the part only.
FREE Shipping is standard on orders shipped to the lower 48 States (Contiguous United States). Standard shipping charges apply to Hawaii and Alaska.
Shipping is not available to a P.O. Box, APO/FPO/DPO addresses, US Territories, or Canada for this item.
Expedited is available on checkout to the United States, excluding Alaska, Hawaii.
Final shipping costs are available at checkout.
How to Replace Parking Light 2004-12 Chevy Colorado
How to Replace Headlight 2004-12 Chevy Colorado
How to Replace Tail Light 2004-12 Chevy Colorado
Created on:
Tools used
Flat Blade Screwdriver
1. Servicing the Bulbs
Twist the bulb socket counterclockwise out of the light
Pull the bulb off of the socket
Push on the new bulb
Twist the bulb clockwise into the light
2. Removing the Headlight
Disconnect the headlight wiring harness
Pry out the clip on the side of headlight with a flat blade screwdriver
Pull the headlight out
Remove the headlight wiring harness
3. Installing the New Headlight
Insert the headlight wiring harness into place
Insert the headlight in place
Push the headlight into the clip
Connect the wiring harness
Brought to you by 1AAuto.com, your source for quality replacement parts and the best service on the Internet.
Hi, I'm Mike from 1A Auto. I hope this how-to video helps you out, and next time you need parts for your vehicle, think of 1AAuto.com. Thanks.
In this video, we're going to show you how to service the parking light, which is the light on top in the front. We're going to show you both if you just need to change one of the bulbs or the whole assembly if it's broken, clouded, or faded. The only tool you'll need is a flat blade screwdriver.
Okay, servicing these parking lights is pretty easy. The bulbs are straight forward. They turn counterclockwise to pull them out. Pull the bulb off the socket. Push the new one on. Twist the socket clockwise to lock it.
If you need to replace this entire assembly, you want to disconnect it right here. You'll take a screwdriver, and there's a little clip right over in here, so you can see that I'm pressing that over. Use a screwdriver, push that over, and the whole light comes right out. You want to take this harness off.
The light's in pretty good shape, so I'm going to put it back on.
To reinstall, you can see there's a little tab there. That tab goes right in behind and it snaps right into place.
We hope this video helps you out. Brought to you by www.1AAuto.com, your source for quality replacement parts and the best service on the Internet. Please feel free to call us toll-free, 888-844-3393. We're the company that's here for you on the Internet and in person.
Tools used
Socket Extensions
10mm Socket
Ratchet
1. Changing the Bulbs
Reach down behind the light and turn counterclockwise to release the socket.
Disconnect the light.
Reconnect the new light.
Twist it clockwise back into place.
2. Removing the Headlight Assembly
Disconnect the parking lights.
Push down on each of the four clips along the top of the grille.
Pull out along the sides and bottom of the grille to release the clips on the back.
Remove the two 10mm bolts at the top of the headlight.
Lift the light up and out.
Disconnect the harnesses.
3. Replacing the Headlight Assembly
Connect the harnesses to the new headlight assembly.
Line the headlight up and push it into place.
Replace the two 10mm bolts at the top of the headlight.
Push the clips for the grille and pull them from the body of the truck.
Push the clips into the grille.
Line up the grille and push it into place.
Reconnect the parking light harnesses.
Brought to you by 1AAuto.com. Your source for quality replacement parts and the best service on the Internet.
Hi, I'm Mike from 1A Auto. I hope this how-to video helps you out and next time you need parts for your vehicle, think of 1AAuto.com. Thanks. In this video, we're going to show you how to service a headlight on this 2004 Chevy Colorado. If you're just looking to change a bulb, we do show that to you. You won't need any tools. If you're looking to replace the headlight with a new headlight from 1A Auto because yours is chipped, faded, clouded or broken, the only tool you'll need is a 10 millimeter socket with a ratchet extension and actually a 10 millimeter wrench would work as well.
Servicing a headlight is fairly straightforward actually. Lets see if I can film this here. The lights are right down here. You just have to reach in and find the back side of the light. You can't see that at all. Turn counterclockwise and bring the light right out. Then disconnect, put the new light bulb back on. It's really kind of a feel thing. You can't see this pretty well. Put the light back into place and turn it clockwise to lock it in.
If you need to replace a headlight because it's broken, fogged or faded, what you want to do is first come in here and disconnect both your upper lights and pull that out like that. Same thing on the other side, disconnect and pull up out. Now you're going to have four clips. You see one right here. It looks like this has been apart already and some of them broken, or most of them broken actually. There's going to be one here, there's one intact there, should be one here and there should be one here. What you want to do is actually push down on these clips and they release. So you release all four like that. Then there's two clips on each side and you basically just have to grab real firmly and pull.
There's clips on the bottom. You want to grab right here, pull the middle. The other side, grab over here on this side, firm pull and then the last clip is on the bottom here and pull. As you can see, clips on the bottom here and then the two clips on each side as well. To remove your headlights you're going to remove two 10 millimeter bolts right here. Then the light lifts up and out and disconnect the bulb harnesses, pull that out. New headlight from 1A Auto. I'm just going to pull the plastic off the side here a little bit. Put it in, reconnect our bulbs. It does have tabs down in the bottom that go into slots in the bottom. I'm just going to load that in, make sure you go in to the right slots.
I'm going to fast forward here as I just put those bolts back in place and tighten them up. See our new light compared to our old headlight. The headlight's much clearer, brighter, just looks nicer. Once you have it apart, you should be able to pinch these clips and pull them out or you can turn them to the side and pull them out. Now you just want put them right back into the grill. You just slide them right in so that the tab is pushing through. To re-install your grill, make sure these harness connections are up and out of our way. Very carefully, line up your four clips up here and clip those right in. Then kind of peak down at the bottom here. Push your three clips down there real good. Push your clips on the side. Reconnect your parking lights.
We hope this helps you out. Brought to you by www.1AAuto.com. Your source for quality replacement parts and the best service on the Internet. Please feel free to call us toll free 888-844-3393. We're the company that's here for you on the Internet and in person.
Tools used
Phillips Head Screwdriver
1. Remove the tail light
Use your Phillips screwdriver to remove the two anchor screws.
Pull out the tail light and unplug the wiring harness.
Twist and unplug the bulbs to replace them.
2. Install the new tail light
You can re-install the old assembly if you were just changing the bulbs.
Plug in the bulbs and wiring harness.
Line up the two tabs and click the tail light assembly into the truck.
Screw in the two Phillips screws.
Brought to you by 1AAuto.com. Your source for quality replacement parts and the best service on the internet. Hi. I'm Mike from 1A Auto. I hope this how to video helps you out, and next time you need parts for your vehicle think of 1AAuto.com. Thanks.
In this video, i'm going to show you how to service a taillight on one of these Chevy Colorado's pretty much same as a Colorado as well as the GMC Canyon. We're going to show you both if you're just looking to change a bulb as well as if you're going to replace the whole taillight assembly, because yours is broken or scratched or whatever. The only tool you'll need is a Phillips screwdriver.
Taillight service you'll need a Phillips screwdriver. There's one screw right down here. We'll remove that. Then there's another screw right here in your latch. We'll remove that. Your taillight will come right out. Just going to get my screw here. This will come out. These just turn counter-clockwise. All the bulbs just pull straight out and back in. If you're replacing your light because it's broken, your light from 1A Auto, it's going to go right in and fit just like the original. Just line up the bulbs correctly. Lock it into place. There are two tabs on the outside that line up with holes in the fender of the truck. Line them up. Push it right in. This screw straight in line. Tighten them up. Your all set.
We hope this helps you out. Brought to you by www.1AAuto.com. Your source for quality replacement parts and the best service on the internet. Please feel free to call us toll free at 888-844-3393. We're the company that's here for you on the internet and in person.
Product Reviews
Loading reviews
4.55/ 5.020
20 reviews
5 Stars
4 Stars
3 Stars
2 Stars
1 Star
17
1
0
0
2
Lighting kit
Terry
March 23, 2018
Replaced head lights, parking lights, taillights kit. Everything fit perfectly. The video that 1aauto has was very helpful. Would highly recommend this company, Im very satisfied.
2004 Colorado Light Assemblies
Cary
April 21, 2018
My Colorado lights were dim and fogged, in desperate need of replacement. Found them at 1A Auto for a great price. Watched their video on replacement and was surprised how easy the installation went. Great Customer Support and really happy with the quality and price. Will definitely buy here again!
Overall great quality, headlight pattern slight off
Michael
October 9, 2018
This is a great set of light assemblies to replace the original ones that were 14 years old. Fitment is great; direct replacement. However, the low beam pattern is uneven, but manageable, thus taking one star away. I bought this for my 05 GMC Canyon Crew 4X4.
Cheap
J
November 9, 2018
Get what you pay for. Lights didnt work until I repaired the crushed terminals inside the sockets . Bad design has the turn signal housing jiggling in its location can pull off truck with slight breeze. Lens fog up when driving moisture getting inside brand new assemblies .
First time buyer-- great experience
Frank
November 18, 2018
This was the first time I ordered from 1A Auto. Order arrived faster than expected and all parts were exactly as described. I will definitely use them again in the future!
Great site to order parts from
Michael
January 17, 2020
I ordered replacement headlights and tail lights for my 2004 Colorado. They arrived 2 days ahead of schedule. The order was very well packed with no damage. All of the parts fit exactly. I am very pleased with the quality and price. I have ordered parts from 1AAuto before and they always deliver what they advertise, good parts at a great price.
Head light kit
David
June 16, 2020
The head light kit I ordered was great, it came with head lights, park lights and tail lights. I would recommend 1 aauto.con for your parts. Easy to deal with and fast shipping.
Replacement light assemblies for GMC Canyon
L
July 1, 2020
I ordered/replaced six replacement light assemblies
On my 2009 GMC Canyon; headlights, park and
Turn and tail light assemblies. Every one of them
Look great, fit perfect, no problems ! Totally satisfied.
No Complaints
J
December 28, 2020
Ordered for my 2008 Colorado that would not pass inspection with cloudy lights. These were shipped quick and very EZ to install. My 16 YO daughter did most of the work. Thanks 1A!
Parts worked to perfection
larry
December 29, 2020
The order I placed and the parts I received were top-notch quality. It was also very helpful to have how to videos when it comes to installing the parts. I am not very handy when it comes to those things but I was able to do the replacement inside of an hour...thanks to your help. I will certainly be ordering more parts in the near future!
Perfect
Kit
January 23, 2021
Came quick. Installed perfect. And the headlights and marker lights came with new bulbs installed!!
New Lights
Bruce
March 8, 2021
Hi, I bought these Lights. They fit perfectly. And look great.
I would recommend. Thanks
Chyanne
November 23, 2021
Makes the appearance look better over all
light um up
Ronald
March 9, 2022
very good service lights fit perfect and delivered early great job you guys.
These lights work great and were easy to install with the instructional videos, I am very happy with my purchase!
[{"url": "https://wac.edgecastcdn.net/001A39/prod/media/pNISJll75W64CYGsite/c8b0bc61e026e0d1b7532cb7620329eb_1651450958655_0.jpeg", "caption": "Not happy with product it failed in a week with water entry need a refund or replacement"}, {"url": "https://wac.edgecastcdn.net/001A39/prod/media/pNISJll75W64CYGsite/b9e262b816f5d05c4dd8a816839b45f2_1651450958655_1.jpeg", "caption": "Another view of failed new passenger side light I just had mechanic install"}]
Bernard
May 1, 2022
Bought kit lighting kit 1ALHT00257 for my 2004 Colorado the passenger side light failed with moisture in housing I had a mechanic install to pass state inspection and it failed inspection I need it replaced asap can't drive my vehicle not happy
Glenn
January 15, 2023
loved the kit. Makes our old truck look so new! One of the Lights was cracked and 1A replaced it in a fast manner. Can't complain one bit about the parts and the service wonderful!
Good buy!!
Carol
April 2, 2023
Great fit. Installed easily, as described on site.
Michael
May 19, 2023
Came in great condition and installed easily,looked great
Customer Q&A
Do these lights come in clear ?June 26, 2020
S T
10
They are clear.
June 26, 2020
B M
10
These parts will come clear as pictured. Please do not hesitate to contact us with any further questions.
June 26, 2020
Emma F
Do these lights come in clear?June 26, 2020
S T
10
Thank you for your inquiry. We are happy to see if we carry a different style of lights for your vehicle. Can you please provide the 17-digit VIN so we can assist further with this? Please let us know if you have any further questions.
June 26, 2020
A C
10
Yes. Just specify you want clear. That's what I got. Headlight adjusters are wonky but they look great.
June 28, 2020
Howard M
Can this fit the xtreme model ?January 5, 2022
Landon B
10
This lighting kit does not fit the 2005-2008 Chevy Colorado models with the Xtreme Package.
January 5, 2022
T I
Is the lens clear on the black bezel housing?April 17, 2023
John D
10
The lens is clear.
April 18, 2023
Ronald- B
Customer service
877-844-3393
Monday - Friday 8:00am - 9:30pm ET Saturday - Sunday 8:00am - 4:30pm ET
GMC is a registered trademark of General Motors Company. 1A Auto is not affiliated with or sponsored by GMC or General Motors Company.See all trademarks.
Enter Vehicle Year Make Model
Specify your vehicle's year, make and model to guarantee fit.
Year
Make
Model
Options
Drivetrain
This part doesn’t fit a . Select from parts that fit.